
Detecting the ball
The Arduino detects the ball: a microswitch on a ramp, a hit timed with micros(), why Bounce2 misses a short hit, a tilt and a Hall sensor with a magnet
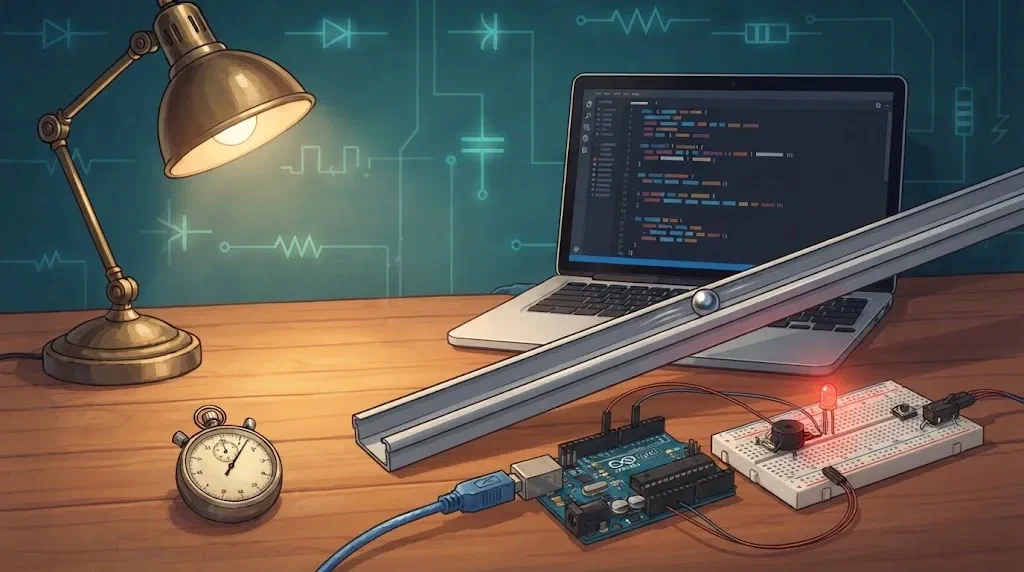
A pinball machine must know where the ball is at every moment. When the ball runs through a lane, hits a target or falls into the drain, the program must notice it, add points and play a sound. The ball in our pinball machine is a steel ball 15 mm across, and it weighs about 14 grams. A hit from a ball like that lasts a very short time, and the program mustn’t miss it.
Today we’ll let the ball roll down a ramp that slopes like the playfield of our pinball machine and measure how long its hit on a microswitch lasts. We’ll see why the Bounce2 library, which is excellent for buttons, can miss the short hit of a ball. We’ll also build a tilt: a sensor that notices when a player shoves the machine too hard. There’s a ball inside it too. At the end we’ll detect the ball without touching it, with a Hall sensor and a magnet.
What does this mean for the pinball machine?
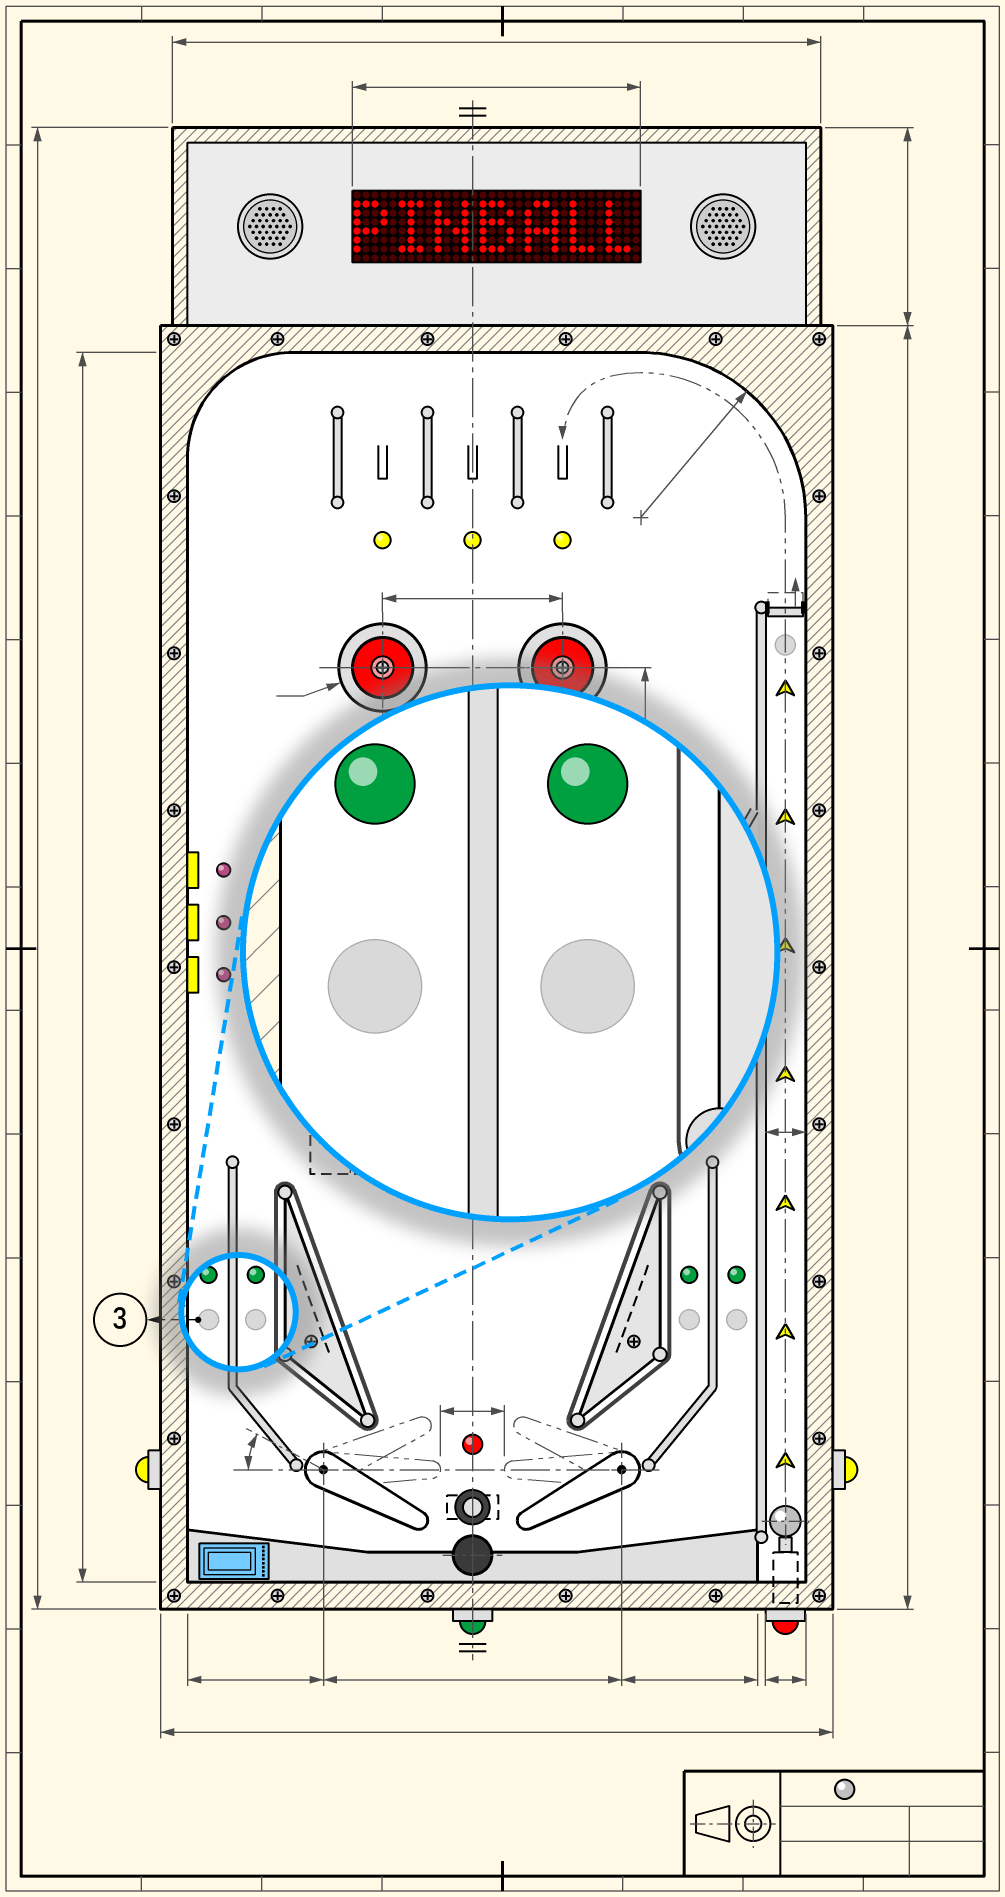
On the top view of our pinball machine, a blue circle marks the two lanes beside the left flipper, and the large circle shows the same lanes enlarged. The faded circles under the green lamps are the ball sensors: Hall sensors with a magnet under the playfield, which the ball rolls over. The pinball page explains the other parts of the drawing.
- Targets, pop bumpers and slingshots have microswitches that the ball hits. The program reads them with debouncing that reacts to the first contact, never with Bounce2 as we use it for buttons.
- The sensors in the lanes beside the flippers and at the top of the shooter lane are Hall sensors, as in Exercise 4. The ball doesn't have to press them, so they detect a slow ball too. The playfield above a sensor may be at most 2 mm thick, so we'll make it thinner there from below.
loop()never waits. A hit lasts a few milliseconds, and the program must look at every switch many times in that time.- The tilt is four ball tilt switches. When a coil kicks the ball, it also shakes the machine a little, so the main Arduino doesn't count the tilt while a coil is working.
- There will be 10 switches and 5 Hall sensors on the playfield of the pinball machine, and an Arduino Uno has only 18 free pins. So the switches will be in a matrix, as in the last lesson. A Hall sensor can't go in the matrix, because it connects its output only to GND. So the Hall sensors and the tilt are read by a separate chip, the 74HC165, which needs only 3 pins.
The ramp
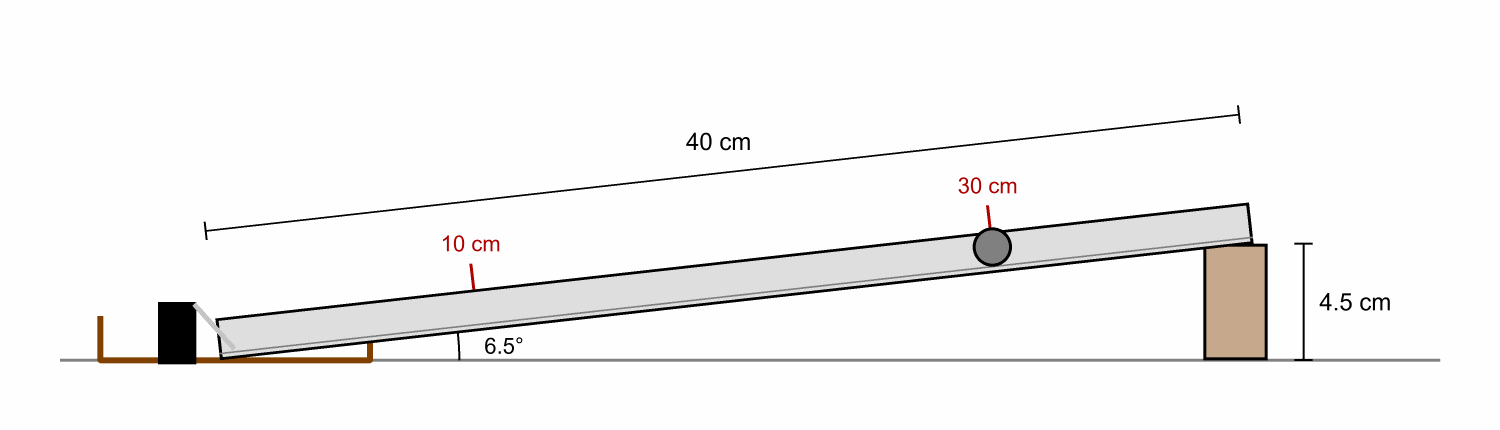
The ramp is a 40 cm piece of 25 × 16 mm cable trunking without its lid. It is wide enough for the 15 mm ball to roll freely in it. One end is raised by 4.5 cm, so the ramp slopes at about 6.5°, like the playfield of our pinball machine. At the lower end there’s a microswitch, with its lever across the channel. The ball rolls down the channel and hits the lever. A box under the lower end catches the ball if it bounces away.
There are two marks on the ramp. From the mark at 30 cm the ball arrives fast, and from the mark at 10 cm slowly.
A steel ball that falls on the floor is easily lost, and someone could slip on it. If your ball gets away, pick it up straight away.
Materials
Each participant gets:
- everything from the lesson Reaction game: an Arduino Uno and a USB cable, a large breadboard, a button, a red LED, an active buzzer, 470 Ω, 220 Ω and 68 Ω resistors, jumper wires, and the Bounce2 library on the computer
- a ramp with a microswitch at the lower end; two wires are soldered to the microswitch, to the COM and NO legs
- a steel ball
- a ball tilt switch for the tilt
- a module with a Hall sensor and a magnet, prepared by the instructor; it has three wires, OUT, GND and 5V
- three more 470 Ω resistors (yellow-violet-brown)
The microswitch
A microswitch is a small button with a lever. When something presses the lever, the lever presses a small button in the case, and the contacts change over with a quiet click. A very small force is enough for that, which is why every pinball machine has microswitches: under the targets, in the lanes and in the drain.
A microswitch has three legs:
- COM (common) – the leg that connects to one of the other two;
- NO (normally open) – connected to COM only while the lever is pressed;
- NC (normally closed) – connected to COM while the lever isn’t pressed.
We use COM and NO, so the microswitch works like the button from the lesson on buttons: while it is pressed, the pin reads LOW.
Wiring
The wiring rules are the same as in the lesson on buttons. Build the circuit from the reaction game again: the LED is on D8, the button on D2 and the buzzer on D5. The button is now the Start button. Add the microswitch and the ball tilt switch:
| Part | Arduino pin | Wire from the Arduino | Resistor | Right side |
|---|---|---|---|---|
| LED | D8 | a3 | 220 Ω: e3–f3 | red LED: long leg in j3, short leg in the right – line |
| Button (Start) | D2 | a8 | 470 Ω: b8–b12 | button in e12, e14, f12, f14; wire from j14 to the right – line |
| Microswitch | D4 | a18 | 470 Ω: e18–f18 | the wire from the COM leg in j18, the wire from the NO leg in the right – line |
| Ball tilt switch | D7 | a22 | 470 Ω: e22–f22 | the switch in h22 and h23; wire from j23 to the right – line |
| Buzzer | D5 | a27 | 68 Ω: e27–f27 | the buzzer’s + leg in j27, the other leg in the right – line |
| Common GND | GND | right – line | – | – |
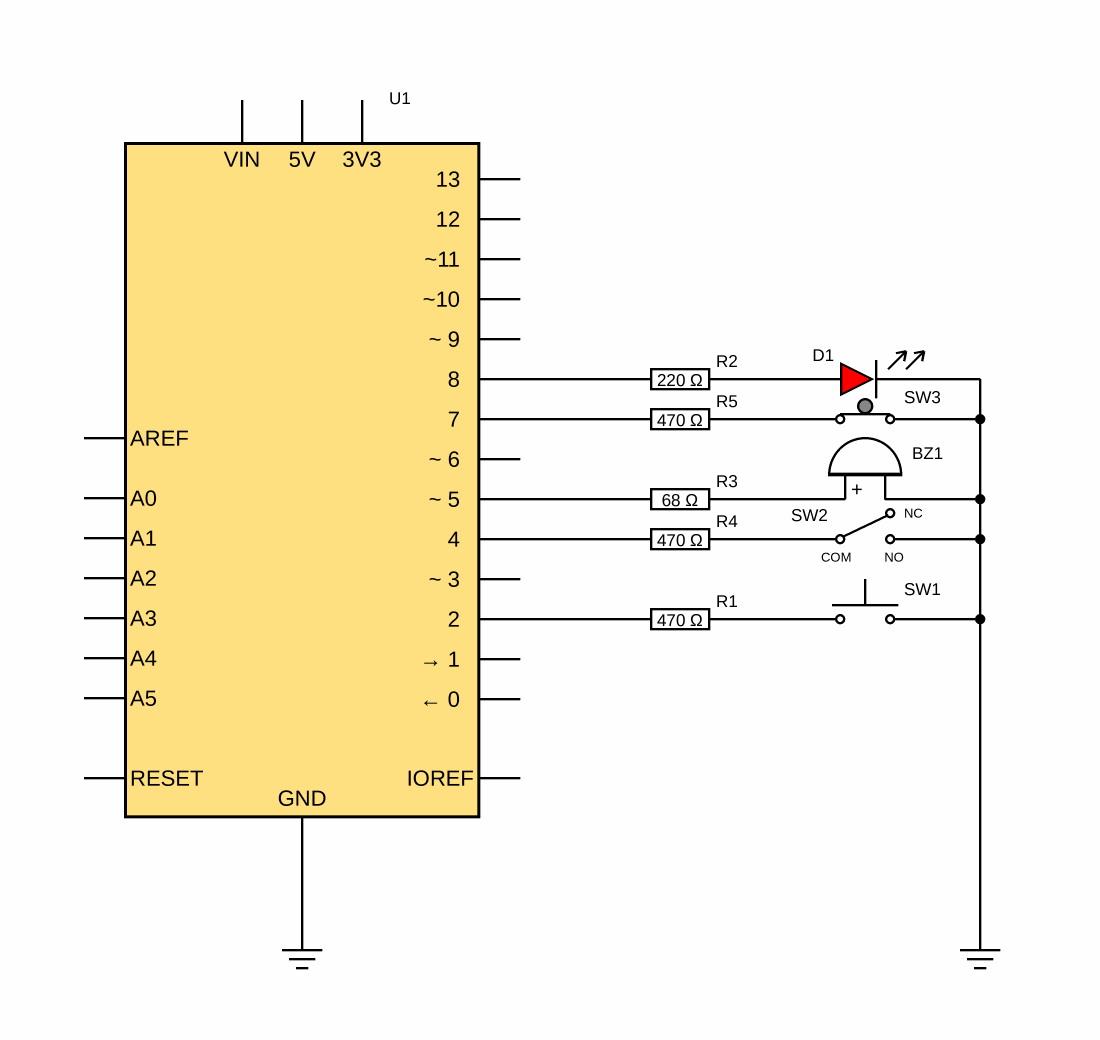
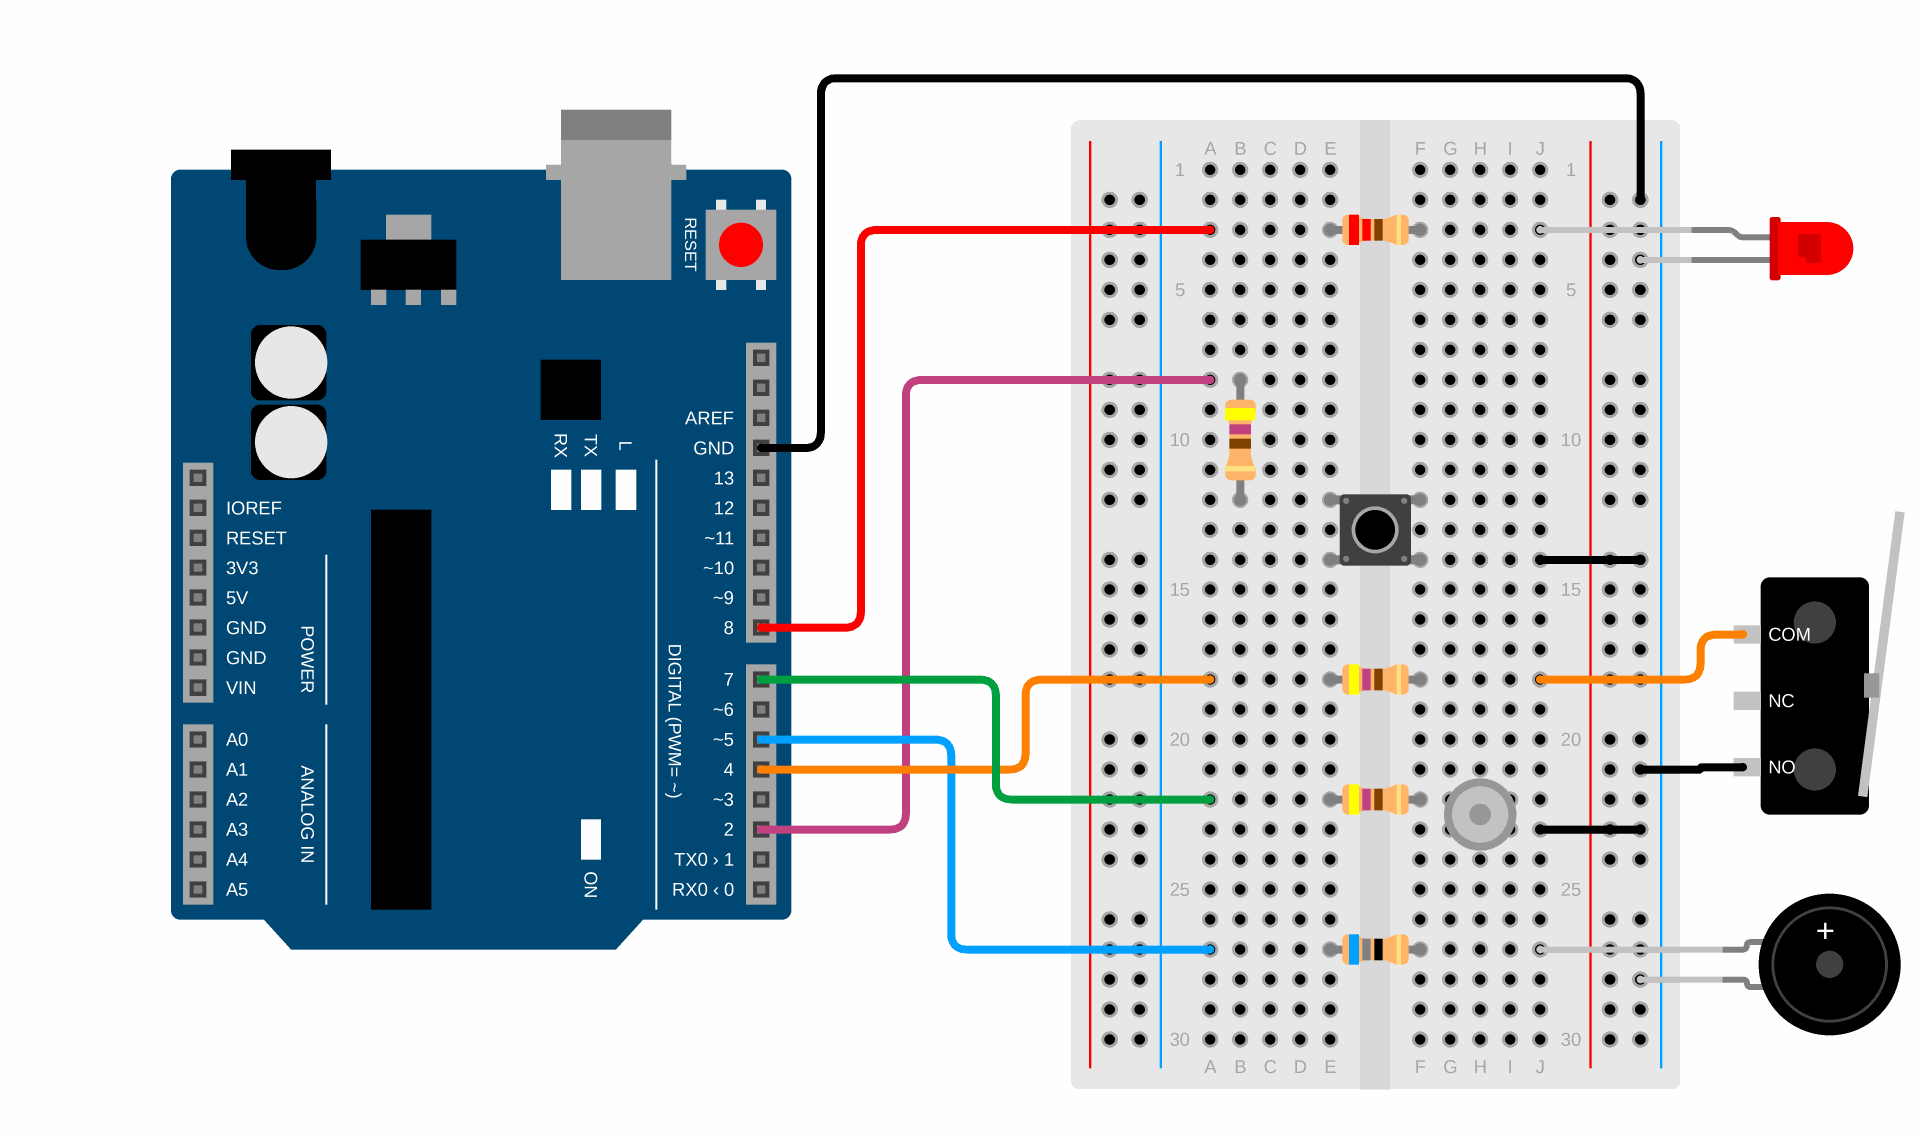
- The microswitch is on the ramp, so it reaches the breadboard on wires. Don’t pull the wires tight: if the ramp moves, they can break off the microswitch.
- The 470 Ω resistors protect the pins, as in the lesson on buttons. The pins are inputs now, but if the Arduino still has an old program on it in which D4 or D7 is an output, the resistor limits the current.
- The ball tilt switch stands upright, with its legs pointing down. We’ll need it in Exercise 3.
Exercise 1: Counting hits
We’ll detect the ball like a press on a button, with the debouncing from Exercise 3 of the lesson on buttons. Our code reacts to the first touch of the contacts and then doesn’t look at the microswitch for 50 ms. We’ll find out in Exercise 2 why we don’t use the Bounce2 library here.
// C++
const int microswitch = 4;
const int buzzer = 5;
const unsigned long DEBOUNCE_TIME = 50;   // after a change, we don't look at the microswitch for 50 ms

int hits = 0;                             // how many times the ball has hit the microswitch
int lastState = HIGH;                     // what the microswitch was like last time
unsigned long lastChange = 0;             // when the microswitch last changed

void setup() {
  pinMode(microswitch, INPUT_PULLUP);
  pinMode(buzzer, OUTPUT);
  Serial.begin(9600);
}

void loop() {
  if (millis() - lastChange >= DEBOUNCE_TIME) {   // have the contacts settled?
    int reading = digitalRead(microswitch);

    if (reading != lastState) {                   // the microswitch has changed
      lastChange = millis();
      lastState = reading;
      if (reading == LOW) {                       // the contacts have closed: a hit
        hits = hits + 1;
        tone(buzzer, 1000, 30);
        Serial.print("Hits: ");
        Serial.println(hits);
      }
    }
  }
}
Upload the program, open the Serial Monitor (9600 baud) and try it:
- Let the ball go 10 times from the mark at 30 cm. How many hits did the program count?
- Let the ball go 10 times from the mark at 10 cm.
- Put the ball in the channel right next to the lever and let it go. Does it press the lever hard enough for the microswitch to click?
Just let the ball go, don’t push it. Write down the results; you’ll need them in Exercise 2.
What’s new in the program?
Nothing! This is the program for counting presses from the lesson on buttons, just with the microswitch on pin D4 and a short sound with every hit. To the Arduino, a microswitch is just another button.
Why does a slow ball sometimes not count as a hit?
In a pinball machine the ball hits some switches (targets) and only rolls over others (lanes). A switch in a lane is the hardest: the ball presses it only with its own weight, as it passes. So the lanes of our pinball machine won’t have microswitches, but sensors that detect the ball without touching it, as in Exercise 4.
Exercise 2: How long does a hit last?
When you press a button, you usually hold it for at least a tenth of a second. The ball only hits the lever and bounces off. How long are the contacts closed then? millis() isn’t precise enough for this, because it counts whole milliseconds. We’ll use micros(), which counts microseconds: 1000 µs is one millisecond.
On purpose, this program doesn’t debounce the contacts, because we want to see every contact. A hit begins with the first touch of the contacts, and it is over when the contacts have been open for 20 ms. Then the program prints three numbers: how long the whole hit lasted, how many times the contacts closed and how long the longest contact lasted.
// C++
const int microswitch = 4;
const unsigned long HIT_END = 20000;       // 20 000 µs (20 ms) without contact: the hit is over

int lastState = HIGH;                  // what the microswitch was like last time
bool hit = false;                      // is a hit going on right now
unsigned long hitStart = 0;            // when the contacts first closed (µs)
unsigned long contactStart = 0;        // when the contacts last closed (µs)
unsigned long hitEnd = 0;              // when the contacts last opened (µs)
unsigned long longest = 0;             // the longest contact in this hit (µs)
int contacts = 0;                      // how many times the contacts have closed

void setup() {
  pinMode(microswitch, INPUT_PULLUP);
  Serial.begin(9600);
  Serial.println("Let the ball roll down the ramp.");
}

void loop() {
  int reading = digitalRead(microswitch);
  unsigned long now = micros();

  if (reading != lastState) {          // here we do NOT debounce the contacts, on purpose
    lastState = reading;
    if (reading == LOW) {              // the contacts have closed
      if (!hit) {                      // the first contact: a new hit begins
        hit = true;
        hitStart = now;
        contacts = 0;
        longest = 0;
      }
      contacts = contacts + 1;
      contactStart = now;
    } else {                           // the contacts have opened
      hitEnd = now;
      if (hitEnd - contactStart > longest) {
        longest = hitEnd - contactStart;
      }
    }
  }

  // The hit is over when the contacts have been open for 20 ms.
  if (hit && reading == HIGH && now - hitEnd >= HIT_END) {
    hit = false;
    Serial.print("Hit: ");
    Serial.print(hitEnd - hitStart);
    Serial.print(" µs, contacts: ");
    Serial.print(contacts);
    Serial.print(", longest contact: ");
    Serial.print(longest);
    Serial.println(" µs");
  }
}
Let the ball go a few times from both marks and look at the numbers in the Serial Monitor.
What’s new in the program?
unsigned long now = micros();–micros()is likemillis(), but it counts microseconds since the Arduino was switched on. We work out times in the same way, by subtracting:hitEnd - hitStart.const unsigned long HIT_END = 20000;– 20 000 µs is 20 ms. That’s how long the contacts must be open for the program to decide that the hit is over.bool hit– Remembers whether a hit is going on. The first contact starts a hit, and the next contacts in the same hit are only counted.- Printing only at the end of the hit. While the hit is going on, the program only remembers the numbers. It prints them when the hit is over, so printing doesn’t disturb the measuring.
With most microswitches, a hit lasts only a few milliseconds, and the contacts close several times during it, because they bounce as in a button. The longest contact is often shorter than 10 ms.
Why Bounce2 misses the hit
In the lesson on buttons we saw that Bounce2 accepts a change only when the button has been still for 10 ms, so it doesn’t count short glitches. That’s excellent for buttons. But the hit of a ball looks just like a short glitch: the contacts close and open a few times, and never stay closed for a full 10 ms. So Bounce2 doesn’t report the hit at all. Our code reacts to the first contact, so it counts it.
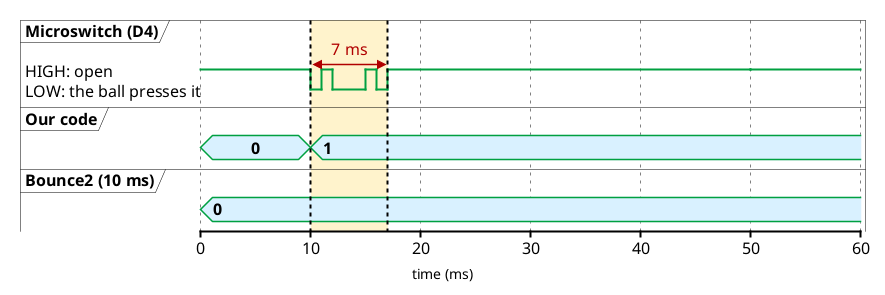
Let’s try it out. This program counts the same microswitch in both ways at once:
// C++
#include <Bounce2.h>                   // the debouncing library from earlier lessons

const int microswitch = 4;
const unsigned long DEBOUNCE_TIME = 50; // our debouncing: after a change, we don't look for 50 ms

Bounce2::Button library;               // the same microswitch, debounced by the library
int hitsOurs = 0;                      // the hits our code counts
int hitsBounce2 = 0;                   // the hits Bounce2 counts
int lastState = HIGH;
unsigned long lastChange = 0;
bool printNow = false;                 // do we need to print the new numbers

void setup() {
  library.attach(microswitch, INPUT_PULLUP);
  library.interval(10);                // a change counts when the contact has been still for 10 ms
  library.setPressedState(LOW);
  Serial.begin(9600);
}

void loop() {
  // 1. Our debouncing, as in lesson 3.0: the first change counts at once.
  if (millis() - lastChange >= DEBOUNCE_TIME) {
    int reading = digitalRead(microswitch);
    if (reading != lastState) {
      lastChange = millis();
      lastState = reading;
      if (reading == LOW) {
        hitsOurs = hitsOurs + 1;
        printNow = true;
      }
    }
  }

  // 2. Bounce2: a change counts only when the contact has been still for 10 ms.
  library.update();
  if (library.pressed()) {
    hitsBounce2 = hitsBounce2 + 1;
    printNow = true;
  }

  // 3. Print only when the microswitch has been still for 100 ms, so printing doesn't disturb the counting.
  if (printNow && millis() - lastChange >= 100) {
    printNow = false;
    Serial.print("Our code: ");
    Serial.print(hitsOurs);
    Serial.print(", Bounce2: ");
    Serial.println(hitsBounce2);
  }
}
Let the ball go 10 times from the mark at 30 cm and 10 times from the mark at 10 cm. Which counter has more hits?
What’s new in the program?
- Two counters for the same pin. Our code reads the pin with
digitalRead(), and the library reads it by itself, inupdate(). Both parts run in the same pass throughloop()and don’t get in each other’s way. bool printNow– The program doesn’t print straight after a hit, but only once the microswitch has been still for 100 ms. That way printing doesn’t disturb the counting while the hit is still going on.
On your ramp, Bounce2 counted as many hits as our code. What does that mean?
The library for buttons, our code for the ball
A person holds a button for at least a tenth of a second, so Bounce2 has enough time to wait for the contacts to settle. That's why we read the buttons of our pinball machine with the library. The ball closes the contacts for only a few milliseconds, so for the ball we use the debouncing from the lesson on buttons: the first contact counts at once, and after it we don't look at the microswitch for a while.
The library isn't bad; it's just made for a different job. A good programmer knows what a library does and when something else is needed.
Experiment: a slow loop()
Upload the program from Exercise 1 again, and at the end of the loop() function, before the last curly bracket, add the line delay(20);. Let the ball go 10 times from the mark at 30 cm. How many hits did the program count?
Why does delay(20) lose hits?
delay(20) the program doesn’t read the microswitch. If the whole hit, from the first to the last contact, falls within those 20 ms, the program doesn’t see it. A hit lasts only a few milliseconds, so this happens often. That’s why in a pinball machine loop() must never wait: it must run many times in every millisecond.Delete delay(20); before the next exercise.
Exercise 3: Tilt
Players sometimes shove or lift a pinball machine to help the ball. That’s why every pinball machine has a tilt: a sensor that notices when the player has gone too far. In our pinball machine the player gets two warnings, and the third time the game takes the ball.
Our tilt is a ball tilt switch: a small cylinder with two legs and a metal ball inside. While the switch stands upright, with its legs pointing down, the ball lies on two contacts and connects them, so the pin reads LOW. When we tilt the switch or move it suddenly, the ball rolls or jumps and separates the contacts for a moment. The pin then reads HIGH.
Our pinball machine will have four switches like this, almost flat and facing four ways, like a compass, as it says on the pinball page. They are connected one after another, so it’s enough for one of them to open. Today we work with one.
With the tilt, we watch out for two things:
- The short opening is what we’re looking for. A shove opens the switch only for a moment, and the ball inside rattles for a while and opens it many times. We mustn’t debounce it away, the way Bounce2 throws away the hit of the ball. We count the first opening and then don’t count new ones for 1 s. That’s the same debouncing as in the lesson on buttons, just with 1000 ms instead of 50 ms.
- A switch that stays open too long means TILT at once. If the switch is open for longer than 1 s, the player has lifted or tipped the machine. The same happens if the wire to the switch breaks. The game then goes into TILT at once, so we notice a broken wire straight away. A tilt that quietly stopped working because of a broken wire would be much harder to notice.
The game has two states, like the state machine in the reaction game: PLAYING and TILT. The Start button gets the game out of the TILT state.
// C++
#include <Bounce2.h>                   // for the Start button

const int button = 2;                  // the Start button: a new game after TILT
const int buzzer = 5;
const int tiltSensor = 7;              // the ball tilt switch
const int ledPin = 8;
const unsigned long SETTLE_TIME = 1000; // after a warning, we don't count new openings for 1 s
const unsigned long LIFTED_TIME = 1000; // open for longer than 1 s: the machine has been lifted

// The game's states
const int PLAYING = 0;                 // the game is on, we watch the tilt
const int TILT = 1;                    // the player went too far: the game stops

int state = PLAYING;
int warnings = 0;                      // how many times the player has shoved the machine
unsigned long lastWarning = 0;         // when we last counted a shove
unsigned long openSince = 0;           // when the switch last opened
int lastTilt = LOW;                    // what the switch was like last time: closed at the start

Bounce2::Button start;                 // the Start button, as in the reaction game

void setup() {
  start.attach(button, INPUT_PULLUP);
  start.interval(10);
  start.setPressedState(LOW);
  pinMode(tiltSensor, INPUT_PULLUP);
  pinMode(buzzer, OUTPUT);
  pinMode(ledPin, OUTPUT);
  Serial.begin(9600);
  Serial.println("The game is on. Don't shove the machine!");
}

void loop() {
  start.update();
  int reading = digitalRead(tiltSensor);   // LOW: closed, HIGH: open

  switch (state) {
    case PLAYING:
      if (reading == HIGH && lastTilt == LOW) {        // the switch has just opened
        openSince = millis();
        if (millis() - lastWarning >= SETTLE_TIME) {   // a new shove, not the same one
          lastWarning = millis();
          warnings = warnings + 1;
          if (warnings <= 2) {
            tone(buzzer, 600, 100);
            Serial.print("Warning ");
            Serial.println(warnings);
          } else {
            goToTilt();
          }
        }
      }
      if (state == PLAYING && reading == HIGH && millis() - openSince >= LIFTED_TIME) {
        goToTilt();                    // open for too long: the machine has been lifted or a wire is broken
      }
      break;

    case TILT:
      if (start.pressed()) {
        warnings = 0;
        digitalWrite(ledPin, LOW);
        Serial.println("New game. Don't shove the machine!");
        state = PLAYING;
      }
      break;
  }

  lastTilt = reading;
}

void goToTilt() {
  state = TILT;
  digitalWrite(ledPin, HIGH);
  tone(buzzer, 150, 1000);             // long low sound
  Serial.println("TILT! Press Start for a new game.");
}
Upload the program and open the Serial Monitor. Gently slap the table next to the breadboard with your palm, or move the breadboard slightly. When does the program give a warning? When does it say TILT?
If the switch doesn’t react even to a harder shove, lean it a little in the direction you’re shoving: the ball will jump off the contacts more easily. If it gives warnings even when you don’t touch the table, stand it up straighter.
Experiment: pull the wire out of j23 and wait. What happens after one second?
What’s new in the program?
reading == HIGH && lastTilt == LOW– The switch has just opened: it is open now, and in the last pass it was closed. The variablelastTiltremembers what the switch was like in the last pass, and at the end ofloop()it gets the new value.millis() - lastWarning >= SETTLE_TIME– A new opening counts as a new shove only if at least 1 s has passed since the last warning. That way all the rattling of the ball after one shove is one warning.millis() - openSince >= LIFTED_TIME– The switch has been open for longer than 1 s: the machine has been lifted or a wire is broken.state == PLAYING &&– If the third shove has just switched on TILT, the game is no longer in thePLAYINGstate, so we don’t switch TILT on a second time.void goToTilt()– Everything that happens when the game goes into TILT is in one place: the state, the LED, the sound and the printing. We call the function from two places.const int TILT = 1;andtiltSensor–TILTis a state of the game, andtiltSensoris the pin the switch is connected to. The names are different so that we don’t mix them up.
The ball without touching
The ball has to press a microswitch, and in Exercise 1 we saw that a slow ball sometimes doesn’t press it hard enough. We can also detect the ball without touching it: with a magnet or with light. In our pinball machine, Hall sensors will detect the ball in the lanes beside the flippers and at the top of the shooter lane.
The Hall sensor
A Hall sensor feels a magnetic field. Our sensor, the A3144, is a small black chip with three legs. When the field through it is strong enough, the sensor connects its output to GND, so the pin reads LOW. When the field gets weaker, the sensor disconnects its output, and the resistor to 5 V inside the Arduino (INPUT_PULLUP) brings the pin back to HIGH. To the Arduino, that’s the same as a button pressed by a magnet. The sensor also needs power, so the module has three wires: 5V, GND and OUT (the output).
A steel ball isn’t a magnet, so the sensor on its own wouldn’t notice it. That’s why there’s a magnet under the sensor in the module. Its field goes through the sensor, but the instructor has set it so that it is a little too weak for the sensor. Steel pulls in the lines of a magnetic field: when the ball comes over the sensor, the field lines gather towards it and the field through the sensor gets stronger. The sensor switches on.
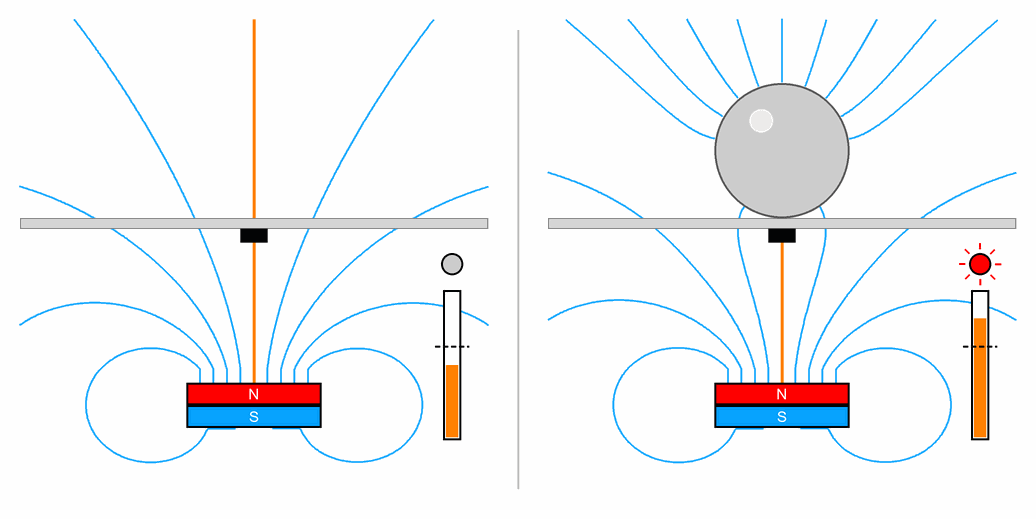
The sensor switches on at a stronger field than it switches off at. So when the ball is at the edge, the sensor doesn’t keep switching on and off, but stays on until the ball has gone. A Hall sensor has no contacts that could bounce either, so one pass of the ball makes only one change on the pin.
A strong magnet
There's a small but very strong magnet in the module. Don't take the module apart. Keep it away from phones and cards with a magnetic stripe. Two magnets like this jump towards each other suddenly and can pinch a finger.
Where the name comes from
The sensor is named after the American physicist Edwin Hall, who found in 1879 that a magnetic field pushes the current in a conductor slightly to one side. Today Hall sensors are in laptops, which use them to know that the lid is closed, and in many cars, where they measure how fast the wheels turn.
Exercise 4: The Hall sensor
Fix the module to the underside of the ramp, as the instructor shows you: the sensor must be exactly under the middle of the channel, a few centimetres before the microswitch. The microswitch, the button, the LED, the buzzer and the ball tilt switch stay connected. Add the module:
| Part | Arduino pin | Wire from the Arduino | Resistor | Right side |
|---|---|---|---|---|
| Hall sensor | D9 | a7 | 470 Ω: e7–f7 | the module’s OUT wire in j7, the GND wire in the right – line, the 5V wire in the right + line |
| 5 V supply | 5V | right + line | – | – |
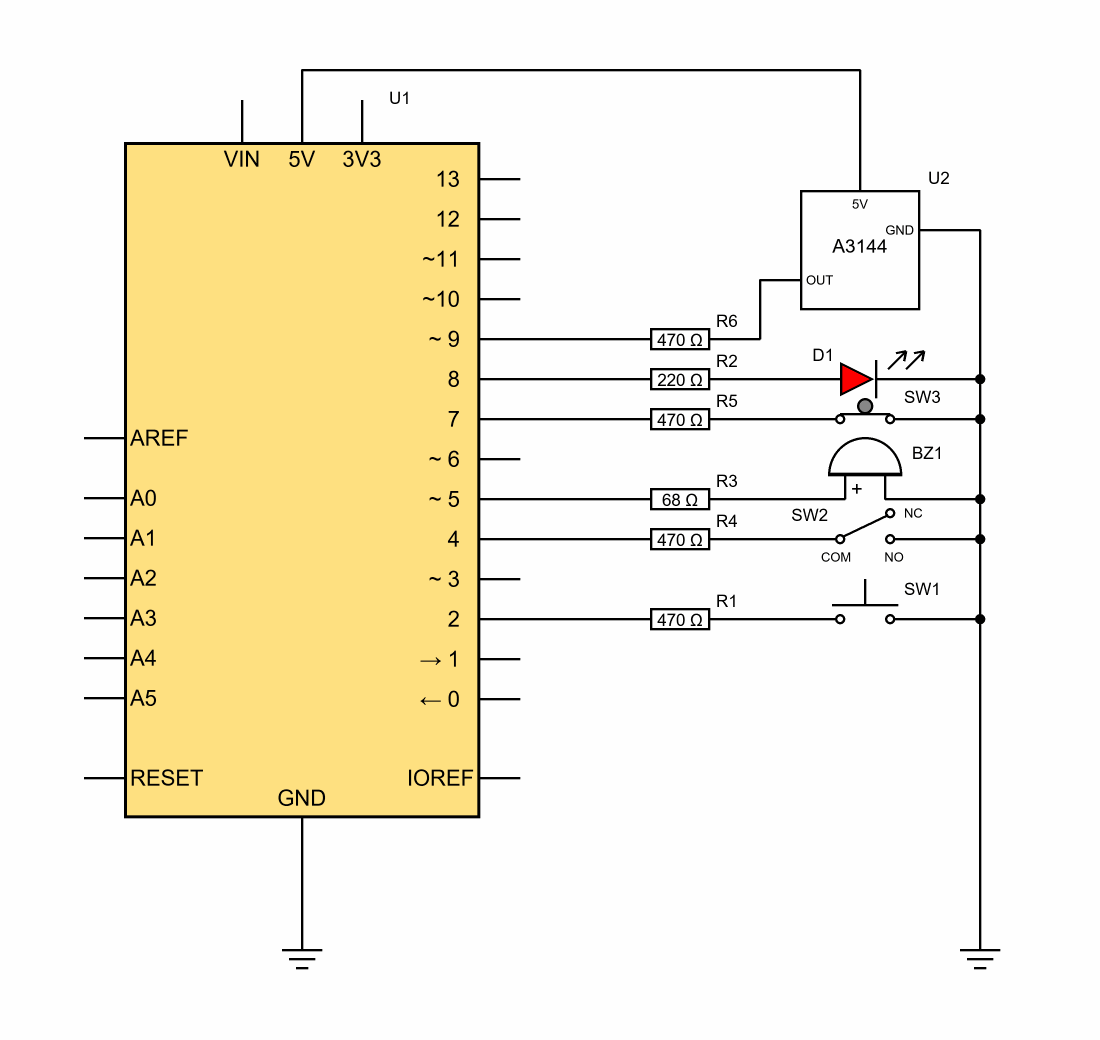
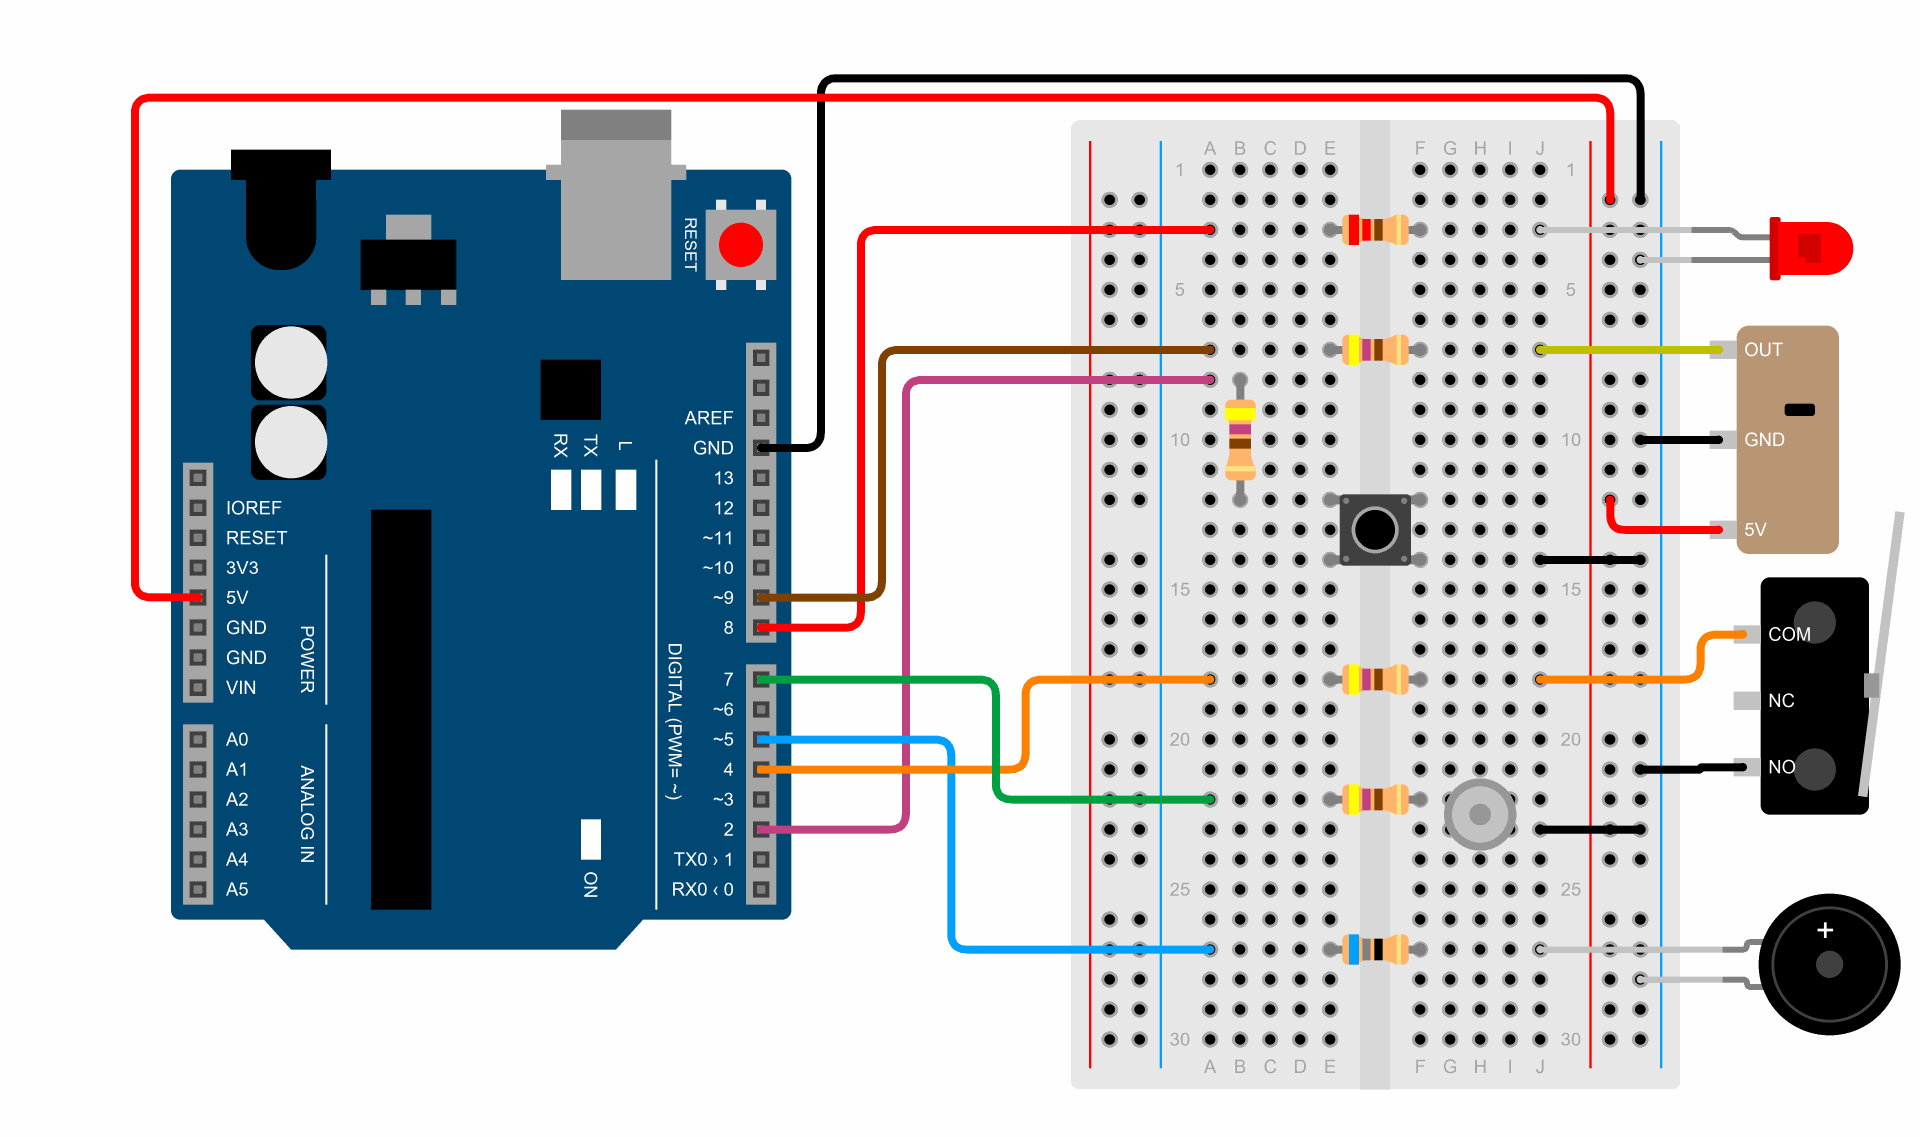
- Until now, no part needed 5 V from the breadboard. The Hall sensor needs power, so a wire goes from the Arduino’s 5V pin to the right + line.
- Don’t swap the 5V and GND wires. Check them once more before you plug in the USB cable.
// C++
const int microswitch = 4;
const int buzzer = 5;
const int hallSensor = 9;
const unsigned long DEBOUNCE_TIME = 50;   // after a change, we don't look at the microswitch for 50 ms

int hits = 0;                             // how many times the ball has hit the microswitch
int passes = 0;                           // how many times the ball has passed over the Hall sensor
int lastState = HIGH;                     // what the microswitch was like last time
int lastHall = HIGH;                      // what the Hall sensor was like in the last pass
unsigned long lastChange = 0;             // when the microswitch last changed

void setup() {
  pinMode(microswitch, INPUT_PULLUP);
  pinMode(hallSensor, INPUT_PULLUP);
  pinMode(buzzer, OUTPUT);
  Serial.begin(9600);
}

void loop() {
  // Hall sensor: it has no contacts, so we don't debounce it
  int hall = digitalRead(hallSensor);
  if (hall == LOW && lastHall == HIGH) {          // the ball has just come over the sensor
    passes = passes + 1;
    tone(buzzer, 1000, 30);
    printCounts();
  }
  lastHall = hall;

  // microswitch: as in Exercise 1
  if (millis() - lastChange >= DEBOUNCE_TIME) {   // have the contacts settled?
    int reading = digitalRead(microswitch);

    if (reading != lastState) {                   // the microswitch has changed
      lastChange = millis();
      lastState = reading;
      if (reading == LOW) {                       // the contacts have closed: a hit
        hits = hits + 1;
        tone(buzzer, 1000, 30);
        printCounts();
      }
    }
  }
}

void printCounts() {
  Serial.print("Hall sensor: ");
  Serial.print(passes);
  Serial.print(", microswitch: ");
  Serial.println(hits);
}
Upload the program, open the Serial Monitor and try it:
- Let the ball go 10 times from the mark at 30 cm, and then 10 times from the mark at 10 cm. How many passes did the Hall sensor count, and how many hits the microswitch? Compare that with your results from Exercise 1.
- Upload the program from Exercise 2 and change the pin number in the line
const int microswitch = 4;to 9. The program now measures the Hall sensor. How many contacts does it print for one pass of the ball? How long is the ball over the sensor when it comes from the mark at 30 cm, and how long when it comes from the mark at 10 cm? - Put a coin under one long side of the ramp, so that the ball rolls along the edge of the channel. Does the Hall sensor still count every pass?
What’s new in the program?
pinMode(hallSensor, INPUT_PULLUP);– We read the Hall sensor like a button. While the ball isn’t over the sensor, the resistor inside the Arduino keeps the pinHIGH, and when it is, the sensor connects the pin to GND.hall == LOW && lastHall == HIGH– The sensor has just switched on: it isLOWnow, and in the last pass throughloop()it wasHIGH. That way we count one pass of the ball only once, however long the ball stays over the sensor. We did the same with the tilt switch in Exercise 3.- We don’t debounce the Hall sensor. It has no contacts that could bounce, so the program reads it without waiting. We still debounce the microswitch as in Exercise 1.
void printCounts()– The printing is in a function, because we call it from two places: when the Hall sensor switches on and when the ball hits the microswitch.
The Hall sensor usually counts every pass, including the slow ones that the microswitch misses. For the Hall sensor, the program from Exercise 2 prints only one contact per pass.
How would you solve it if the ball passed too far to the side of the sensor, so that the sensor didn't notice it?
The break-beam
We can also detect the ball without touching it by using light. A narrow beam of light shines across a lane, and on the other side of the lane there’s a light sensor. When the ball goes past, it blocks the beam, and the sensor gets less light for a moment. A sensor like this is called a break-beam. Nothing has to press it, so it also works with a light ball that rolls slowly.
The light-dependent resistor from the lesson Arduino - step by step is too slow for this: it responds to a change in light within a few tens of milliseconds, and the ball blocks the beam for only about ten milliseconds. That’s why break-beams use infrared light, which the human eye can’t see, and sensors that react to it in less than a millisecond. A TV remote control uses the same kind of light. How such sensors work is explained on the Infrared sensors page.
See invisible light
A phone camera can see some of the infrared light that we can't. Point a TV remote control at a phone camera and press any button. On the phone's screen you'll see the LED at the tip of the remote blinking. If you can't see it, try the phone's front camera.
If something doesn’t work
- The program doesn’t count a single hit ⇒ Does the microswitch click when you press the lever with your finger? Is the wire from the COM leg in j18, and the wire from the NO leg in the right – line? Is the wire from D4 in a18, and the resistor from e18 to f18?
- The count goes up even when the ball isn’t touching the lever ⇒ Is the second wire perhaps on the NC leg instead of NO? With the NC leg, the microswitch is connected while the lever is not pressed.
- In Exercise 2 the program prints nothing ⇒ The printing comes only 20 ms after the last contact. If the lever stays pressed because the ball is resting on it, the hit is still going on. Take the ball away.
- The error
Bounce2.h: No such file or directory⇒ The Bounce2 library isn’t installed. Install it as in the lesson on buttons. - The tilt says TILT straight after starting ⇒ The switch is open: is it standing upright, with its legs pointing down? Is it in h22 and h23, and is the wire from j23 in the right – line? Is the wire from D7 in a22?
- The tilt doesn’t react even to a hard shove ⇒ Lean the switch a little. If it still doesn’t react, pull it out and check with a multimeter whether it connects its legs while it stands upright.
- The Hall sensor doesn’t count a single pass ⇒ Is the module’s OUT wire in j7, its GND wire in the right – line and its 5V wire in the right + line? Does the wire from the Arduino’s 5V pin go to the right + line? Is the wire from D9 in a7, and the resistor from e7 to f7? Is the sensor exactly under the middle of the channel?
- The Hall sensor counts even when there’s no ball ⇒ Is there something made of steel near the module, for example scissors, a screwdriver or another ball? Move it away. If that doesn’t help, the magnet in the module may have moved: tell the instructor.
- The Serial Monitor shows nothing or shows strange characters ⇒ Choose 9600 baud.
- The program won’t upload ⇒ Check that the board Arduino Uno and the right port are selected in the Arduino IDE.
Extra challenges
- A small pinball game. Combine Exercises 1 and 3 into one game. The Start button starts the game. Every hit on the microswitch scores 10 points, and the program prints the score. TILT ends the game and prints the final score. Hits don’t count during TILT. Tip: the states
WAITING,PLAYINGandTILT. - Warnings are forgotten. Let the program set the warnings back to zero if the player hasn’t shoved the machine for 10 s. Does that make the game easier or harder?
- The shortest contact. Extend the program from Exercise 2 so that it also prints how long the shortest contact in a hit lasted. How short is the shortest contact you’ve measured?
- The speed of the ball. Measure the distance from the Hall sensor to the microswitch’s lever. Let the program from Exercise 4 use
micros()to measure how long it takes from the Hall sensor switching on to the hit on the microswitch, and work out the speed of the ball in metres per second from that. How much faster is the ball from the mark at 30 cm than the ball from the mark at 10 cm?
 What did we learn?
- A microswitch has the legs COM, NO and NC. With the COM and NO legs it works like a button: while the lever is pressed, the pin reads
LOW. - The hit of a ball lasts only a few milliseconds, and the contacts close several times during it.
micros()counts microseconds: 1000 µs is 1 ms. We use it for very short times.- Bounce2 accepts a change only when the contact has been still for 10 ms. That’s good for buttons, but it can miss the short hit of a ball.
- For the ball we use debouncing that reacts to the first contact and then doesn’t look at the switch for a while.
- A
delay()inloop()can hide a whole hit. A program that must notice the ball never waits. - A ball tilt switch is closed while it stands upright, and a shove opens it for a moment.
- With the tilt, we count the first opening and then don’t count new ones for a while. A switch that stays open too long means TILT, so we notice a broken wire too.
- A Hall sensor feels a magnetic field. When the field is strong enough, it connects the pin to GND, so we read it like a button.
- A Hall sensor notices a steel ball with the help of a magnet under it: the ball gathers the field lines towards itself, and the field through the sensor gets stronger.
- A Hall sensor has no contacts, so it doesn’t bounce and needs no debouncing. It detects a slow ball too, one that wouldn’t press a microswitch.
- A break-beam detects the ball without touching it, using infrared light that we can’t see.
Quick quiz
1. What do the markings COM, NO and NC on a microswitch mean?
2. Why do we use micros() and not millis() in Exercise 2?
millis() counts whole milliseconds, so it would measure a short contact as 0 or 1 ms. micros() counts microseconds, a thousand times more precisely.3. Why doesn't Bounce2 count the short hit of a ball?
4. Why do we still read the pinball machine's buttons with Bounce2?
5. Why does the program in Exercise 2 print only when the hit is over?
6. Why doesn't the tilt count new openings for 1 s after a warning?
7. What does the tilt do if the wire to the switch breaks, and why is that good?
HIGH, like an open switch. After one second the program takes it as a lifted machine and switches TILT on. That way we notice the fault at once. A tilt that quietly stopped working because of a fault would go unnoticed.