Arduino boards: Uno, Nano, Mega and Giga
How the Arduino Uno, Nano, Mega and Giga differ: chip, memory, voltage, power supply and size, which board to choose, and originals and clones.
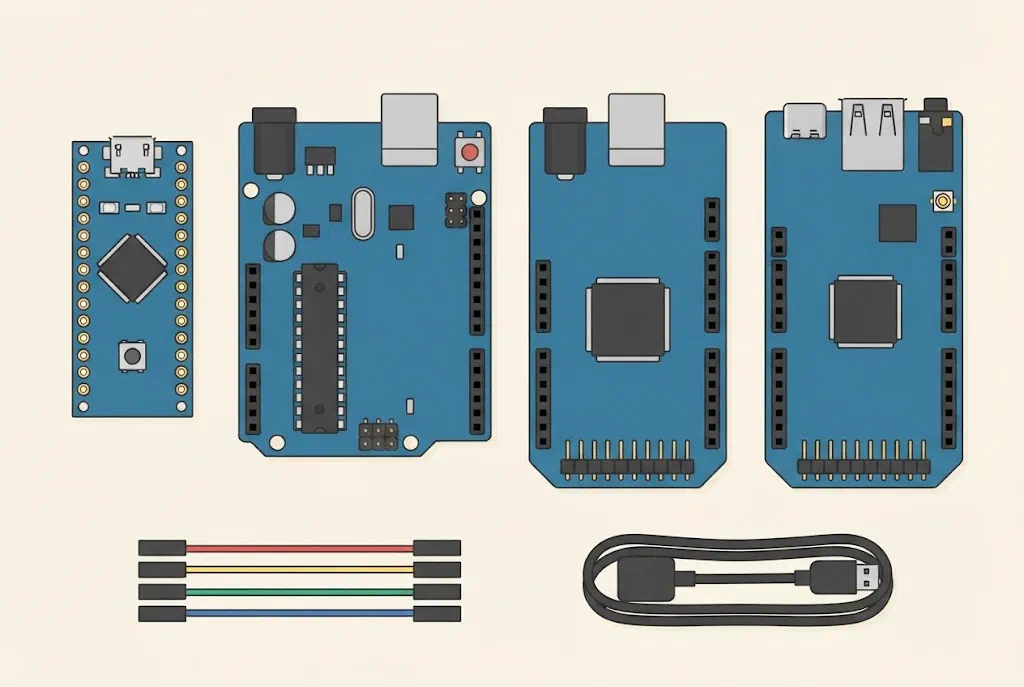
Arduino isn’t one board but a whole family. Each board has a microcontroller, a small computer in a single chip, and next to it everything you need to connect it to a computer and a power supply. In the workshop we use the Arduino Uno, and here are three of its relatives too: the small Nano, the big Mega and the fast Giga.
Which pin is where on each board is on the Pinouts page. This page is about everything around the pins: what is on the board, how much memory it has, how it is powered and which one to choose for your project.
What is on the board?
On its own, a microcontroller is just a chip. To work, it needs a 5 V supply, a clock and a way to receive a program from the computer. The board gives it all that. The picture shows an Arduino Uno with the USB socket at the top, and the numbers are explained below it.
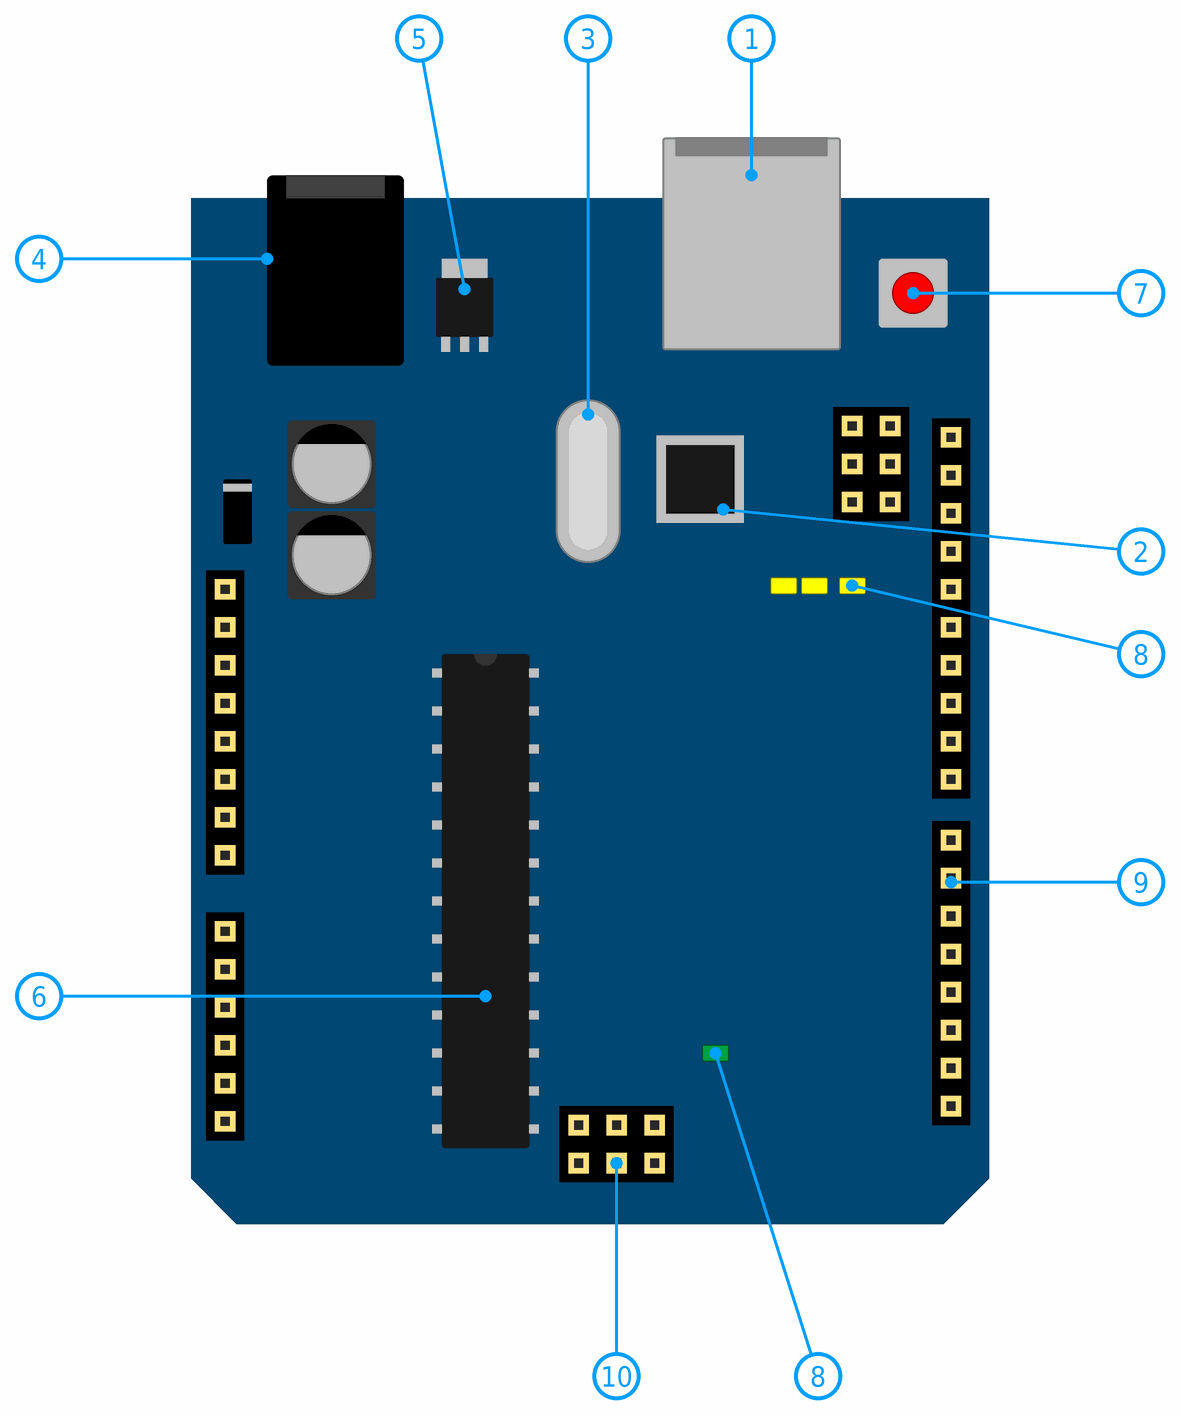
- USB socket (USB-B). Through it, the computer uploads the program, the Serial Monitor receives messages and the board gets a 5 V supply.
- USB chip, the ATmega16U2, translates USB into a UART connection, which the microcontroller speaks. Clones usually have a CH340 chip instead.
- Crystal of 16 MHz gives the USB chip its clock: 16 million ticks a second. The microcontroller has its own, much smaller resonator next to it, also of 16 MHz.
- Power socket takes an adapter or a battery of 7 to 12 V.
- Voltage regulator turns that into a steady 5 V for the whole board. In front of it is a diode, which protects the board when the supply is connected the wrong way round, and next to it are two capacitors, which smooth the voltage.
- Microcontroller, the ATmega328P, runs your program. On the original Uno it is plugged into a socket, so it can be replaced if it gets damaged.
- RESET button starts the program again, from the beginning of the
setup()function. - LEDs: ON lights up when the board has power, L is connected to pin 13, and TX and RX blink while data travels over USB.
- Pin headers, which you plug wires and modules into.
- ICSP is six pins for programming the microcontroller with a programmer, without USB. This is how a new chip gets its bootloader, a small program that later receives your programs over USB. The SPI connection is on the same pins.
The Nano and the Mega have the same parts, just in other places. The Nano has no power socket, and the Giga has completely different chips and talks over USB by itself, without a separate USB chip.
What do they have in common?
- You program all four in the Arduino IDE or in Visual Studio Code with PlatformIO, in the same language and with the same commands:
pinMode(),digitalWrite(),analogRead(),Serial.println(). - When you change boards, choose the other one in the Arduino IDE in the Tools → Board menu. For the Giga, first install the Arduino Mbed OS Giga Boards package in the Boards Manager.
- A program also works on another board if it uses pin names (
LED_BUILTIN,SDA,A0) instead of numbers, as in the section Names instead of numbers. - Most libraries work on all of them. The ones that don’t are those that change parts of the ATmega chip directly (its registers): they work on the Uno, Nano and Mega, but not on the Giga.
- The Uno, Mega and Giga have their pin headers in the same places, so a board made for the Uno (a shield) fits all three. On the Mega, I2C and SPI are on other pins, and the Giga works at 3.3 V, so before you connect a shield, check that it works on them.
Uno, Nano, Mega and Giga
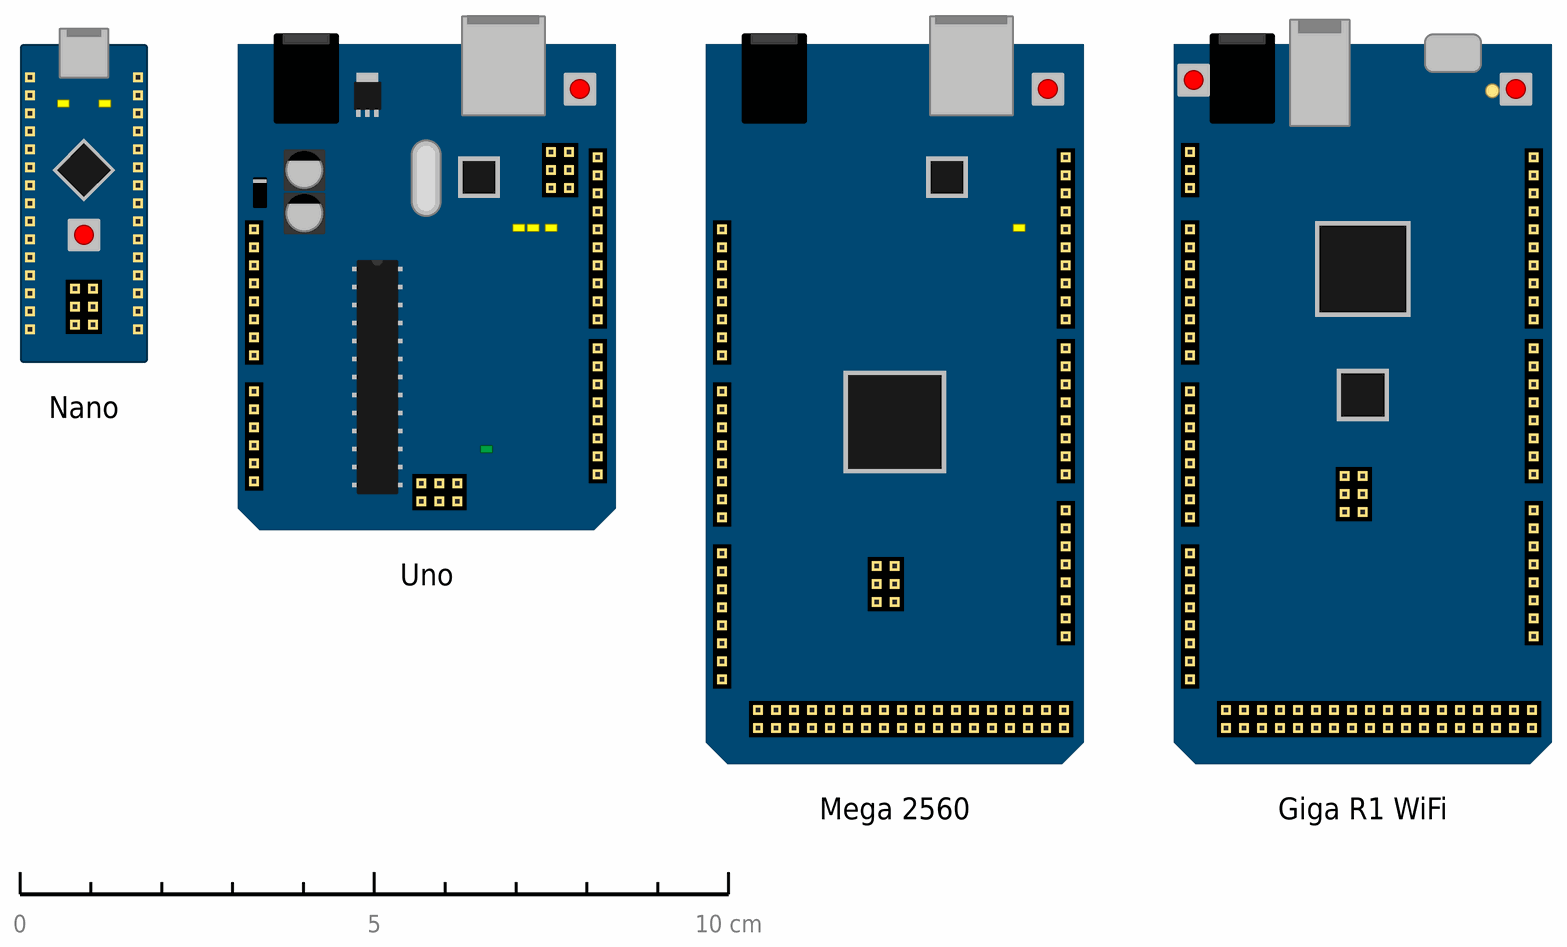
The picture shows all four at their real sizes relative to each other, with the USB socket at the top. The Mega and the Giga are longer than the Uno by the double header with pins 22 to 53.
| Uno | Nano | Mega 2560 | Giga R1 WiFi | |
|---|---|---|---|---|
| Microcontroller | ATmega328P | ATmega328P | ATmega2560 | STM32H747XI |
| Bits at a time | 8 | 8 | 8 | 32 |
| Clock | 16 MHz | 16 MHz | 16 MHz | 480 MHz and 240 MHz (two cores) |
| Program memory (flash) | 32 KB | 32 KB | 256 KB | 2 MB, plus 16 MB on the board |
| Working memory (RAM) | 2 KB | 2 KB | 8 KB | 1 MB, plus 8 MB on the board |
| EEPROM | 1 KB | 1 KB | 4 KB | none |
| Pin voltage | 5 V | 5 V | 5 V | 3.3 V |
| Current per pin | 20 mA | 20 mA | 20 mA | 8 mA |
| Digital pins / analog inputs | 14 / 6 | 14 / 8 | 54 / 16 | 76 / 12 |
| USB socket | USB-B | Mini-B | USB-B | USB-C, plus USB-A for devices |
| USB chip | ATmega16U2 | FT232RL | ATmega16U2 | in the microcontroller |
| Power socket | yes | no | yes | no |
| Supply through VIN | 7–12 V | 7–12 V | 7–12 V | 6–24 V |
| Wi-Fi and Bluetooth | no | no | no | yes |
| Size | 69 × 53 mm | 45 × 18 mm | 102 × 53 mm | 101 × 53 mm |
What some of the rows mean:
- Bits at a time. In one step, the ATmega adds two 8-bit numbers, from 0 to 255. A bigger number takes it more steps. The Giga adds 32-bit numbers in one step.
- Clock says how many steps the chip takes in a second. The Giga’s clock is 30 times faster than the Uno’s, and it does more work in each step too.
- Flash is the memory for the program. The program stays in it when you switch the power off.
- RAM is the memory for variables while the program runs. On the Uno it is only 2 KB, so a program with a lot of text or large arrays quickly uses up the RAM, even though there is enough flash memory.
- EEPROM is a small memory where the program itself saves data that must stay when you switch the power off, such as the best score in a game.
Which board should you choose?
- Uno for learning and the workshop. It is big and easy to see, and wires plug straight into the headers on the board. Almost every example on the internet is written for the Uno.
- Nano when the board has to fit on a breadboard or inside a project. It has the same chip as the Uno, so the same program runs on it.
- Mega when the Uno runs out of pins or memory: for lots of buttons, LEDs and modules, or for a project with several UART modules.
- Giga when a project needs a lot of speed and memory, Wi-Fi or sound. It is also the most expensive and the most delicate of the four, because it works at 3.3 V and gives only 8 mA per pin.
When a project is finished and needs only a few pins, you can build in a small microcontroller on its own instead of a whole Arduino, for example an ATtiny85. How an Uno programs it is on the ATtiny85 and other small microcontrollers page.
The Giga works at 3.3 V
Modules and shields that work at 5 V can put 5 V on a Giga pin, and that can damage it. Before you connect a module, check that it works at 3.3 V. Take at most 8 mA from a single Giga pin. There is more about this on the Pinouts page, in the section on the Giga.
Power supply
The Uno, Nano and Mega can be powered in three ways:
- Over USB, from a computer or a USB charger. This is the simplest: in the workshop, the board gets both its program and its power this way. On most Uno boards, USB is protected by a 500 mA fuse. When what is connected to the board draws too much current, the fuse heats up and cuts the current, and when it cools down, it works again.
- Through the power socket (Uno and Mega), with an adapter or a battery of 7 to 12 V.
- Through the VIN pin, with the same 7 to 12 V. The Nano has no power socket, so without USB this is the only way to power it.
If both USB and the power socket with more than about 6.6 V are connected, most Uno boards choose the power socket by themselves.
Why 7 to 12 V?
The Uno’s voltage regulator is a linear one: it turns all the voltage above 5 V into heat, like the 7806 regulator on the Rectifiers and voltage regulators page. That heat is P = (U − 5 V) · I, where U is the voltage at the power socket and I is the current drawn by the board and everything connected to it. Part of this heat goes into the diode in front of the regulator, but most of it is in the regulator itself.
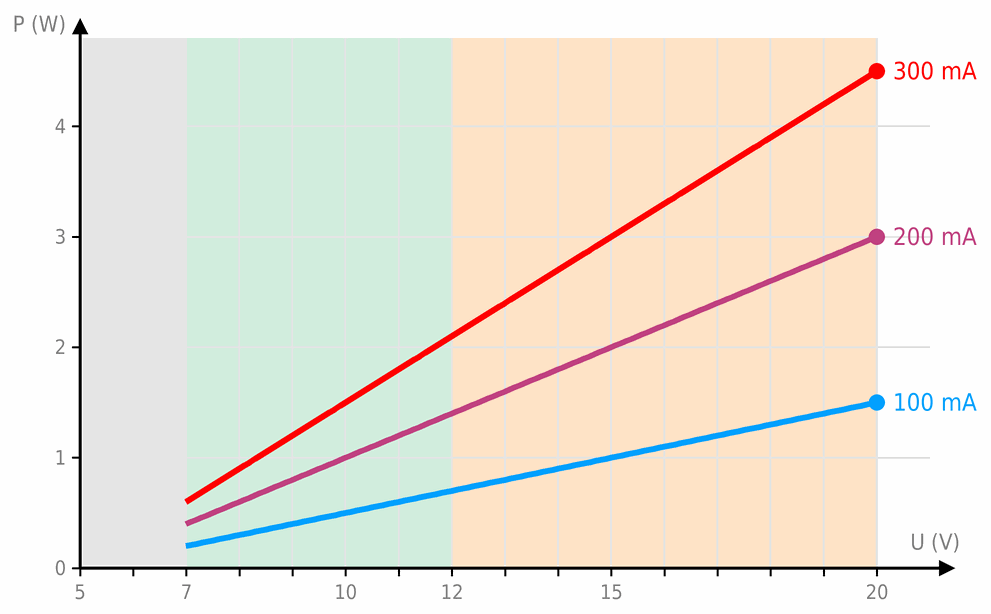
- Below 7 V (grey), there isn’t enough voltage left for the regulator, because both it and the diode in front of it take part of the voltage. The 5V pin then has less than 5 V, and the board may not work reliably.
- From 7 to 12 V (green) is the voltage Arduino recommends. At 200 mA, the regulator and the diode turn 0.4 W into heat at 7 V, 0.8 W at 9 V and 1.4 W at 12 V.
- From 12 to 20 V (orange), the board still works, but the regulator gets very hot: at 200 mA and 20 V it is 3 W. The board has no heat sink, so the regulator overheats and switches off, or gets damaged.
That is why a 9 V adapter is a good choice for the Uno and the Mega. Motors, servo motors and LED strips don’t go on the 5V pin: they need their own supply, with a common GND with the board.
Instead of a linear regulator, the Giga has a switching one, which doesn’t turn the extra voltage into heat. That is why it can take up to 24 V on the VIN pin. It has no power socket: the black socket in the corner is a 3.5 mm audio socket. It is powered through the USB-C socket or the VIN pin.
Originals and clones
Arduino is open hardware: the schematics and board designs are published for free, so anyone may use them. That is why there are clones, boards from other makers that work just like the original and cost much less. Clones must not carry the Arduino name and logo. A board that carries it but isn’t an original is a counterfeit.
How a clone differs from the original:
- The USB chip is usually a CH340, not an ATmega16U2 (Uno, Mega) or FT232RL (Nano). The Arduino IDE doesn’t recognise it by name, and on some computers you need to install a driver. What to do then is on the Arduino IDE page, in the section Connecting the board.
- The microcontroller is often a small one soldered straight onto the board, not plugged into a socket. If it gets damaged, it can’t be replaced.
- An old bootloader is on many Nano clones. If uploading fails, choose Tools → Processor → ATmega328P (Old Bootloader) in the Arduino IDE and try again.
The Uno R4 and other boards with the same name
The boards on this page are more precisely called the Uno R3, the Nano (the classic one, with the ATmega328P), the Mega 2560 Rev3 and the Giga R1 WiFi. The same names are used for boards that are completely different inside:
- The Uno R4 (Minima and WiFi) has the same shape and the same pins as the Uno R3, but a different microcontroller, the Renesas RA4M1 at 48 MHz, with 256 KB of program memory and 32 KB of RAM. It works at 5 V, but you may take only 8 mA from a single pin, so a circuit that was fine on the Uno R3 can damage a pin. That is why we don’t use it in the workshop. The Uno R4 WiFi also has Wi-Fi and a display of 12 × 8 LEDs.
- Nano is the name of a whole family of small boards. The Nano Every works at 5 V, while the Nano 33 IoT, Nano 33 BLE and Nano ESP32 work at 3.3 V and have other chips. When you buy a Nano, check which one it is.
Uno Q: an Uno with Linux
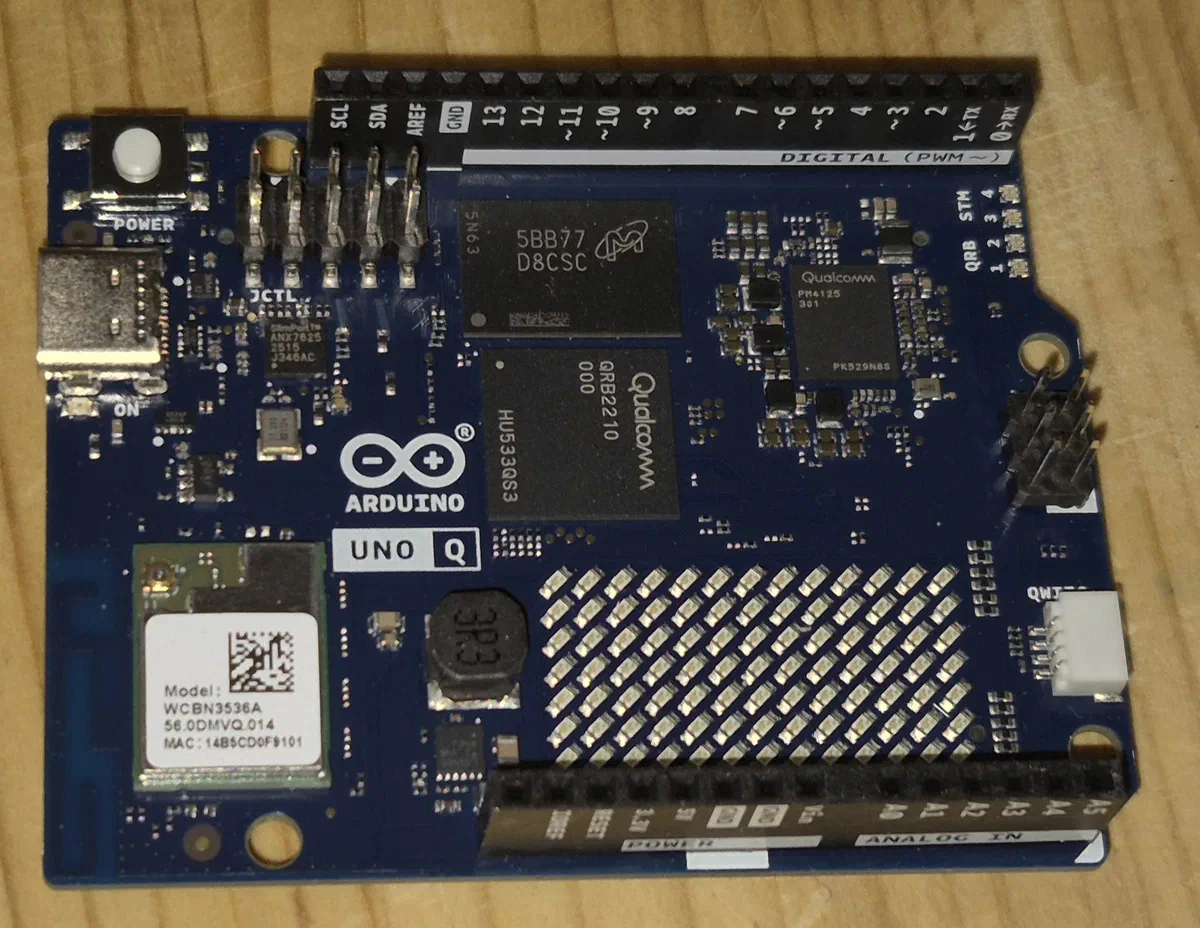
In October 2025 Arduino introduced the Uno Q. It has the shape and headers of an Uno, but it has two brains inside. The first is a Qualcomm Dragonwing QRB2210 processor with four 2 GHz cores, 2 or 4 GB of RAM and 16 or 32 GB of storage, which runs Linux (Debian), like a small computer. The second is an STM32U585 microcontroller at 160 MHz, with 2 MB of flash and 786 KB of RAM, which runs Arduino programs and controls the pins. The two chips talk to each other through a software bridge called Bridge.
The Uno Q has Wi-Fi, Bluetooth, an 8 × 13 LED matrix and a USB-C socket through which you can connect a screen, a keyboard and a mouse. It is programmed in Arduino App Lab, where an Arduino program is joined to a Python program and to an artificial intelligence model, for example to recognise objects in a camera picture. Its pins work at 3.3 V, as on the Giga, and may take at most 3.6 V. So connect circuits and modules made for the Uno's 5 V to it only through a level shifter.
There is also the Portenta family, made for industry: cameras that recognise objects on their own, machines and motors that need precise control, and devices that send data from far away. A Portenta is 66 mm long, like an Uno, and 25 mm wide, half as wide. Besides the pins along its edges, it has two connectors with closely packed pins on the bottom, which plug into a larger board with connections for a machine. The Portenta H7 has two cores, at 480 and 240 MHz, 1 MB of RAM in the chip and another 8 MB on the board, plus Wi-Fi and Bluetooth. The Portenta C33 has one 200 MHz core and 512 KB of RAM, and an ESP32-C3 gives it Wi-Fi and Bluetooth. The Portenta X8 is a small computer running Linux: a processor with four cores at up to 1.8 GHz and 2 GB of RAM, plus the Portenta H7’s chip for tasks whose timing must be exact. They all work at 3.3 V and cost much more than an Uno, and you don’t need them to learn electronics.
Where does the name Arduino come from?
Arduino was created in 2005 in the town of Ivrea in Italy, as a cheap board for design students. It was named after a café, the Bar di Re Arduino, where its creators used to meet. The café in turn was named after Arduin, a king of Italy a thousand years ago, who was the margrave of Ivrea.
 What did we learn?
- Besides the microcontroller, the board has everything it needs: the USB socket and USB chip, the voltage regulator, the clock, the RESET button, the LEDs and the pins.
- The Uno, Nano, Mega and Giga are programmed in the same language with the same commands, and a program works on all of them if we use pin names.
- The Uno and the Nano have the same chip, the Mega has many more pins and much more memory, and the Giga is the fastest, but works at 3.3 V.
- We power the Uno and the Mega over USB or with 7 to 12 V. The higher the voltage, the hotter the regulator gets.
- Clones work like the original, but often have a CH340 USB chip or, on the Nano, an old bootloader.
- The Uno R4 and some Nano boards are different inside from the boards that carry the same name.
Quick quiz
1. What is the difference between a microcontroller and an Arduino board?
2. You need a board that fits on a breadboard and runs a program written for the Uno. Which one do you choose?
3. A program compiles without errors, but while it runs the Uno behaves strangely, and the program has a lot of text. What is the likely problem?
4. You power an Uno with a 12 V adapter, and 300 mA is drawn from the 5V pin. How much heat is produced in the regulator and the diode?
5. Why must you not connect a 9 V battery to the Nano's 5V pin?
6. An Uno clone is connected to the computer, but in the Arduino IDE the port doesn't say Arduino Uno. Is the board broken?
7. May you connect a circuit with an LED that draws 15 mA on the Uno R3 to an Uno R4?