
Arduino IDE: from program to microcontroller
How to install the Arduino IDE, choose the board and port, upload a program to the Arduino, use the Serial Monitor and libraries, and fix common errors.
What is the Arduino IDE?
The Arduino IDE is a free program in which we write programs for the Arduino and send them to the board. IDE stands for Integrated Development Environment: everything this takes is in one program:
- an editor, in which we write the program,
- a compiler, which turns the program into instructions the microcontroller understands,
- uploading the program to the board over a USB cable,
- the Serial Monitor and the Serial Plotter, where we see what the board reports,
- libraries and examples, ready-made programs for modules and sensors.
This page is for the Arduino workshop, where we start with the Arduino IDE, as the lesson Arduino, electronics and building your own devices says. It describes the Arduino IDE 2 (version 2.3). Its look changes a little between versions, so we describe the menus in words, and the pictures are simplified.
From program to microcontroller
The picture shows what happens when we send a program to the Arduino:
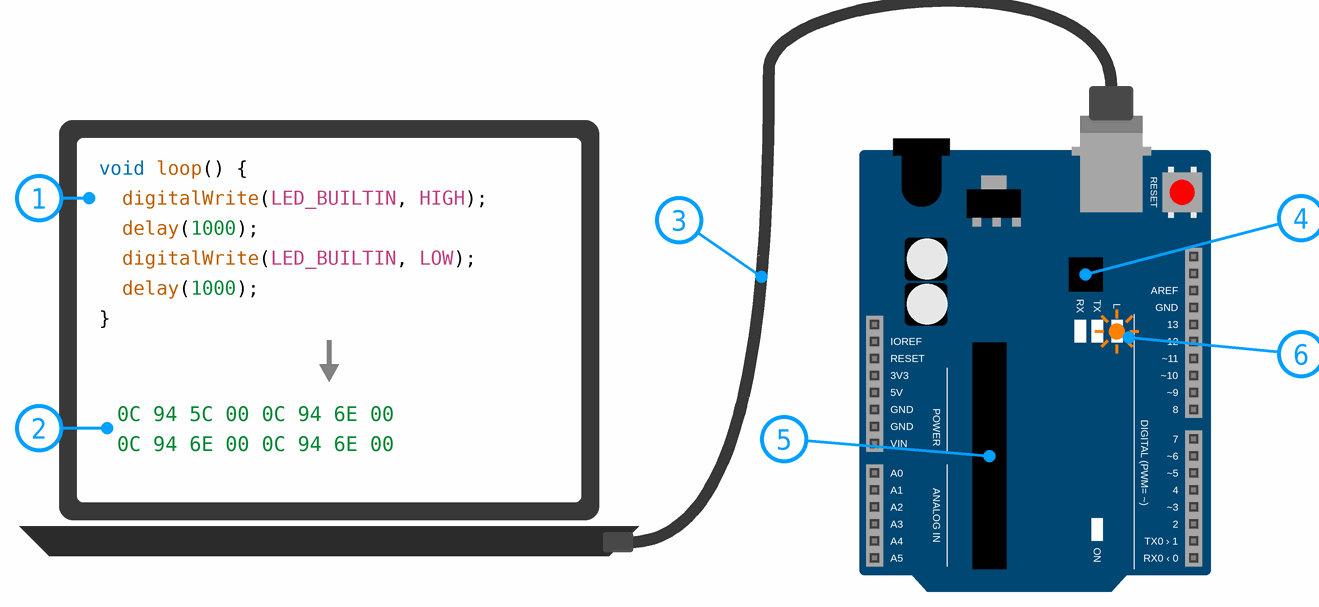
- We write the program, called a sketch, in the Arduino IDE, in the C++ language. It is saved in an
.inofile, in a folder with the same name. - The compiler turns the program into machine code: a series of bytes with instructions the microcontroller understands. In the picture they are written in hexadecimal.
- The USB cable carries the machine code to the board, and powers it as well.
- The USB chip on the board turns USB into a serial connection, UART, which the microcontroller understands. While the data travels, the RX and TX LEDs next to it flicker.
- The microcontroller, an ATmega328P, has a small program inside it, the bootloader. It receives the machine code and writes it into its flash memory. The program stays there even when you switch off the power.
- The program starts. In our example the L LED, connected to pin 13, starts to blink.
Compiling takes a few seconds, and uploading a few more.
Installing
- Download the Arduino IDE only from the official page, arduino.cc/en/software. It is available for Windows, macOS and Linux. Programs from other sites can be out of date or infected.
- For Windows there is also a ZIP file. You just unpack it into a folder and run
Arduino IDE.exe, without installing, which helps on school computers. - Support for the Arduino Uno (Arduino AVR Boards) comes with the program and is set up by itself the first time you start it. If the Uno isn’t in the list of boards, open the Boards Manager (the board icon in the sidebar), search for AVR and click Install. This needs the internet.
- On Linux the user must be in the
dialoutgroup, or they aren’t allowed to use the port. The commandsudo usermod -a -G dialout $USERadds them, and the change takes effect after logging out and in again.
For the leader: prepare the computers before the workshop
- Install the Arduino IDE, the Uno support, the libraries the lessons need and the driver for the USB chip on every computer, and upload a test program on each one.
- The school network can stop downloads, and the driver needs administrator rights. Keep the installation files on a USB stick as well.
- Arduino also has an online editor (Arduino Cloud Editor), but it needs a user account. In the workshop we use the program installed on the computer, without an account.
Connecting the board
- Connect the Arduino with a USB cable. The cable must carry data: some cables are only for charging, and with them the board lights up, but the computer doesn’t see it.
- Choose the board: Tools → Board → Arduino AVR Boards → Arduino UNO.
- Choose the port: Tools → Port. On Windows the port is called, for example,
COM3, on Linux/dev/ttyUSB0or/dev/ttyACM0, and on macOS it starts with/dev/cu.. If you don’t know which one is yours, look at the list, unplug the board and look again: the port that disappeared is yours.
You can also choose the board and port in the drop-down menu on the toolbar: click Select other board and port, type uno in the Boards field, choose Arduino UNO, choose the port on the right and click OK. If you only choose the board, you can compile the program, but not upload it.
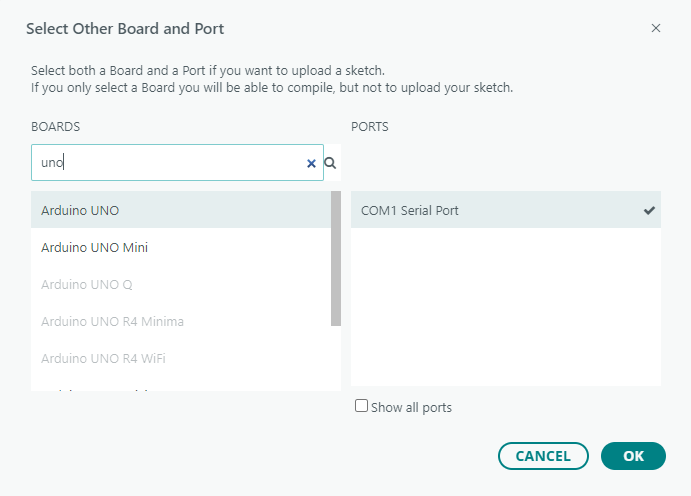
In the workshop we use boards that aren’t originals (clones). Many of them have a CH340 USB chip, which the Arduino IDE doesn’t recognise by name, so Arduino UNO isn’t shown next to the port. Then choose the board yourself. Windows 10 and 11 and newer versions of macOS usually have the driver for the CH340 already. If the port still doesn’t appear with a good cable, the driver has to be installed from the chip maker’s site, WCH.
The Arduino IDE window
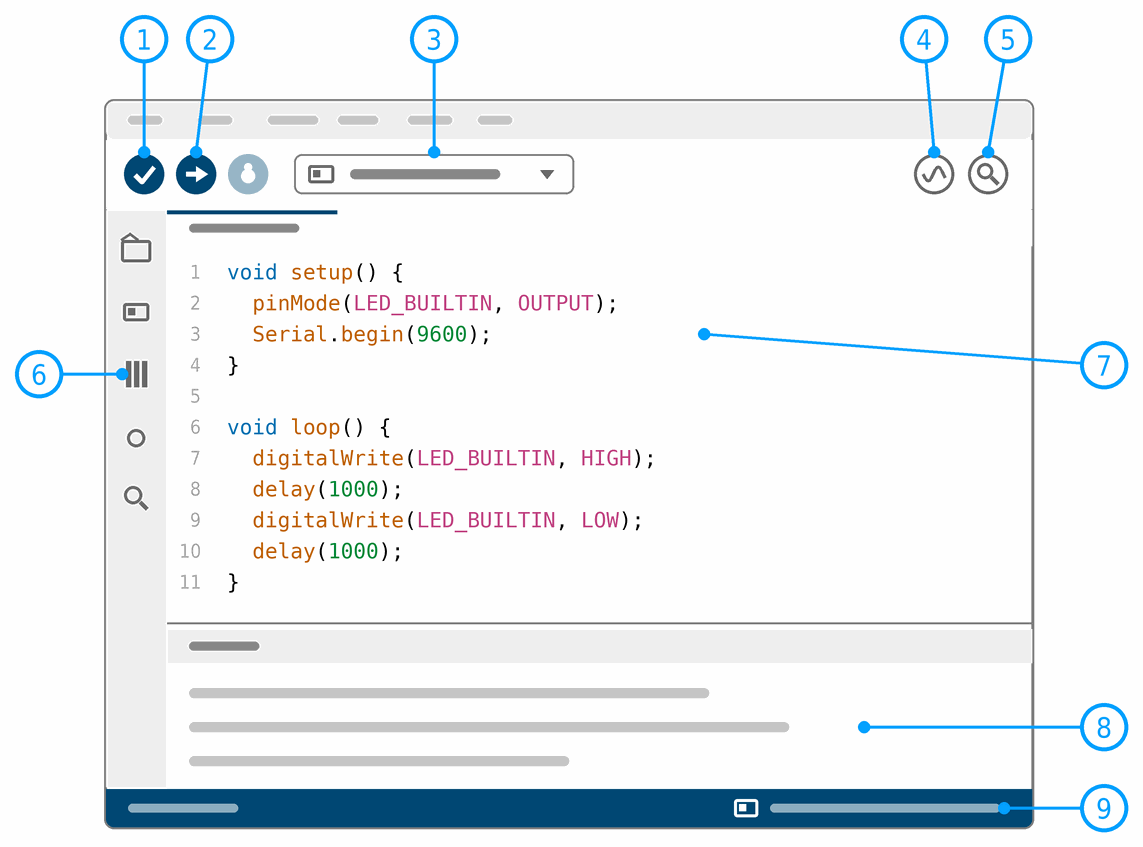
- Verify (the tick, Ctrl+R): compiles the program and reports errors, but doesn’t send it to the board.
- Upload (the arrow, Ctrl+U): compiles the program and sends it to the board. The grey button next to it (Debug) doesn’t work with the Uno.
- Board and port, the same as in the Tools menu.
- Serial Plotter: draws the numbers the program sends. You can also open it from the Tools → Serial Plotter menu.
- Serial Monitor (Ctrl+Shift+M): shows messages from the board. You can also open it from the Tools → Serial Monitor menu. It appears at the bottom of the window, in place of the output.
- Sidebar, from top to bottom:
- Sketchbook (the folder): a list of your saved programs. Click a name to open the program.
- Boards Manager (the board): installs and updates support for boards, for example Arduino AVR Boards for the Uno.
- Library Manager (the books): searches for, installs and updates libraries, as in the section Libraries.
- Debug: runs the program step by step, but only on boards that support it. The Uno doesn’t.
- Search (the magnifying glass): looks for a word in all the files of the open program and, if you want, replaces it with another.
- Editor: this is where you write the program. The numbers on the left are line numbers. Tools → Auto Format (Ctrl+T) lines up the indents neatly.
- Output: messages from the compiler, for example how much memory the program takes, and errors.
- Status bar: the line you are on and the chosen board and port.
The first program
Ready-made examples are in the File → Examples menu. The best known is 01.Basics → Blink, which turns the L LED on the board on and off. Our version also reports what it does:
// Turns the L LED on the board on and off and reports what it does
void setup() {
  pinMode(LED_BUILTIN, OUTPUT);  // the L LED, connected to pin 13
  Serial.begin(9600);            // the speed must be the same as in the Serial Monitor
  Serial.println("Started!");
}

void loop() {
  digitalWrite(LED_BUILTIN, HIGH);
  Serial.println("on");
  delay(1000);
  digitalWrite(LED_BUILTIN, LOW);
  Serial.println("off");
  delay(1000);
}
- Click Verify. The output says how much the program takes: about 2000 bytes of the 32,256 the Uno has.
- Click Upload. While the program is sent, the RX and TX LEDs flicker, and at the end the output says Done uploading.
- The L LED is now on for one second, then off for one second.
- Open the Serial Monitor and choose the speed 9600 baud. The messages on and off are printed.
The Serial Monitor
The Serial Monitor shows everything the program sends with the Serial.print() and Serial.println() commands. The second one moves to a new line at the end of the message. This is the easiest way to see what the program does and which values it reads, for example the light on the LDR in the lesson Arduino - step by step.
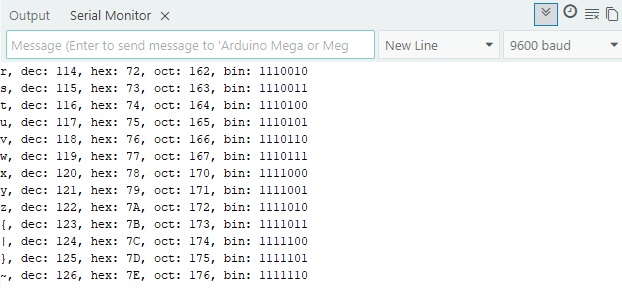
- The speed must be the same. The number in
Serial.begin(9600)and the speed chosen in the Serial Monitor must be equal. If they aren’t, you see strange characters instead of messages. - Only one program can use the port. If the Serial Monitor is open in another program, the Arduino IDE can’t upload to the board.
- Pins 0 and 1 are taken. The serial connection to the USB chip goes through them. If something is connected to them, uploading can fail and wrong characters appear in the monitor.
- You can type a message in the field at the top of the Serial Monitor and send it to the board. The program reads it with the
Serial.read()command.
The Serial Plotter
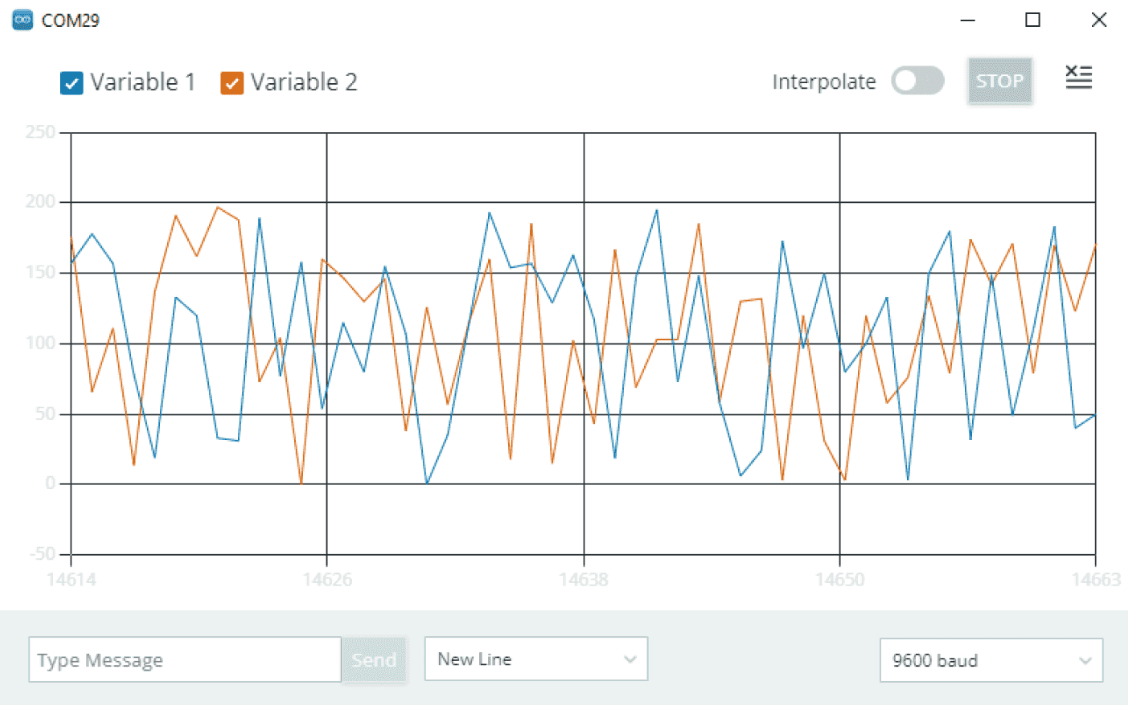
The Serial Plotter draws a graph of the numbers the program sends, so changes are much easier to see than in a column of numbers. It opens in its own window, and the speed must be the same as in the program:
// Sends the voltage on A0 to the Serial Plotter (0 to 1023)
void setup() {
  Serial.begin(9600);
}

void loop() {
  Serial.println(analogRead(A0));
  delay(20);
}
Connect a potentiometer: its outer legs to 5 V and GND, and the wiper to A0. As you turn the knob, the line rises and falls between 0 and 1023. If nothing is connected to A0, the line jumps around at random, because an unconnected input doesn’t read 0 (misconception 10). To draw several values at once, print them on the same line, separated by a comma or a space, and move to a new line at the end.
Libraries
A library is ready-made code for a module, for example a display, a clock or a sensor, so we don’t have to write it ourselves. We install it in the Library Manager (the books icon in the sidebar): we search for the library name that the lesson or the module’s maker gives and click Install. We include it in the program with #include at the top, for example #include <Wire.h> for an I2C connection. Most libraries come with examples, in the File → Examples menu.
When something doesn’t work
Compile errors
When a program has an error, the compiler doesn’t compile it and says in red in the output what is wrong. The message starts with the file name and the line and column number. Always read the first error first, because the others are often just its result.
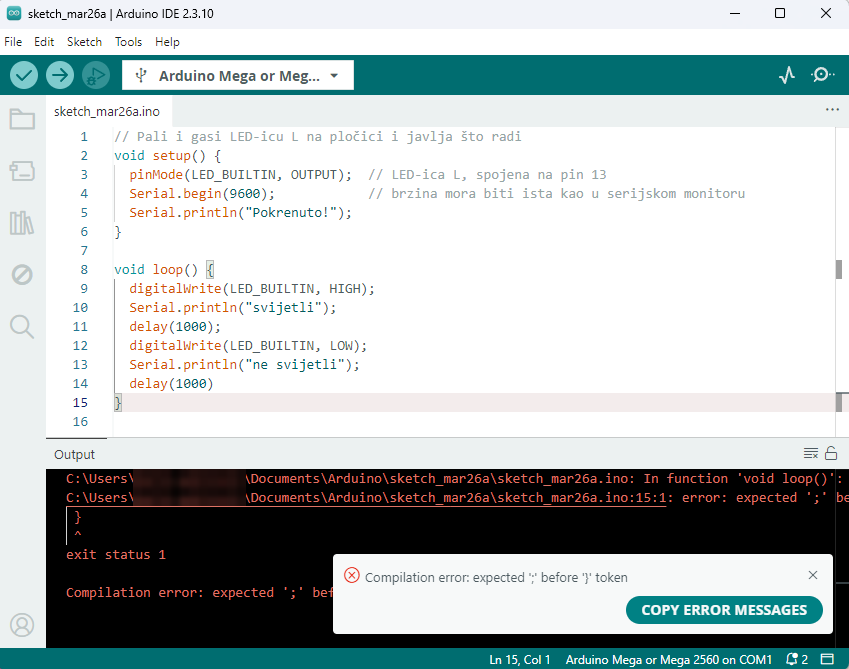
; is missing at the end of line 14, after delay(1000). The compiler only notices when it reaches the } on line 15, so it reports :15:1:, line 15 and column 1. The Copy error messages button copies all the messages, so you can send them to the leader or to Discord.| Message | What it means |
|---|---|
error: expected ';' before '}' token | A ; is missing. The compiler only notices on the next line, so the error is at the end of the line before the one it reports. |
error: 'digitalwrite' was not declared in this scope | The compiler doesn’t know this word. C++ tells capital and small letters apart: the right name is digitalWrite. The compiler even suggests it (suggested alternative). |
error: expected '}' at end of input | A curly bracket isn’t closed. Auto Format helps: the block that isn’t closed stays wrongly indented. |
Upload errors
| What you see | Most common cause | What to do |
|---|---|---|
| The port doesn’t appear | a charging-only cable, or a missing driver | try another cable, then the driver for the CH340 |
avrdude: stk500_recv(): programmer is not responding | the wrong board or port is chosen, or something is connected to pins 0 and 1 | check the board and port, disconnect pins 0 and 1 and try again |
Access is denied, Permission denied or port busy | another program is using the port, or on Linux the user isn’t in the dialout group | close the Serial Monitor in the other program; on Linux add the user to the group |
| The upload works, but nothing happens | a wrong pin in the program, or a mistake in the circuit | print what the program does to the Serial Monitor and check the circuit |
Saving programs
The Arduino IDE saves programs in the Sketchbook folder: on Windows and macOS it is the Arduino folder in Documents, and on Linux ~/Arduino. Each program gets its own folder with the same name as its .ino file, and it has to stay that way. Write the name without spaces or special letters, for example traffic_light_2. If there are several .ino files in the same folder, the Arduino IDE shows them as tabs and compiles them together, as one program.
Arduino IDE or Visual Studio Code?
The Arduino IDE is the simplest to start with and to try things out quickly. When projects grow, we move on to Visual Studio Code with the PlatformIO extension, which helps better with organising larger programs. It is described on the page Arduino and Visual Studio Code.
Troubleshooting tips
When something doesn’t work, don’t change everything at once. Go step by step, from the board towards the program, and try again after each change.
The board and the connection
- Is the ON LED on the board lit? If it isn’t, the board has no power: check the cable and the USB socket, and if the board gets hot or the computer switches it off, look for a short circuit.
- Try another cable, another USB port and, if needed, another computer. This quickly tells you whether the fault is in the board, the cable or the computer.
- On Windows, open the Device Manager. A yellow exclamation mark next to the board means a driver is missing.
- Upload the Blink example. If the L LED blinks, the board and the Arduino IDE work, and the mistake is in your program or circuit.
Uploading
- The message
avrdude: stk500_getsync(): not in synchas the same causes asprogrammer is not responding: the wrong board or port, a port used by another program, or something connected to pins 0 and 1. On some clones it helps to press the RESET button on the board just as the upload starts. - Does the board reset by itself or disconnect when a motor starts? USB gives only about 500 mA. Power motors, servos and LED strips from a separate supply, and connect the grounds of both supplies (misconception 8, misconception 25).
Compiling
- Read the whole message in the output. The notice at the bottom right and the last line,
exit status 1, only say that compiling failed. What is wrong is written above them, so scroll up. warning:is noterror:. A warning doesn’t stop compiling, an error does. You can usually ignore warnings from other people’s libraries. Still, it is best to resolve warnings too, especially those from your own program: they often point to a mistake that only shows up later, for example a variable you use before giving it a value. A warning from a library often goes away when you update it to a newer version. How many warnings the Arduino IDE shows is set in File → Preferences, under Compiler warnings.No such file or directorywith#includemeans the library isn’t installed. Install it in the Library Manager.undefined reference to 'setup'or'loop'means one of the two required functions is missing. A program must have both, even if one is empty.Sketch too bigorNot enough memorymeans the program is too big for the Uno, which has 32 KB of memory for the program and only 2 KB for variables. Put text you print insideF(), for exampleSerial.println(F("Started!"));, so it stays in the program memory. Use smaller types,byteinstead ofintwhere the number is below 256, and avoidString.
The same goes for larger constant texts and tables: with thePROGMEMkeyword they stay only in the program memory and don’t take up the 2 KB for variables. Such data isn’t read directly but with special commands, andSerialprints it like this:const char s_help[] PROGMEM = "CONTROLS"; // the text stays only in the program memory void setup() { Serial.begin(9600); Serial.println((const __FlashStringHelper *) s_help); // print the text from the program memory } void loop() { }Multiple libraries were found foris usually not an error: the Arduino IDE is just saying that it found a library in two places and which one it used.- Brackets that don’t match are easiest to find with Auto Format (Ctrl+T). When you put the cursor next to a bracket, the Arduino IDE also highlights its pair.
When the program uploads but doesn’t work as it should
- Print what the program does. Add
Serial.println()at important points, for example when a button is pressed or before anif, so you see in the Serial Monitor how far the program gets and which values it reads. - If nothing appears in the Serial Monitor, check that the program has
Serial.begin(), that the speed is the same and that it prints anything at all. As a test, addSerial.println("Hello");toloop(). Closing the monitor and opening it again also helps. - Switch off part of the program. If you don’t know which part causes the problem, turn the suspicious lines into comments for a while, with
//at the start, and bring them back one by one. - Ask for help with enough information. Send the leader or Discord the error message (the Copy error messages button), the program and a description of the circuit, and say what you have already tried.
Some of these tips are taken and adapted from the articles How to Troubleshoot Common Arduino Errors Like a Pro and Troubleshooting Guide for Arduino: Compiling.
 What did we learn?
- The Arduino IDE is a program in which we write a program, compile it and upload it to the board, and in which we see what the board reports.
- The compiler turns the program into machine code, and the bootloader on the board writes it into the microcontroller.
- Before uploading we choose the board (Arduino UNO) and the port. The cable must carry data.
- The speed must be the same in the Serial Monitor and in the program, and pins 0 and 1 are taken by the serial connection.
- When there is an error, we read the first message first and look at the line it reports and the line before it.
Short quiz
1. What is the difference between the Verify and Upload buttons?
2. The board lights up, but its port isn't in the menu. What do you check first?
3. You see strange characters instead of messages in the Serial Monitor. Why?
Serial.begin() command in the program. Choose the same speed in the monitor, for example 9600.4. The compiler reports expected ';' on line 6. Where do you look for the error?
; when it reaches the next line.5. Why don't we connect anything to pins 0 and 1 while uploading a program?
6. What does the bootloader do?