Arduino and Visual Studio Code: larger projects with PlatformIO
How to program an Arduino in Visual Studio Code with PlatformIO: installing, the project and platformio.ini, main.cpp, libraries and several files.
What are Visual Studio Code and PlatformIO?
Visual Studio Code, VS Code for short, is a free program editor from Microsoft. PlatformIO is an extension for VS Code that turns it into a development environment for microcontrollers: it compiles the program, uploads it to the board, has a Serial Monitor and looks after boards and libraries.
This page is for the Arduino workshop and follows on from the Arduino IDE page, so it assumes you can already upload a program to the board and use the Serial Monitor. We use VS Code with PlatformIO when a program grows and several people work on it, as in the pinball machine workshops.
Arduino IDE or VS Code?
| Arduino IDE | VS Code with PlatformIO | |
|---|---|---|
| To start with | the simplest | needs more setting up |
| The program | one .ino file, others as tabs | many .cpp and .h files in folders |
| Help while writing | basic | completes words, underlines errors as you type, jumps to definitions |
| Libraries | installed for the whole computer | written into the project, with their version, so everyone in the team has the same ones |
| Boards | Arduino and many others | Arduino, ESP32 and hundreds of others |
| Serial Plotter | yes | not built in |
| Computer | works on slower ones too | needs more memory and space |
The Arduino IDE and VS Code aren’t rivals: for trying something out quickly the Arduino IDE is still handier, and for a larger project VS Code.
Installing
- Download VS Code from the official site, code.visualstudio.com. For Windows there is also a version that doesn’t need administrator rights (User Installer).
- In VS Code open Extensions (the icon with four squares on the left bar, Ctrl+Shift+X), search for PlatformIO IDE and click Install.
- Wait: PlatformIO installs its core (PlatformIO Core) by itself. This takes a few minutes and needs the internet. When it has finished, it asks you to restart VS Code.
- The first time you compile a project for the Uno, PlatformIO also downloads the compiler and the board support. This also takes a few minutes.
The driver for the board’s USB chip is the same as for the Arduino IDE, so see Connecting the board if the port doesn’t appear.
Watch out for special letters in the path. PlatformIO doesn’t support paths with letters such as č, ć, đ, š or ž, or other letters outside the English alphabet. So save projects in a folder without them, for example C:\projects\pinball, not in C:\Users\Ivančić\Documents.
For the leader: prepare the computers before the workshop
- Install VS Code and PlatformIO on every computer and compile a test project for the Uno once, so that everything it needs is downloaded. On a school network this can take a long time or fail.
- VS Code and PlatformIO send usage data (telemetry). In VS Code you switch it off in the settings (Ctrl+,): search for
telemetryand settelemetry.telemetryLeveltooff. In PlatformIO typepio settings set enable_telemetry Noin the terminal. - VS Code offers to sign in with a Microsoft or GitHub account, for example for the AI assistant Copilot. On the workshop computers don't sign in, and don't ask the participants to.
- Make a folder for the projects with no special letters in its path.
A new project
- Click the PlatformIO icon on the left bar (a head with two antennae), then PIO Home → Open. The house on the status bar at the bottom opens it too.On the start page, under Quick Access, are the buttons for a new project, for importing a program from the Arduino IDE and for opening a project. On the left are Projects (your projects), Libraries, Boards and Devices, a list of the connected boards with their ports.
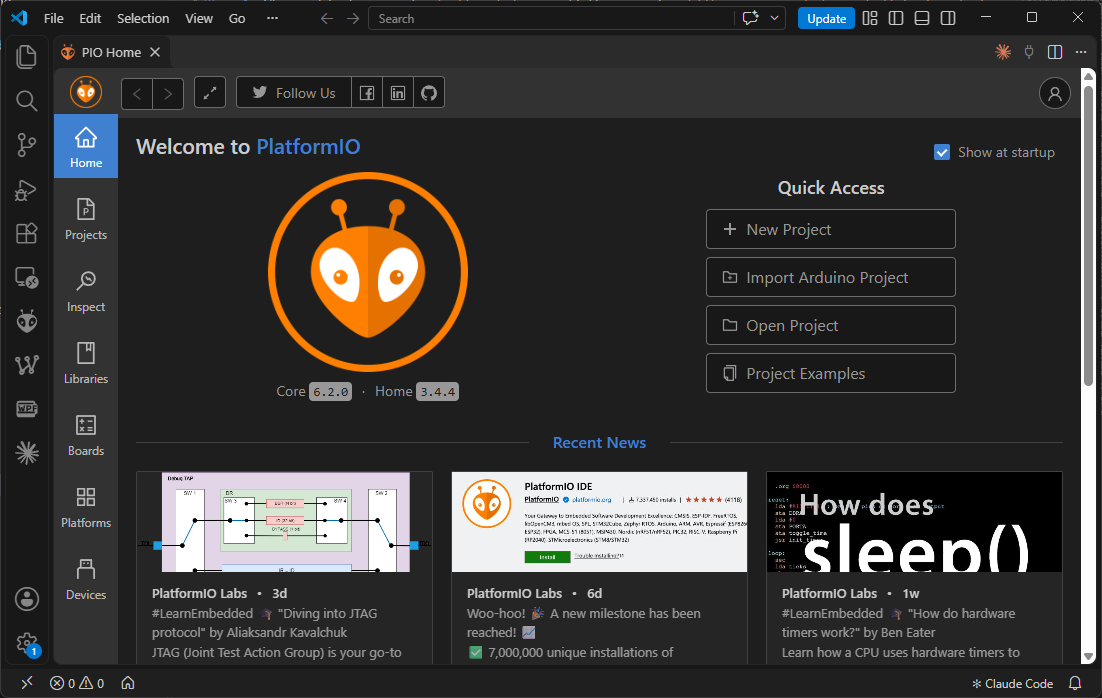
- Click New Project. Type a name, without spaces or special letters, search for Arduino Uno in the Board field, leave Arduino as the Framework, choose a folder and click Finish.
- PlatformIO makes the project folder:
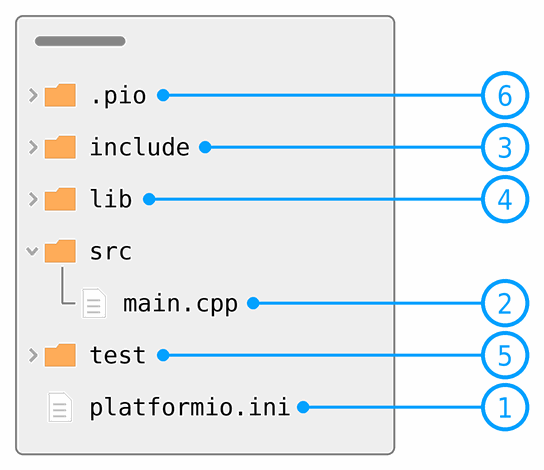
platformio.ini: the project’s settings, for example the board, the Serial Monitor speed and the libraries.src/main.cpp: the program, with thesetup()andloop()functions.include:.hfiles used by several parts of the program.lib: the project’s own libraries.test: for automatic tests. We don’t use it in the workshop..pio: what PlatformIO makes when it compiles. Don’t change it and don’t send it to others. If you delete it, PlatformIO makes it again.
The platformio.ini file
A new project for the Uno has settings like these. Add the monitor_speed line yourself:
[env:uno]
platform = atmelavr
board = uno
framework = arduino
monitor_speed = 9600
[env:uno]is an environment calleduno: a set of settings for one board.platform = atmelavris the family of microcontrollers, AVR, that the Uno’s ATmega328P belongs to.board = unois the board.framework = arduinomeans we program with Arduino commands, as in the Arduino IDE.monitor_speed = 9600is the speed of the Serial Monitor. It must be the same as inSerial.begin().
Later we add libraries (lib_deps) and the port (upload_port) here. A line that starts with ; is a comment.
main.cpp instead of .ino
In PlatformIO the program is an ordinary C++ file. Before compiling, the Arduino IDE adds two things to an .ino file by itself, and here we write them ourselves:
#include <Arduino.h>at the top. Without it the compiler doesn’t knowpinMode(),digitalWrite()and the other Arduino commands.- A declaration of a function you use before it is written: the first line of the function, with a
;at the end.
#include <Arduino.h>

void flash(unsigned int duration);  // declaration: the function is written further down

void setup() {
  pinMode(LED_BUILTIN, OUTPUT);
}

void loop() {
  flash(500);
}

void flash(unsigned int duration) {
  digitalWrite(LED_BUILTIN, HIGH);
  delay(duration);
  digitalWrite(LED_BUILTIN, LOW);
  delay(duration);
}
Without the declaration the compiler reports error: 'flash' was not declared in this scope, because it only sees the function below loop(). Next to the error it may also suggest a suggested alternative that has nothing to do with our program: the compiler’s suggestions aren’t always right. Instead of a declaration, you can also write the function above the place where you use it.
Compiling, uploading and the Serial Monitor
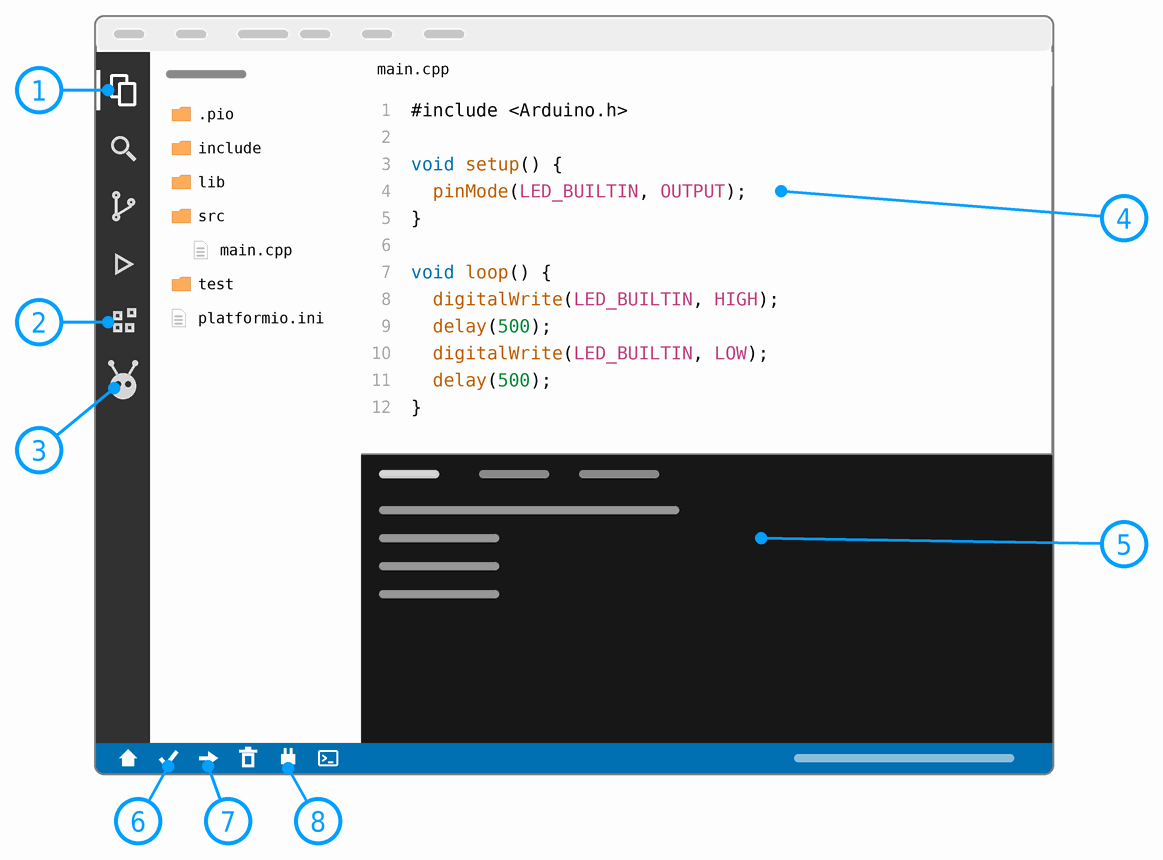
- Explorer (Ctrl+Shift+E): the project’s folders and files.
- Extensions: extensions for VS Code. This is where you install PlatformIO.
- PlatformIO: PIO Home and Project Tasks, a list of all the project’s commands (Build, Upload, Monitor, Clean…).
- Editor: this is where you write the program.
- Terminal: messages from compiling and uploading, and the Serial Monitor.
- Build (the tick, Ctrl+Alt+B): compiles the program.
- Upload (the arrow, Ctrl+Alt+U): compiles the program and uploads it to the board.
- Serial Monitor (the plug, Ctrl+Alt+S): opens the Serial Monitor in the terminal.
On the status bar there are also the house (PIO Home), the bin (Clean, which deletes what has been compiled, so the next build starts from scratch) and PlatformIO’s terminal. In newer versions the Build and Upload buttons are also at the top right, above the editor. If the buttons look different in a newer version, you can also find every command in the command palette: Ctrl+Shift+P, then type, for example, PlatformIO: Upload.
- PlatformIO usually finds the port by itself. When several boards are connected, like the four Unos in the pinball machine, write the port into
platformio.ini:upload_port = COM5andmonitor_port = COM5. - The Serial Monitor runs in the terminal. You close it with Ctrl+C. If uploading fails because the port is busy, close the monitor and try again.
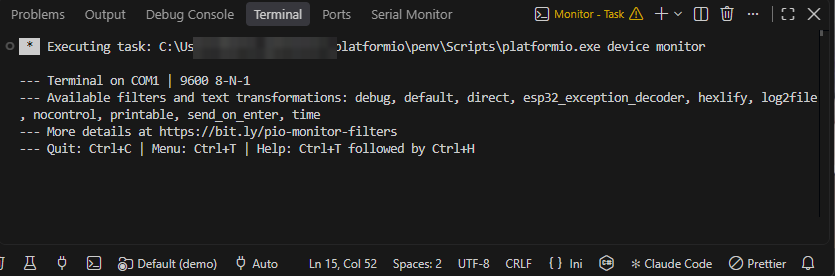
- There is no Serial Plotter. For graphs use the Serial Plotter in the Arduino IDE.
Libraries
- Open PIO Home → Libraries and search for a library, for example RTClib for a clock module.
- Click it, then Add to Project, choose your project and click Add.
PlatformIO writes the library into platformio.ini:
lib_deps =
    adafruit/RTClib @ ^2.1.4
This means: the RTClib library by adafruit, version 2.1.4 or newer, but not 3.0 or later, because that one might work differently. PlatformIO downloads it into the .pio folder when you save platformio.ini, or at the latest the first time it compiles. Because the library is written into the project, everyone in the team gets the same version, and nothing has to be installed by hand on a new computer. You save the project’s own libraries in the lib folder, each in its own folder.
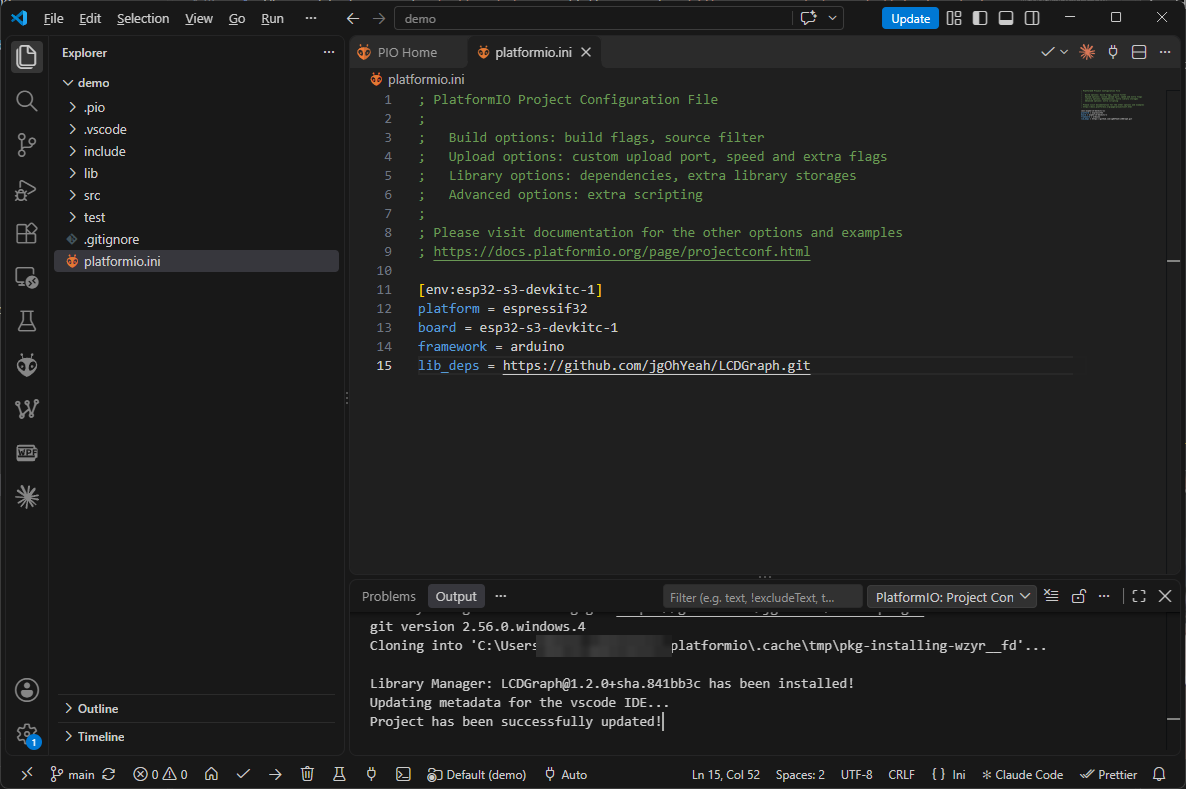
platformio.ini, PlatformIO downloads it and reports has been installed in the Output. A library added this way has no fixed version, so for a team project prefer a library from the list.A program in several files
When a program grows, we split it into parts: in the pinball machine, for example, the lights, the coils and the score. Each part has two files:
- the
.h(header) says what the part offers: a list of functions. - the
.cppsays how it does it: the functions themselves.
src/lights.h:
#pragma once
#include <Arduino.h>

// Lights on pins 5, 6 and 7
void lightsBegin();
void lightsFlash(byte pin, unsigned int duration);
src/lights.cpp:
#include "lights.h"

const byte LIGHTS[] = {5, 6, 7};

void lightsBegin() {
  for (byte pin : LIGHTS) {
    pinMode(pin, OUTPUT);
  }
}

void lightsFlash(byte pin, unsigned int duration) {
  digitalWrite(pin, HIGH);
  delay(duration);
  digitalWrite(pin, LOW);
}
src/main.cpp:
#include <Arduino.h>
#include "lights.h"

void setup() {
  lightsBegin();
}

void loop() {
  lightsFlash(5, 200);
  lightsFlash(6, 200);
  lightsFlash(7, 200);
}
#pragma onceat the top of the.hfile makes sure it is only included once, even when several files include it.- We include our own file with quotes,
#include "lights.h", and a library with angle brackets,#include <Arduino.h>. - The list of pins
LIGHTSis only inlights.cpp, so the other parts of the program don’t see it and can’t change it by accident.
When everyone in the team works on their own pair of files, they get in each other’s way less, and the program is easier to follow.
Several boards in one project
The pinball machine has four Unos, and each has its own program. They can all be in one project: we write the shared settings in the [env] section, and for each board we add its own environment, which compiles only its folder in src:
; settings shared by all the boards
[env]
platform = atmelavr
board = uno
framework = arduino
monitor_speed = 9600

; the Uno with the game rules: compiles only src/game
[env:game]
build_src_filter = +<game/>

; the Uno that drives the coils: compiles only src/coils
[env:coils]
build_src_filter = +<coils/>
In Project Tasks each environment has its own Build and Upload commands. Also add each environment’s upload_port, so the program goes to the right Uno.
Help from the editor
- Word completion: as you type, VS Code offers the names of functions and variables. Tab or Enter accepts the suggestion.
- Errors as you type: a red wavy line under an error, and a list of all errors in the Problems panel (Ctrl+Shift+M).
- F12 (Go to Definition) jumps to where a function or variable is written, even in another file.
- F2 (Rename Symbol) changes the name of a function or variable everywhere in the project at once.
- Shift+Alt+F (Format Document) lines up the indents neatly.
- Ctrl+Shift+F searches for a word in all the project’s files.
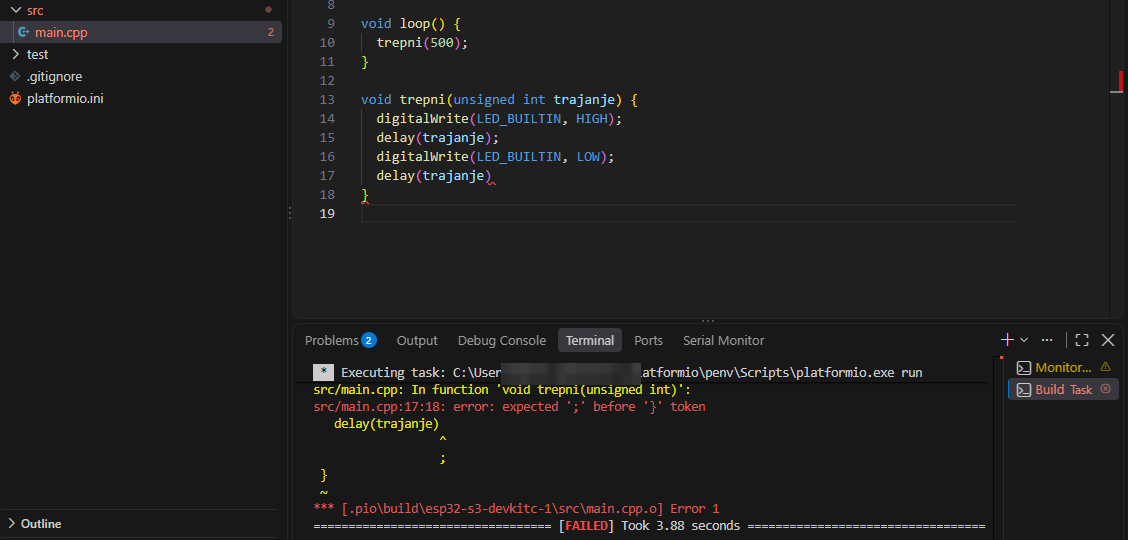
; is missing on line 17. VS Code underlines it as you type, the Problems tab counts the errors, and Build reports the error and FAILED in the terminal. The project in the picture is for an ESP32 board, whose newer compiler reports line 17 itself. The compiler for the Uno reports the same error on the next line, as in the Arduino IDE.Sometimes VS Code underlines something that compiles fine, for example right after you make a project. The real test is Build. If the lines don’t go away even after a successful build, run PlatformIO: Rebuild IntelliSense Index from the command palette.
When something doesn’t work
- Compile errors are the same as in the Arduino IDE, because the compiler is the same too. See the troubleshooting tips.
was not declared in this scopeafter moving a program from the Arduino IDE:#include <Arduino.h>or a function declaration is missing.- The port is busy: close the Serial Monitor (Ctrl+C in the terminal) and upload again.
- The program went to the wrong board: check the environment and
upload_port. - Installing or compiling reports strange errors about paths: check whether the project’s path has special letters in it.
Moving a program from the Arduino IDE
- In PIO Home → Projects click Import Arduino Project and choose the folder of the
.inoprogram. PlatformIO makes a project from it. - Or by hand: make a new project, copy the program into
src/main.cpp, add#include <Arduino.h>and the function declarations at the top, and add the libraries tolib_deps.
 What did we learn?
- PlatformIO is an extension for VS Code that compiles and uploads programs for microcontrollers and looks after boards and libraries.
- The project’s settings, the board, the speed and the libraries with their versions, are written in
platformio.ini, so everyone in the team works with the same ones. - In
main.cppwe write#include <Arduino.h>and the function declarations ourselves, which the Arduino IDE does by itself. - We split a larger program into parts, each with a
.hand a.cppfile. - We save projects in a folder with no special letters in its path.
Short quiz
1. What is PlatformIO?
2. Why is it useful for a team that the libraries are written in platformio.ini?
3. A program compiles in the Arduino IDE, but in PlatformIO it reports 'digitalWrite' was not declared in this scope. What is missing?
#include <Arduino.h> at the top of main.cpp. The Arduino IDE adds it to an .ino file by itself.4. Why mustn't you save a project in the folder C:\Users\Šime\Documents?
5. What do we write in a .h file, and what in a .cpp file?
.h a list of what the part of the program offers, the function declarations. In the .cpp the functions themselves, how it is done.6. Four Unos are connected to the computer. How do you make sure the program goes to the right one?
upload_port into its environment in platformio.ini and upload from that board’s environment.