
LED
How an LED works: which way round it goes, why it needs a resistor and how to work it out, each colour's voltage, brightness and PWM, and RGB LEDs.
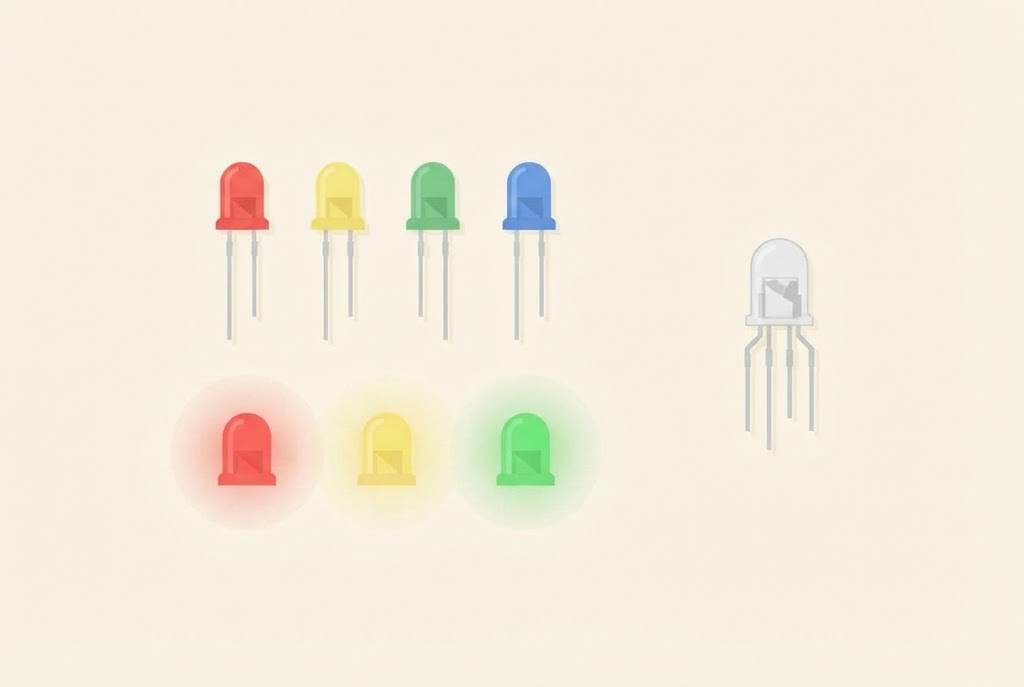
What is an LED?
An LED is a diode that gives light. The name stands for light-emitting diode. Like every diode, it lets current through in one direction only, from the anode to the cathode, and it shines only while that current flows.
LEDs are in traffic lights, torches, screens and on every board we use: the Arduino and the micro:bit both have their own. They use little current, get only a little warm and last tens of thousands of hours. The colour of the light depends on the material the LED is made of, not on the colour of the plastic around it.
Which way round?
An LED has two legs, and it matters which is which:
- the longer leg is the anode (A), plus,
- the shorter leg is the cathode (K), minus. On that side there is also a flat edge on the LED’s bottom rim, and inside a larger piece of metal.
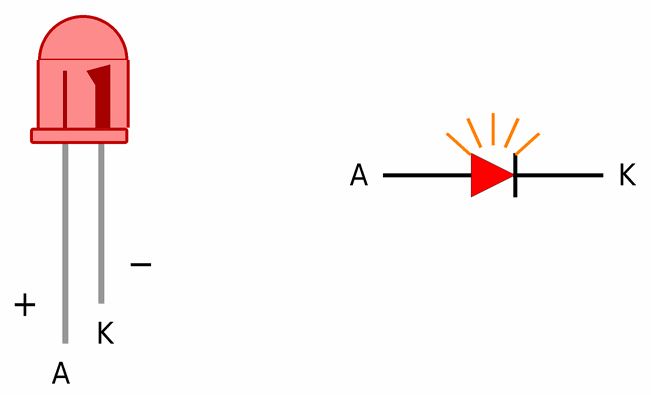
If you put an LED in the wrong way round, it doesn’t light up, but usually it isn’t damaged. Turn it round and try again. Just make sure that, the wrong way round, it doesn’t get more than about 5 V, which is what it usually withstands.
Why does an LED need a resistor?
An LED doesn’t limit the current by itself. The graph shows the current through a red, a green and a blue LED as the voltage across them rises:
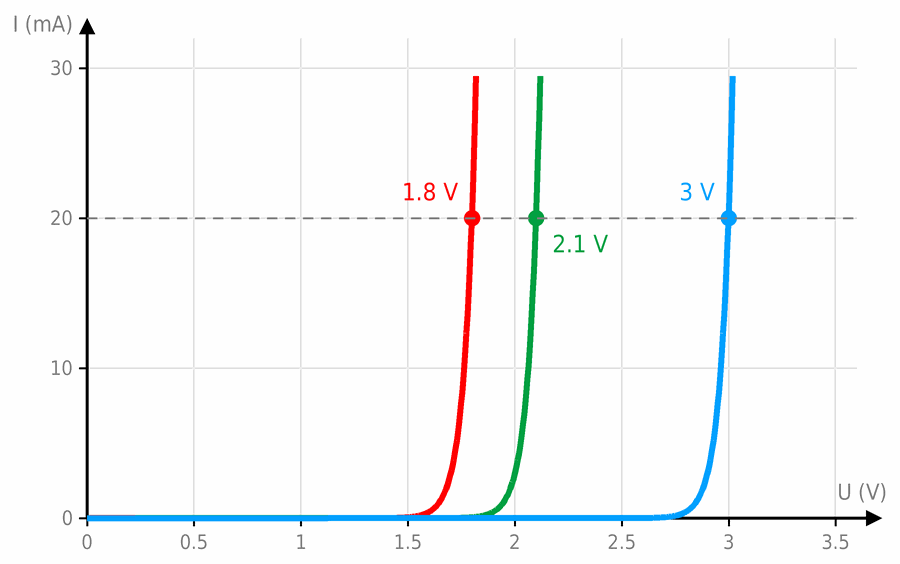
While the voltage is small, no current flows through the LED and it doesn’t shine. When the voltage reaches the forward voltage, about 1.8 V for red, the current rises steeply. Only a little more voltage gives much more current. Connected straight to 5 V, the LED would draw far more current than it may and burn out, perhaps taking the Arduino’s pin with it. That is why we always connect it through a resistor, which limits the current (misconception 13).
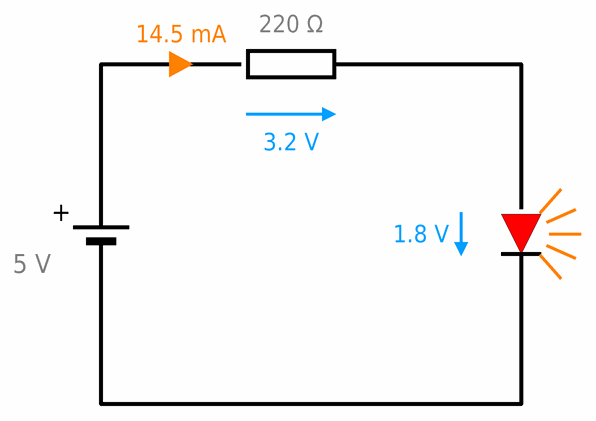
Colours and voltage
Each colour has its own forward voltage. Blue and white need almost twice the voltage of red, so with the same resistor a smaller current flows through them:
| Colour | Forward voltage (at 20 mA) | Resistor on 5 V for about 15 mA |
|---|---|---|
| red | about 1.8 V | 220 Ω |
| orange and yellow | about 2.0 V | 220 Ω |
| green | about 2.1 V | 220 Ω |
| blue and white | about 3.0 V | 150 Ω |
For blue: (5 V − 3 V) / 0.015 A ≈ 133 Ω, so we take the next larger value, 150 Ω. The exact voltage is in the LED’s technical documentation (datasheet).
Brightness and PWM
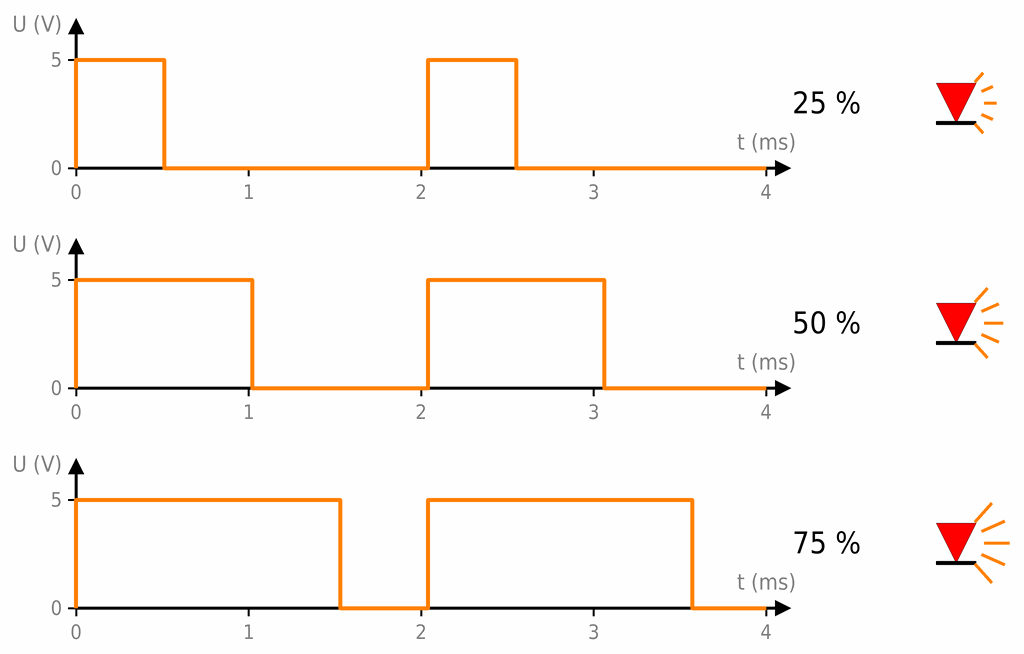
The larger the current through an LED, the brighter it shines. An Arduino can’t gently change its current, but it can switch it on and off very fast. This is called PWM. The graph shows the pin’s voltage when the LED is on a quarter, half and three quarters of the time:
Don't look straight into a bright LED
The small LEDs from the workshop are not dangerous for your eyes, but bright LEDs from torches, especially blue and white ones, can dazzle and damage the eye. Don't look straight into them, and don't point them into anyone's eyes.
The LED in the Arduino workshop
From here on, this page is for the Arduino workshop.
How many LEDs may one pin drive?
An Arduino Uno pin may supply about 20 mA (the absolute maximum is 40 mA), and all the pins together at most about 200 mA. One LED with a 220 Ω resistor uses about 15 mA, so we connect one LED to one pin. For more LEDs or brighter light you need a transistor, see the Transistor page.
Several LEDs
- In parallel each LED needs its own resistor. Two LEDs on a shared resistor don’t share the current equally, so one shines brighter than the other, and it may burn out (misconception 15).
- In series the same current flows through all the LEDs, and their forward voltages add up. Two red LEDs on a 9 V battery need (9 V − 2 · 1.8 V) / 0.015 A = 360 Ω, so we take 390 Ω. On 5 V you can connect at most two red LEDs like this, and two blue ones not at all, because they need 6 V.
RGB LEDs
An RGB LED has three LEDs in one case: red (R), green (G) and blue (B). By mixing their brightnesses you get almost any colour: red and green give yellow, and all three give white. It has four legs. The longest is the shared one: the cathode on LEDs with a common cathode, or the anode on those with a common anode.
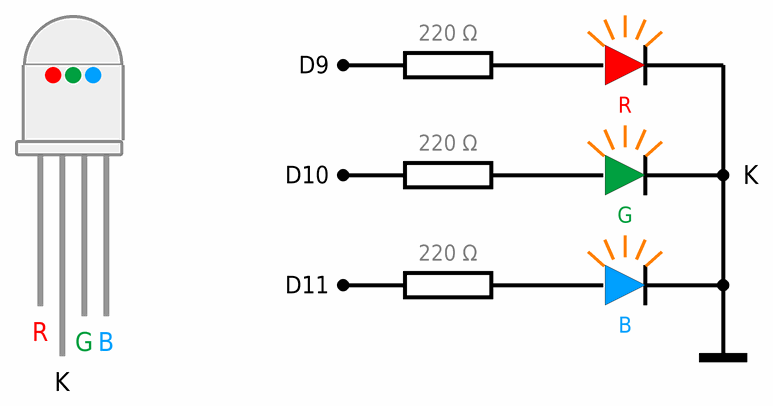
LOW, so everything in the program is the other way round.LED strips and addressable LEDs
Some LEDs, such as the WS2812 (also sold under the name NeoPixel), have a small chip inside. They are all connected by one data wire, and each one knows its own colour. That way one pin controls a strip of a hundred LEDs. But mind the current: one such LED at full white uses up to 60 mA, so a strip of 100 LEDs needs up to 6 A. Such a strip must not be powered from the Arduino, but from its own power supply, with a common GND.
 What did we learn?
- An LED is a diode that shines. The longer leg is the anode (plus), and the shorter one the cathode (minus), on the side of the flat edge.
- An LED doesn’t limit the current by itself, so we always connect it through a resistor: R = (U − UF) / I, rounded up to the next larger value.
- Each colour has its own forward voltage: red about 1.8 V, and blue and white about 3 V.
- An Arduino changes an LED’s brightness with PWM: it switches it on and off fast, and the eye sees the average.
- LEDs in parallel each need their own resistor. An Arduino pin may supply about 20 mA.
Short quiz
1. How do you know which leg of an LED is plus?
2. Why don't we connect an LED straight to 5 V?
3. Work out the resistor for a green LED (2.1 V) on 5 V and a current of 15 mA.
4. A blue and a red LED each have the same 220 Ω resistor on 5 V. Which one gets more current, and why?
5. Why does an LED at 25 % PWM look dimmer, even though it is switched to the full 5 V?
6. May you connect three LEDs in parallel to one resistor?