
Servo motor
How an SG90 servo knows its angle: a pulse every 20 ms, three wires, its own power supply, the Arduino Servo library and how long it takes to turn.
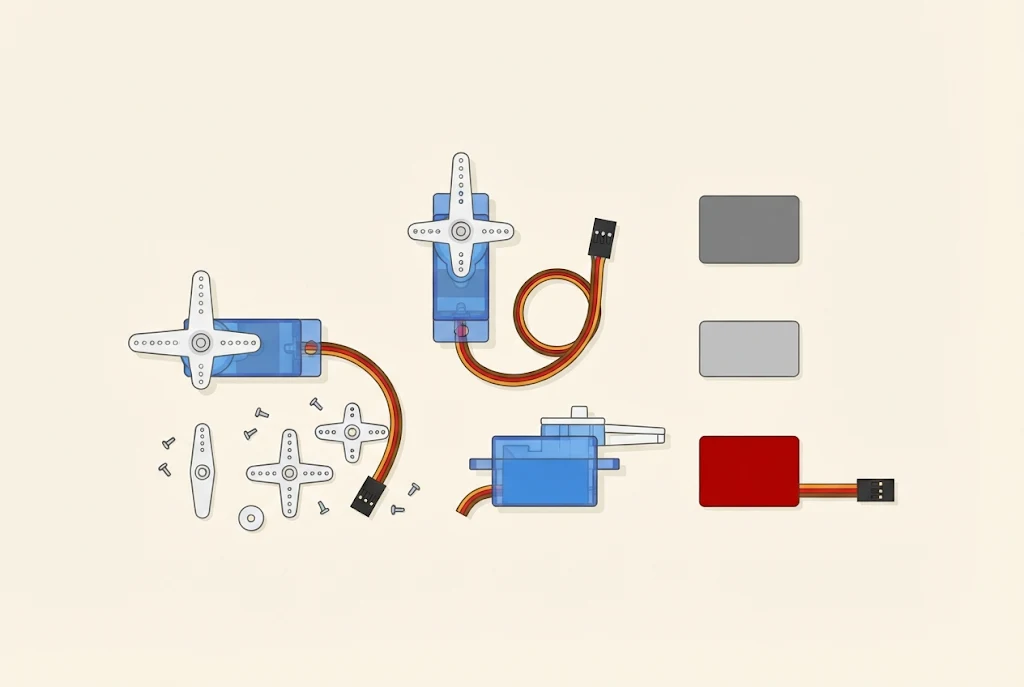
What is a servo motor?
An ordinary motor spins as long as it has current. A servo motor turns to the angle we give it and stays there. The program tells it turn to 90°, and the servo turns and holds that position, even when something pushes it. The most common servos turn from 0° to 180°, half a circle.
You find servos in model planes and boats, where they move the rudders, in robot arms and in toys that wave. In our pinball machine a servo raises the post between the flippers to save the ball.
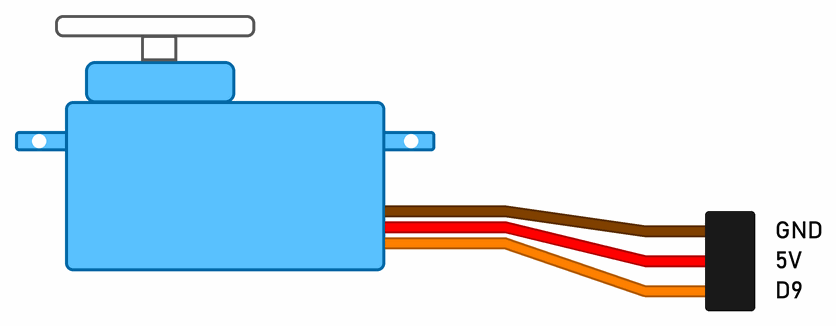
At the workshops we use the small SG90 servo. It weighs about 9 grams and has three wires:
- brown is GND (minus),
- red is the supply of about 5 V (plus),
- orange is the signal, which tells the servo which angle to turn to.
Some servos have wires of other colours: black for GND, red for plus and white or yellow for the signal.
Arms of different shapes (horns) push onto the shaft.
What is inside a servo?
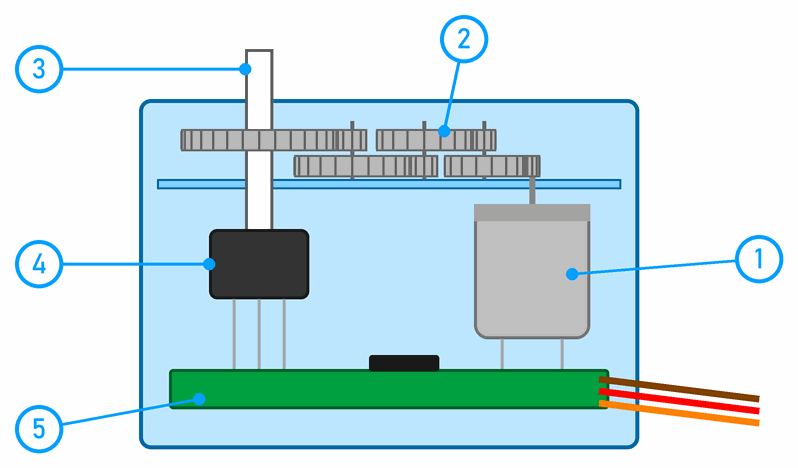
- The motor: small and fast, but weak.
- The gears lower the speed and raise the force. The motor turns many times while the shaft turns once.
- The shaft comes out of the case. The arm goes on it.
- The potentiometer is joined to the shaft and turns with it, so its resistance tells which angle the shaft is at.
- The circuit compares the angle the program asks for with the angle the potentiometer shows. If they differ, it turns the motor until they are the same. If someone moves the arm, the circuit notices and moves it back.
It is like reaching for a cup: your eyes keep telling you how far your hand is, so your hand slows down as it gets close and stops right at the cup.
Don't turn a servo by hand
The gears slow the motor down many times, so the motor turns many times while the arm turns once. When you turn the arm by hand, you drive the whole row of gears backwards, and the small motor at the end of it has to spin much faster than the arm. That takes a lot of force, and the tiny teeth of the plastic gears have to carry it. A tooth cracks or breaks off, and afterwards the servo skips, sticks or doesn't turn at all.
If the servo is switched on, it is even worse: the circuit notices the arm has moved and pushes it back with all its strength. You and the motor are fighting, and the motor draws its highest current and gets hot. So set the arm's position with the program. If you really must move it by hand, for example to push an arm on, switch the power off first and turn it slowly, without force.
How does the servo know which angle we want?
Every 20 milliseconds the orange wire gets a short pulse: the voltage jumps to 5 V and back to 0 V. The angle depends on how long the pulse lasts:
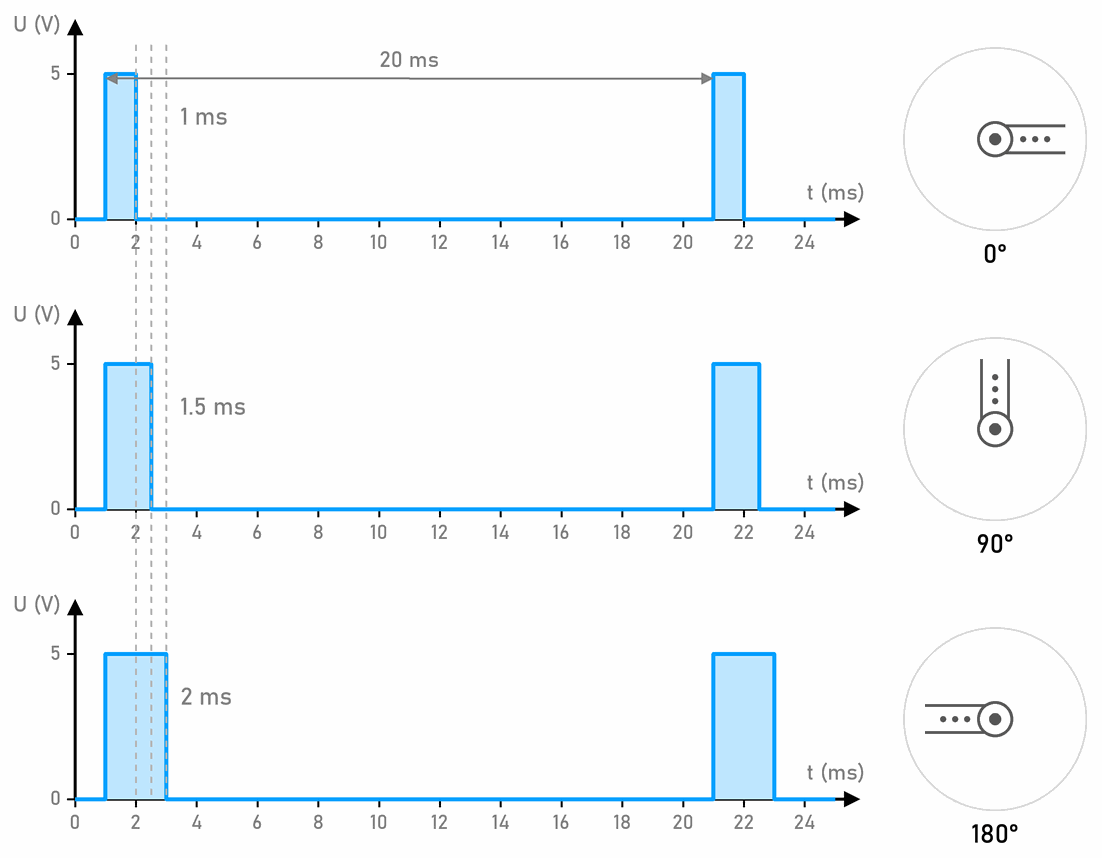
- a 1 ms pulse means 0°,
- a 1.5 ms pulse means 90°,
- a 2 ms pulse means 180°.
A longer pulse means a bigger angle. The exact limits differ a little from servo to servo, but the middle is almost always 1.5 ms.
Positional and continuous servos
Servos come in two kinds:
- A positional servo turns to the angle it is given and stops there, usually somewhere from 0° to 180°. The SG90 is one, and the rest of this page is about it. The pulse tells it where to stop.
- A continuous rotation servo, for example the FS90R, spins round and round like an ordinary motor. The pulse tells it which way and how fast to spin: about 1.5 ms means stop, 1 ms full speed one way, and 2 ms full speed the other way. Pulses in between make it turn more slowly.
A continuous servo has no potentiometer following the shaft, and no end stop that holds the shaft at the end of its travel. So it doesn’t know which angle it is at and can’t stop at a given angle, but it can spin without end. From the outside both kinds look almost the same, so check the kind on the label or in the product description.
A positional servo moves an arm, a rudder or the post in the pinball machine. A continuous one drives the wheels of a small robot, which then needs no separate motor driver.
Where we use it
- At the micro:bit workshop we connect a servo to the Maqueen robot. In MakeCode the servo write pin block, in the Pins category, turns it.
- At the Arduino workshop SG90 servos are part of the pinball machine: they raise the post, and they can move other mechanisms too.
The servo at the Arduino workshop
From here on, this page is for the Arduino workshop.
Power
While it turns, an SG90 uses a few hundred mA, and when it starts or gets stuck, up to 0.7 A. That is far more than a pin may give, and more than USB gives without trouble. When the servo starts, the voltage on the Arduino drops and the Arduino may reset itself. So the servo has its own supply:
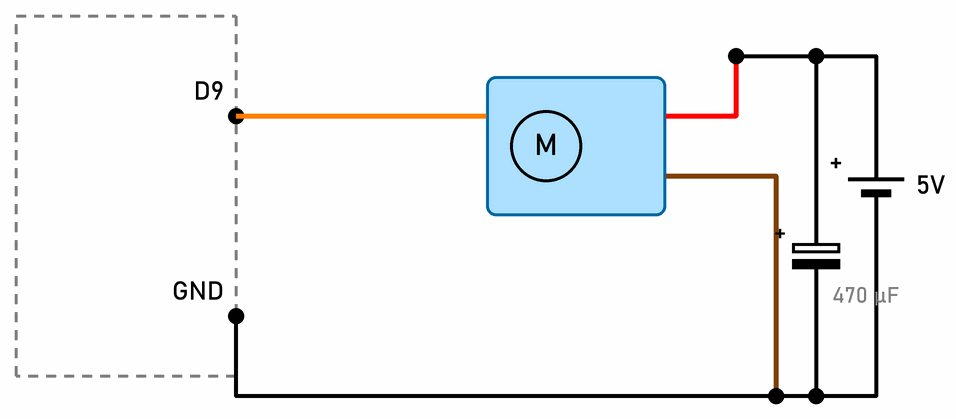
- The signal comes from pin D9, and the servo takes its current from a separate 5 V supply, for example an adapter.
- A 470 µF capacitor next to the servo gives current at the moment the servo starts, so the voltage doesn’t drop. In the pinball machine, with three servos, we use 1000 µF.
- The supply’s GND and the Arduino’s GND must be joined. The servo measures the pulse against its own GND, so without a common ground it can’t tell when the pulse starts (misconception 8).
The Servo library
We don’t have to send the pulses ourselves. The Servo library, which comes with the Arduino IDE, does it:
// C++
#include <Servo.h>                     // the Servo library, comes with the Arduino IDE

Servo servo;                           // our servo
const int servoPin = 9;                // the orange wire

void setup() {
  servo.attach(servoPin);              // from now on D9 sends a pulse every 20 ms
}

void loop() {
  servo.write(0);                      // quickly to 0°
  delay(1000);
  servo.write(90);                     // quickly to 90°
  delay(1000);
  servo.write(180);                    // quickly to 180°
  delay(1000);
  for (int angle = 180; angle >= 0; angle--) {
    servo.write(angle);                // slowly back, one degree at a time
    delay(15);
  }
  delay(1000);
}
What is new in the program?
Servo servo;– Creates an object for one servo. For two servos we would make two objects with different names.servo.attach(servoPin);– From this moment the library sends the pulses to D9 by itself, in the background, while the program does something else.servo.write(90);– Sets the angle in degrees, from 0 to 180. The library turns it into a pulse length: 0° is 544 µs and 180° is 2400 µs. That is a little wider than 1 to 2 ms, so that servos with wider limits also reach the end.- Turning slowly comes from changing the angle by one degree and waiting a little. The whole way from 180° to 0° then takes 181 · 15 ms ≈ 2.7 s.
On the Uno the Servo library uses the timer Timer1, so while any servo is attached, analogWrite() doesn’t work on pins 9 and 10. That is why the servos and the flippers of the pinball machine are not on the same Uno. An Uno can drive up to 12 servos.
Which Uno pins can do PWM?
The Arduino Uno has PWM on six pins: D3, D5, D6, D9, D10 and D11. On the board they are marked with a wavy line (~). Each pair of these pins is driven by one timer, so a command or library that takes a timer takes its two pins as well:
| Pins | Timer | PWM | What else uses it |
|---|---|---|---|
| D5 and D6 | Timer0 | about 980 Hz | millis() and delay(), but PWM still works |
| D9 and D10 | Timer1 | about 490 Hz | the Servo library |
| D3 and D11 | Timer2 | about 490 Hz | tone() and the IRremote library |
A servo doesn't need a PWM pin: the Servo library sends its pulses on any digital pin. A servo's signal isn't the same as PWM from analogWrite(). analogWrite() switches the pin on and off about 490 times a second, while a servo expects one pulse every 20 ms, 50 a second. All the Uno's pins are described on the Pinouts page.
How long does it take to turn?
servo.write() doesn’t wait for the servo to turn. The program goes on at once, while the servo is still turning. The graph shows a calculation for an SG90, which turns 60° in 0.1 s at 4.8 V:
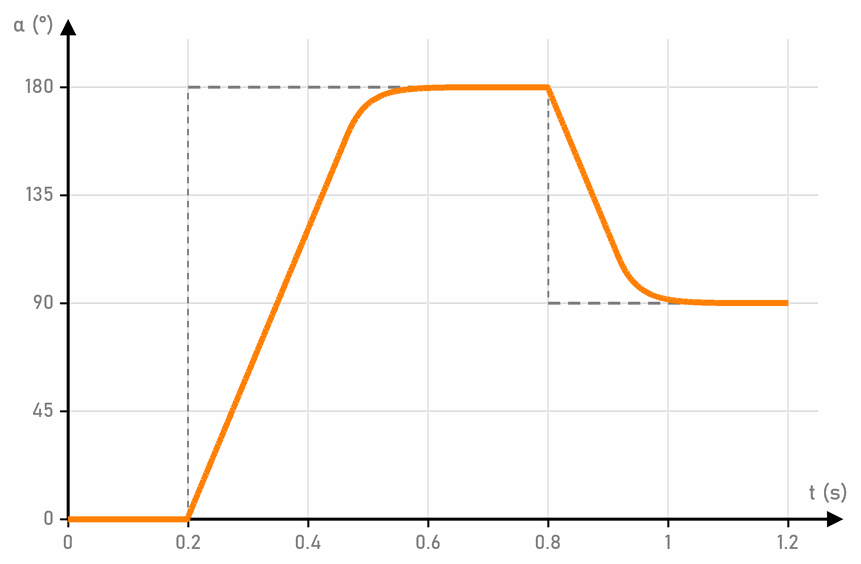
servo.write() the program needs a delay() or a check with millis() before it counts on the arm having arrived.When a servo buzzes
If a servo buzzes and gets warm at the end of its travel, the arm or the mechanism doesn’t let it reach the angle asked for. The circuit then keeps pushing the motor, and the motor draws its highest current. Make the angle smaller then, for example 10° to 170°, or set the pulse limits yourself: servo.attach(servoPin, 1000, 2000); sends 1000 µs for 0° and 2000 µs for 180°.
A continuous servo in the program
A continuous servo is driven with the same Servo library, but servo.write() now sets a speed, not an angle: servo.write(90) stops it, servo.write(0) spins it at full speed one way, and servo.write(180) the other way. Values in between, for example 70 or 110, make it turn more slowly. If the servo still creeps at 90, try 88 or 92: the point where it stands still differs a little from servo to servo.
Moving slowly: a servo without jerks
servo.write() gives the servo a new angle, and the servo rushes there at full speed. A sudden start and a sudden stop knock the gears inside the servo and the mechanism it moves: an arm, a post or the joint of a robot arm. The heavier the mechanism, the harder the knock. So we don’t give a big move all at once, but lead the servo to its target slowly, in small steps:
// C++
#include <Servo.h>

Servo servo;
const int servoPin = 9;
const int START_ANGLE = 90;            // where the servo stands when the program starts
const unsigned long STEP_MS = 15;      // one degree every 15 ms: 60° in 0.9 s

int servoAngle = START_ANGLE;          // the angle the servo was last given
int servoTarget = START_ANGLE;         // the angle the servo moves to, slowly
unsigned long servoLastStep = 0;       // when the servo last moved
unsigned long lastChange = 0;          // when we last changed the target

void setup() {
  servo.write(START_ANGLE);            // the first pulse already carries the start angle, not 90°
  servo.attach(servoPin);
}

void loop() {
  // an example: a new target every 4 seconds, 160° and 20° in turn
  if (millis() - lastChange >= 4000) {
    lastChange = millis();
    if (servoTarget == 160) {
      servoTarget = 20;
    } else {
      servoTarget = 160;
    }
  }

  moveTowardsTarget(servo, servoAngle, servoTarget, servoLastStep, STEP_MS);
}

// Moves the servo one degree towards the target, if stepMs have passed since the last step.
// Parameters with & are references: the function changes the very variables it was called with.
void moveTowardsTarget(Servo &s, int &angle, int target, unsigned long &lastStep, unsigned long stepMs) {
  if (angle == target) {
    return;                            // already there
  }
  if (millis() - lastStep < stepMs) {
    return;                            // not yet time for the next step
  }
  lastStep = millis();
  if (target > angle) {
    angle = angle + 1;
  } else {
    angle = angle - 1;
  }
  s.write(angle);
}
What is new in the program?
servoAngle,servoTargetandservoLastStep– The program remembers the angle the servo was last given, the angle it should reach and when the last step was taken. The rest of the program only changesservoTarget.moveTowardsTarget(servo, servoAngle, servoTarget, servoLastStep, STEP_MS);– The function gets everything it needs as parameters and touches no global variable. That is why you can use it for more than one servo. For a second servo, for examplearm, you make its own variables and call the same function:moveTowardsTarget(arm, armAngle, armTarget, armLastStep, STEP_MS);. Both then move at the same time, each towards its own target.int &angle– The&says that the parameter is a reference. The function doesn’t get a copy of the value, but changes the very variable it was called with: when it increasesangle,servoAngleincreases. The same goes forlastStepand for the servo,Servo &s. The function only readstargetandstepMs, so it gets them as ordinary parameters, without&.millis() - lastStep < stepMs– A step is taken only when 15 ms have passed since the last one, like debouncing in the lesson on buttons. The program doesn’t wait, soloop()can read buttons and sensors in the meantime. Turning slowly withdelay(), as in the program above, would stop everything else until the servo has turned.STEP_MS– Sets the speed: with 15 ms the servo covers 60° in 0.9 s, six times slower than at full speed (0.1 s for 60°). With 30 ms it goes half as fast.servo.write(START_ANGLE);beforeservo.attach()– The program doesn’t know where the arm is when the Arduino starts. Without this, the library’s first pulse would ask for 90°, and the servo would rush there. This way the first pulse carries the start angle. The servo still jumps to the start angle, but only if someone moved it while it was off.
In a real program the target isn’t changed by a clock but by an event: a button press, a message from another Arduino or a sensor reading. For an even softer move, the step can be bigger while the servo is far from the target and smaller as it gets close.
 What did we learn?
- A servo turns to the angle it is given and holds it. Inside are a motor, gears, a potentiometer and a circuit that compares them.
- The SG90 has three wires: brown (GND), red (5 V) and orange (signal).
- The angle is set by the length of a pulse that comes every 20 ms: about 1 ms for 0°, 1.5 ms for 90° and 2 ms for 180°.
- A servo has its own 5 V supply, with a common GND and a capacitor.
servo.write()doesn’t wait for the servo to turn. On the Uno the Servo library turns off PWM on pins 9 and 10.- A big move is given in small steps towards the target, with
millis(), so that we don’t knock the gears and the mechanism. - A positional servo stops at the angle it is given. A continuous one has no potentiometer, so it spins round and round, and the pulse sets its direction and speed.
Quick quiz
1. How is a servo different from an ordinary motor?
2. How does a servo know which angle it is at?
3. How long is the pulse for 90°, and how often does it come?
4. When the servo starts, the Arduino resets. What is most likely wrong?
5. A program calls servo.write(180) and straight after it reads a sensor at the arm. Why doesn't the sensor report yet that the arm has arrived?
servo.write() doesn’t wait. An SG90 needs about 0.37 s to turn from 0° to 180°, so the program needs a delay() or a check with millis().6. On an Uno, a servo is on D9 and you want to dim an LED on D10 with analogWrite(). Why doesn't it work?
7. How is a continuous servo different from a positional one?