
Soldering
How to solder safely: iron, solder and flux, fumes and burns, a good joint step by step, eight common faults, desoldering and cleaning the board.
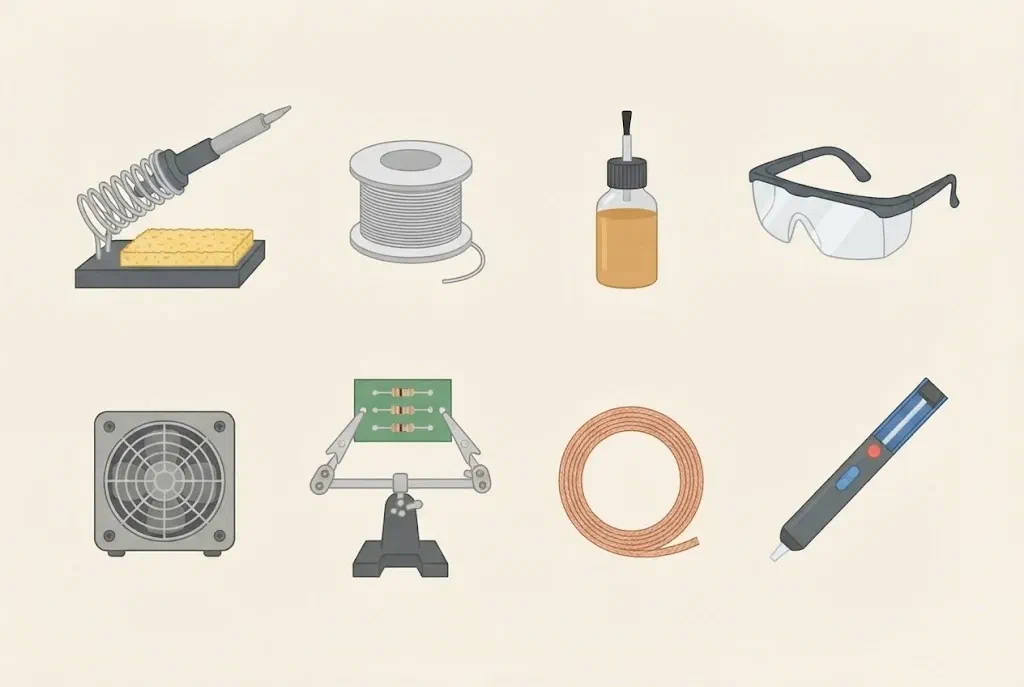
What is soldering?
Soldering joins metal parts with molten metal called solder. The soldering iron heats a component’s lead and the copper on the board, and the solder melts on them and flows. When it cools, the solder holds the lead in place and carries current between it and the copper.
On a breadboard, parts are only pushed in, so you can move them easily. A soldered joint is permanent: it doesn’t work loose when the device shakes, as in the pinball machine, and it doesn’t come out when someone pulls a wire. That is why we solder circuits that have to work for a long time.
Soldering is for the Arduino workshop (ages 12 and up). Younger participants solder only together with an adult, who holds the iron or guides their hand.
Safety first
Only solder with an adult present
The tip of a soldering iron is at 300 to 400 °C, and molten solder can spit. Before you solder for the first time, the instructor or a parent must be with you and show you how.
- Hold the iron like a pen, by the handle. Never touch the metal part, even when you think it has cooled down.
- When you aren't soldering, the iron is in its stand, even if you put it down for only a few seconds.
- If the iron falls, don't try to catch it. Move your hands and feet away and let it fall.
- Keep the iron's cable away from the tip. The tip melts the cable's insulation.
- Wear safety glasses: clipped leads fly, and solder can spit.
- Don't lean over the joint. The fumes irritate your eyes and airways.
- Don't eat or drink at the soldering table, and wash your hands with soap after soldering.
- Never solder a circuit that is connected to a battery, USB or another power supply.
- When you finish, switch the iron off and leave it in its stand. The tip stays hot for several minutes.
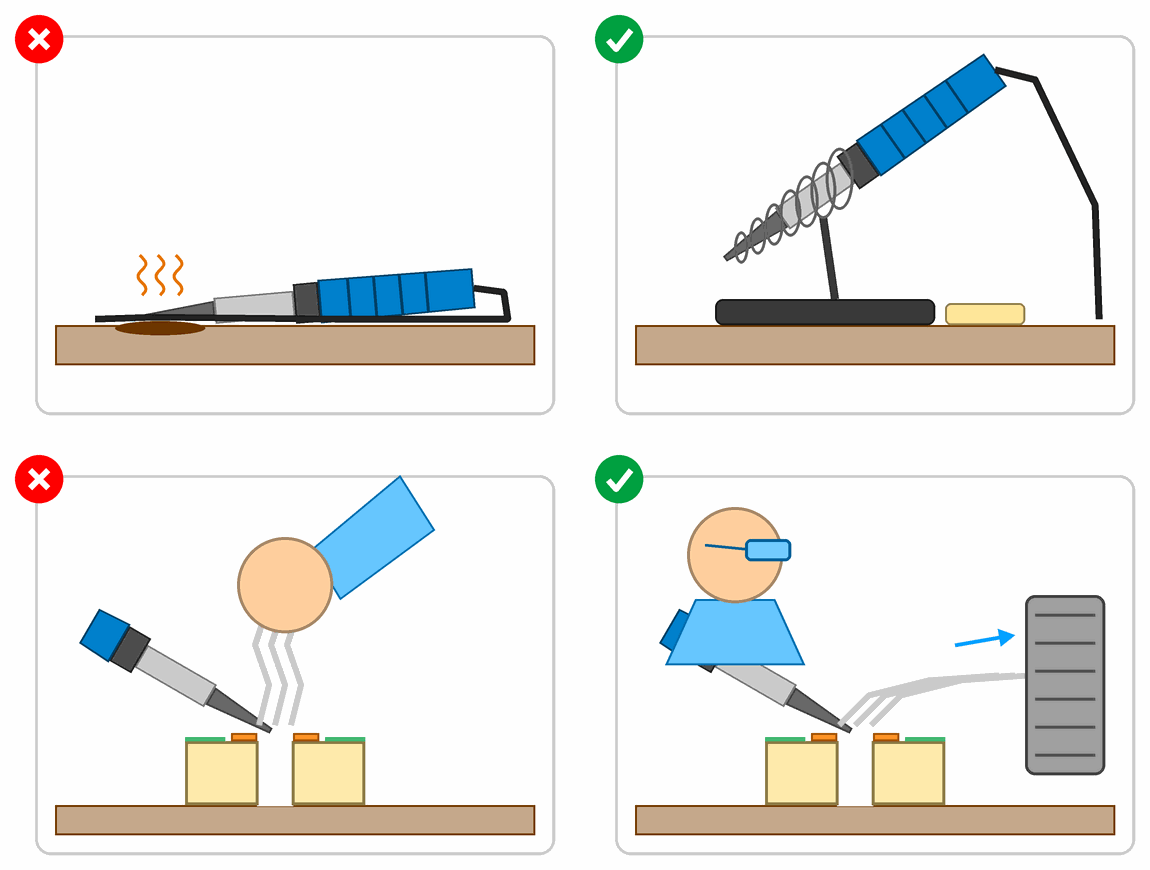
The iron always goes in its stand. An iron lying on the table burns the table, its cable or your sleeve, and if it rolls, it falls on the floor or on your foot. The stand has a spiral that the iron goes into and a heavy base so that it doesn’t tip over.
We don’t breathe the fumes. The smoke that rises from the joint is mostly burnt flux, the resin inside the solder (more about it under Tools). It irritates the eyes, nose and throat, and it can cause asthma in people who solder a lot. So work with a window open or with a fan with a filter, which pulls the fumes away from your face, and don’t put your head over the joint.
Lead stays on your fingers. Solder often contains lead, which is poisonous. At soldering temperatures lead doesn’t evaporate (it boils only at about 1750 °C), so it isn’t in the fumes. But it stays on your fingers and the table, and from your fingers it easily gets into your mouth. That is why we don’t eat or drink at the soldering table and wash our hands with soap.
If you burn yourself
- Straight away, hold the burn under lukewarm running water and keep it there for 20 minutes.
- Tell the instructor or a parent.
- Don’t put ice, butter, oil or cream on it.
- If the burn is bigger than a coin, on the face, or has a blister, a doctor should see it.
Tools
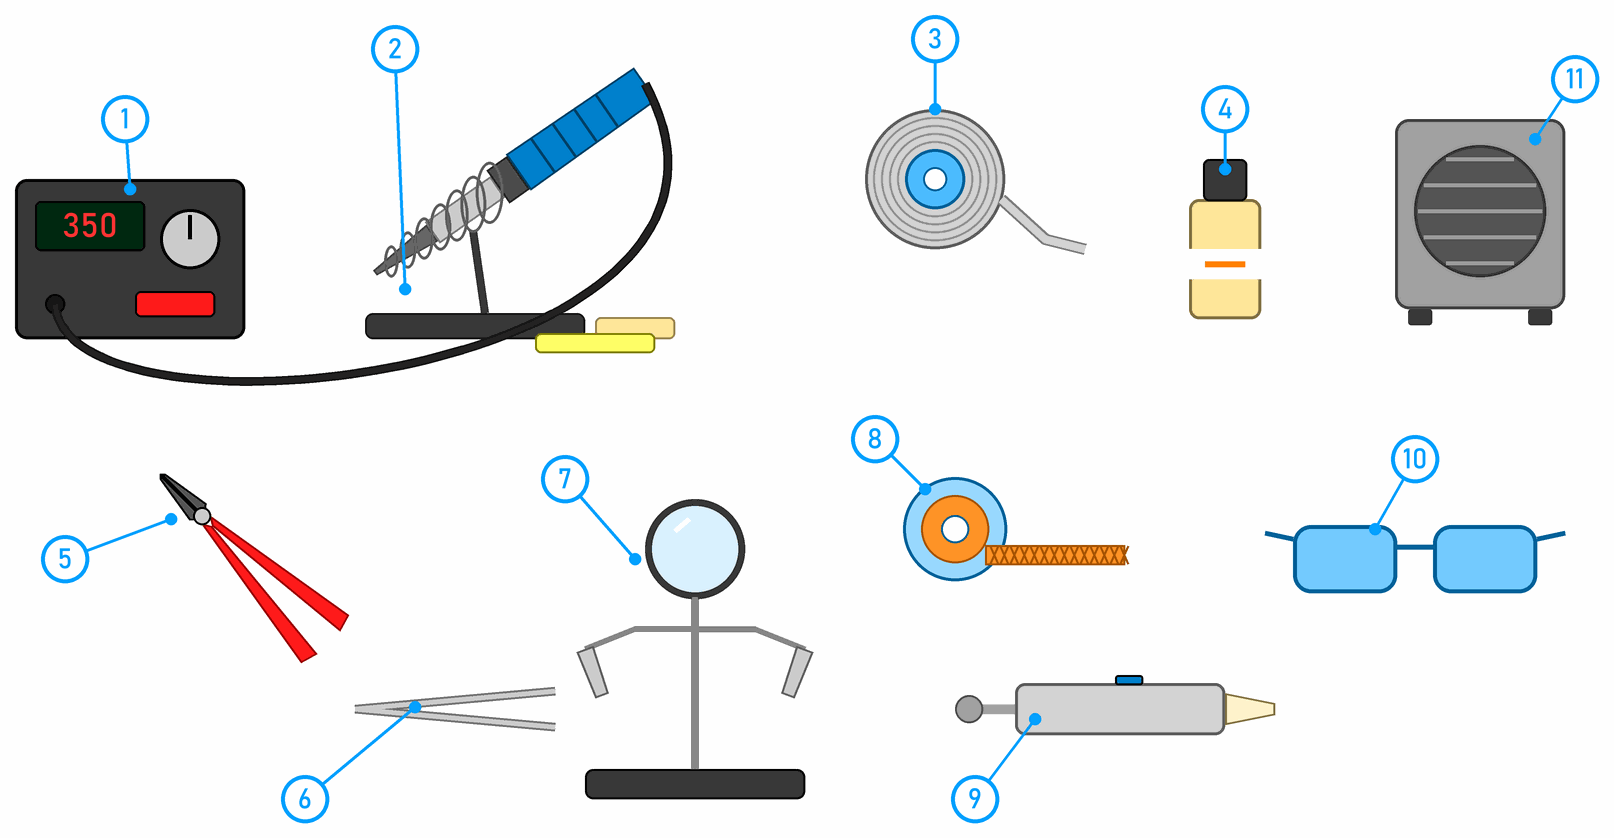
The numbers are the same as in the picture:
- A soldering station, a soldering iron with adjustable temperature. An iron without temperature control gets too hot while it waits in the stand and not hot enough when you solder a bigger joint.
- A stand with a sponge or brass wool for cleaning the tip. The sponge should be damp, not wet.
- Solder, a thin wire 0.5 to 1 mm across. It has a core of flux (usually rosin, a resin from pine trees). The flux removes the thin layer of oxide from the metal, so the solder flows instead of staying a ball.
- Liquid flux or flux paste for joints that the solder doesn’t take to easily, and for desoldering.
- Side cutters for clipping leads.
- Tweezers for small parts.
- A helping hand, a holder that keeps the board or wires still while both your hands are busy with the iron and the solder. Many have a magnifier too.
- Desoldering braid (see Desoldering).
- A desoldering pump.
- Safety glasses.
- A fan with a filter, which pulls the fumes away.
Temperature
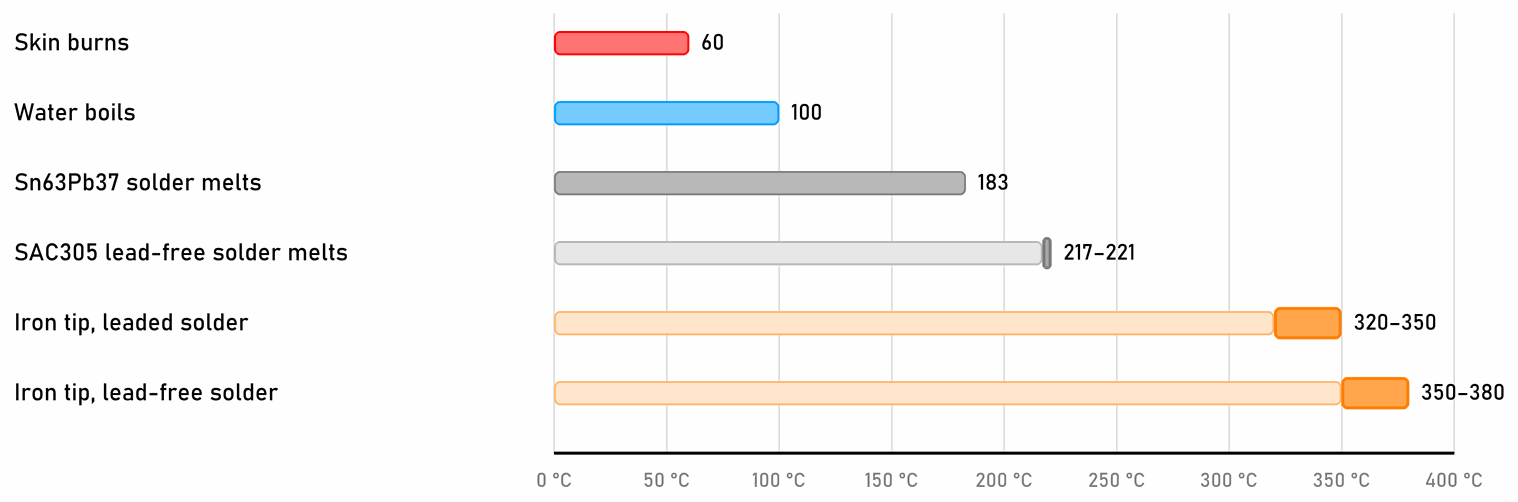
Solder melts below 230 °C, but the iron’s tip is much hotter, 320 to 380 °C. The heat from the tip has to flow quickly into the lead and the copper, and they carry it away at once, so the joint reaches the solder’s melting point only when the tip is much hotter than that.
Hotter isn’t better. The flux then burns away before it has cleaned the joint, the tip oxidises and turns black faster, and the copper can come off the board (fault 8 in the picture under A good joint and a bad one).
Compare it with skin: something at just 60 °C burns the skin in a few seconds, and the iron’s tip is six times hotter.
Leaded or lead-free solder?
- Leaded solder (Sn63Pb37: 63 % tin and 37 % lead, or Sn60Pb40) melts at 183 °C. It flows easily and gives a shiny joint, so it is easier to learn with.
- Lead-free solder (usually SAC305: tin with 3 % silver and 0.5 % copper) melts at 217 to 221 °C. It needs a hotter iron and a bit more practice, and a good joint is dull, not shiny. Devices sold in the European Union must be soldered with lead-free solder, with a few exceptions.
You work the same way with both, and the same rules apply: the fumes come from the flux, which is in both.
How to solder one joint
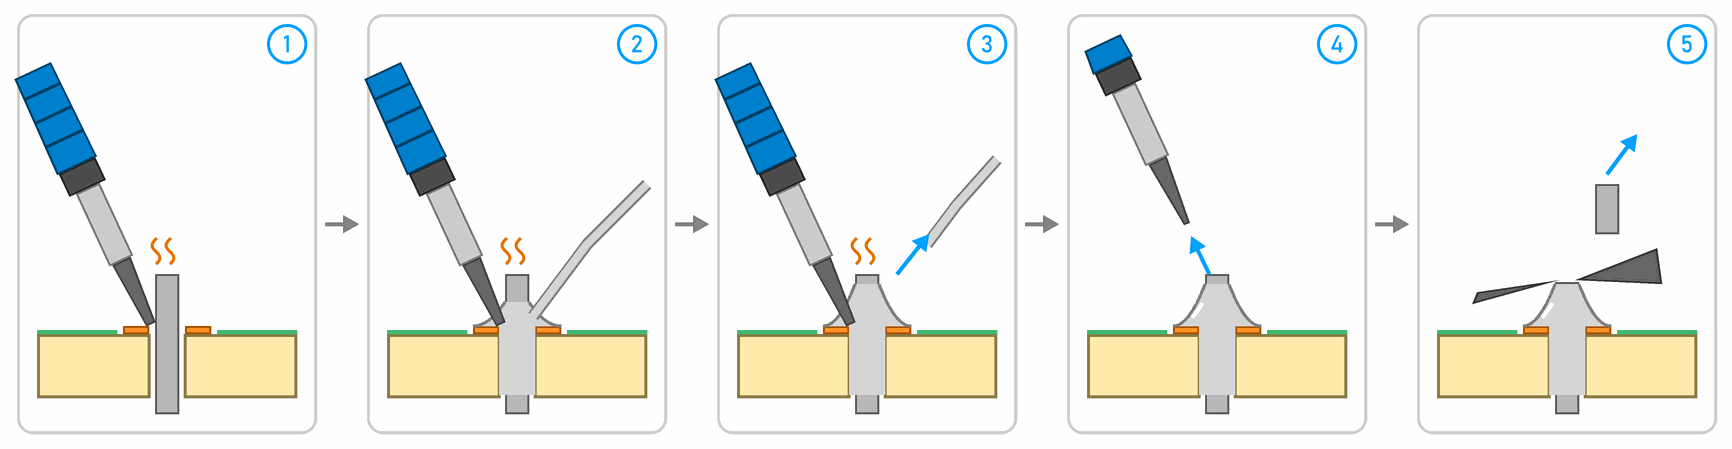
Before you solder:
- Wipe the tip on the sponge or brass wool and put a little solder on it. A shiny tip with a thin layer of solder passes on heat much better than a dry one.
- Push the component into the board and bend its leads apart a little underneath, so it doesn’t fall out when you turn the board over.
Then, as in the picture:
- Heat. Put the tip where it touches both the copper and the lead. Hold it there for 1 to 2 seconds.
- Add solder. Touch the solder to the joint on the other side of the lead, not to the iron’s tip. The solder melts because the joint is hot, and it flows round the lead by itself. Add enough to make a small cone.
- Take the solder away.
- Take the iron away. Don’t move the board or the lead for a few seconds, until the solder sets.
- Clip the lead with side cutters just above the joint. Hold the end of the lead with your other hand so that it doesn’t fly off.
A whole joint takes 3 to 5 seconds. If the solder hasn’t flowed even then, take the iron away, let the joint cool, add a little flux and try again. Heating for longer doesn’t help; it does damage.
On a board, solder the lowest parts first (resistors and diodes, which lie flat on the board), then chip sockets, capacitors, connectors and the tallest parts last. That way every part stays in place when you turn the board over to solder underneath.
A good joint and a bad one
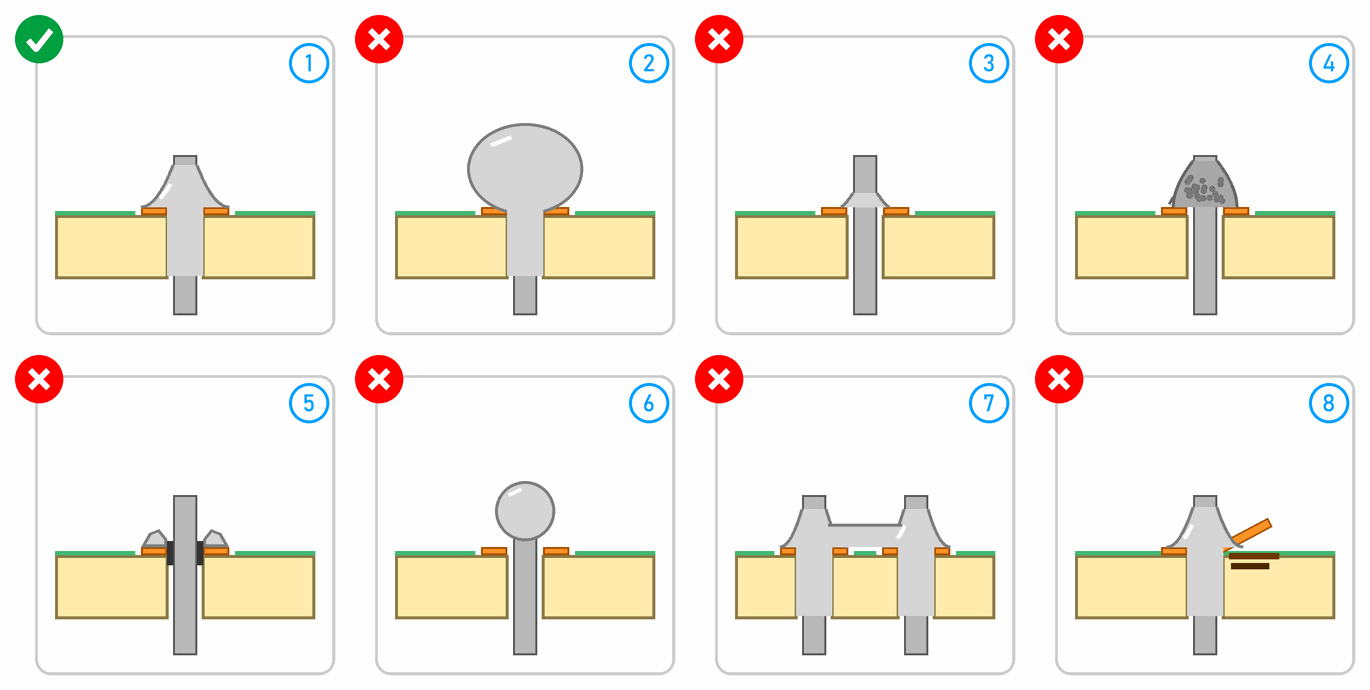
The numbers are the same as in the picture:
- A good joint looks like a small tent or volcano: the solder covers all of the copper, climbs up the lead, and its sides curve inwards. You can see the shape of the lead under the solder. Leaded solder is shiny; lead-free solder is dull.
- Too much solder makes a ball. Under it you can’t see whether the solder really flowed onto the copper, and the ball easily touches the next joint. Remove the extra with desoldering braid.
- Too little solder doesn’t fill the hole or cover all of the copper. The joint may work, but it is weak and cracks easily. Heat the joint again and add solder.
- A cold joint is grey, grainy and lumpy. It happens when the joint wasn’t hot enough or when the lead moved while the solder cooled. Such a joint often works and then stops, for example when the device shakes. Add a little flux and heat the joint until the solder flows.
- The solder didn’t wet the lead: the solder is on the copper, but there is a gap round the lead. The lead wasn’t hot enough, or it was dirty. Heat the lead and the copper together.
- The solder didn’t wet the copper: a ball of solder sits on the lead and doesn’t touch the copper. The copper wasn’t hot, or it was dirty and oxidised. Clean it, then heat both.
- A bridge of solder joins two neighbouring joints. It is a short circuit, and it happens when there is too much solder or when the iron drags solder across the gap. Remove it with braid, or draw the tip of the iron between the joints.
- Lifted copper: heating for too long or at too high a temperature makes the copper come off the board, and the board under it scorches. It is hard to repair (usually with a piece of wire to the next joint), so it is better if it doesn’t happen: heat briefly, and don’t pull the lead while the solder is molten.
Look at each finished joint closely, in good light and with a magnifier. A fault is much easier to see now than to hunt for later when the circuit doesn’t work (see Troubleshooting a circuit).
Desoldering
Sometimes you need to take a part out or remove extra solder:
- Desoldering braid (also called wick) is a strip of thin copper wires with flux. Lay it on the joint and press the iron on top. The molten solder soaks into the braid. Clip off the used, silvery part. The braid gets very hot, so don’t hold it with your fingers close to the joint.
- A desoldering pump sucks up the solder. Cock it, melt the solder with the iron, put the pump’s nozzle against the joint and press the button.
Don’t try to pull out a part with many legs (a chip, a connector) while the other legs are still soldered. Clear the solder from all of them first, then take it out.
Looking after the tip
- Wipe the tip before each joint, not after it. Solder left on the tip between two joints protects it from oxidising.
- Before putting the iron away, put a little more solder on the tip. That keeps it shiny.
- Don’t file the tip or poke holes with it. It has a thin protective coating, and once that is damaged, the tip wears out quickly.
- Don’t press hard with the iron. Force doesn’t pass on heat; a small drop of solder between the tip and the joint does.
Cleaning the board after soldering
When you have finished, a little brown, sticky flux is left around the joints, and cut-off leads and tiny balls of solder are left on the board. Clean the board before you switch the circuit on for the first time.
First, remove the bits of metal. A cut-off lead or a ball of solder can join two tracks and make a short circuit. Turn the board upside down, shake it gently over the table and brush it with a dry brush. Look under the components too.
Then remove what is left of the flux. Whether you need to depends on the flux:
- Solder marked no-clean leaves a thin, clear layer that doesn’t conduct and doesn’t eat into the copper. It can stay.
- Ordinary rosin is brown and sticky. It doesn’t harm the circuit, but dust sticks to it, and it makes the joints under it harder to see. It is better to clean it off.
- Water-washable flux eats into the copper if it stays on the board, so wash it off as the bottle says. Paste for soldering copper pipes contains acid, and we never use it for electronics.
Alcohol is flammable
- Clean the board with an adult present, only once the iron is switched off and cool, and away from any flame.
- The board must not be connected to a battery, USB or any other power supply.
- Pour a little alcohol into a small dish and close the bottle.
- Work with a window open, don't breathe the vapour, and wear safety glasses, because the alcohol splashes off the brush.
- When you have finished, wash your hands with soap.
We remove flux with isopropyl alcohol (isopropanol), as pure as possible, ideally 99 %:
- Dip an old toothbrush or a stiff brush in the alcohol and scrub the joints until the flux dissolves.
- While the alcohol is still wet, wipe it off with a paper towel or a lint-free cloth. If the alcohol dries on the board, the dissolved flux stays behind as a white film. Then clean it once more with a little fresh alcohol.
- Let the board dry completely, for a few minutes, before you switch it on.
Some components must not get alcohol on them: potentiometers, buttons and switches, buzzers, relays that aren’t sealed, microphones and displays. The alcohol gets inside them or washes the grease out of them. Around them, clean only with the tip of the brush and very little alcohol, or solder them on only after you have cleaned the rest of the board.
On a clean board the joints are easy to see, so look at them once more (see A good joint and a bad one).
 What did we learn?
- Only solder with an adult present, wear safety glasses, and always put the iron back in its stand.
- We don’t breathe the fumes (from the flux), and we wash our hands after soldering.
- The tip heats the copper and the lead together, and the solder goes into the joint, not onto the tip.
- A good joint is a concave cone that covers all of the copper. A ball, grey grainy solder and a bridge between joints are faults.
- Cool a burn straight away under lukewarm running water for 20 minutes.
- Before switching on, we remove cut-off leads and solder balls from the board, and we clean off the flux with isopropyl alcohol, but only once the iron is switched off.
Quick quiz
1. The iron slips out of your hand and falls off the table. What do you do?
2. Why does the solder go into the joint and not onto the iron's tip?
3. A joint is grey, grainy and lumpy. What is that fault called, and how do you fix it?
4. Where do the fumes come from when you solder, and why don't we breathe them?
5. Why do we wash our hands after soldering?
6. Solder has joined two neighbouring joints. What is that, and how do you fix it?
7. Why do we clean the board before switching it on for the first time?