
The micro:bit as a controller
The micro:bit as a remote control: the accelerometer measures pitch and roll, the sender sends the direction, and the receiver stops if the link is lost.
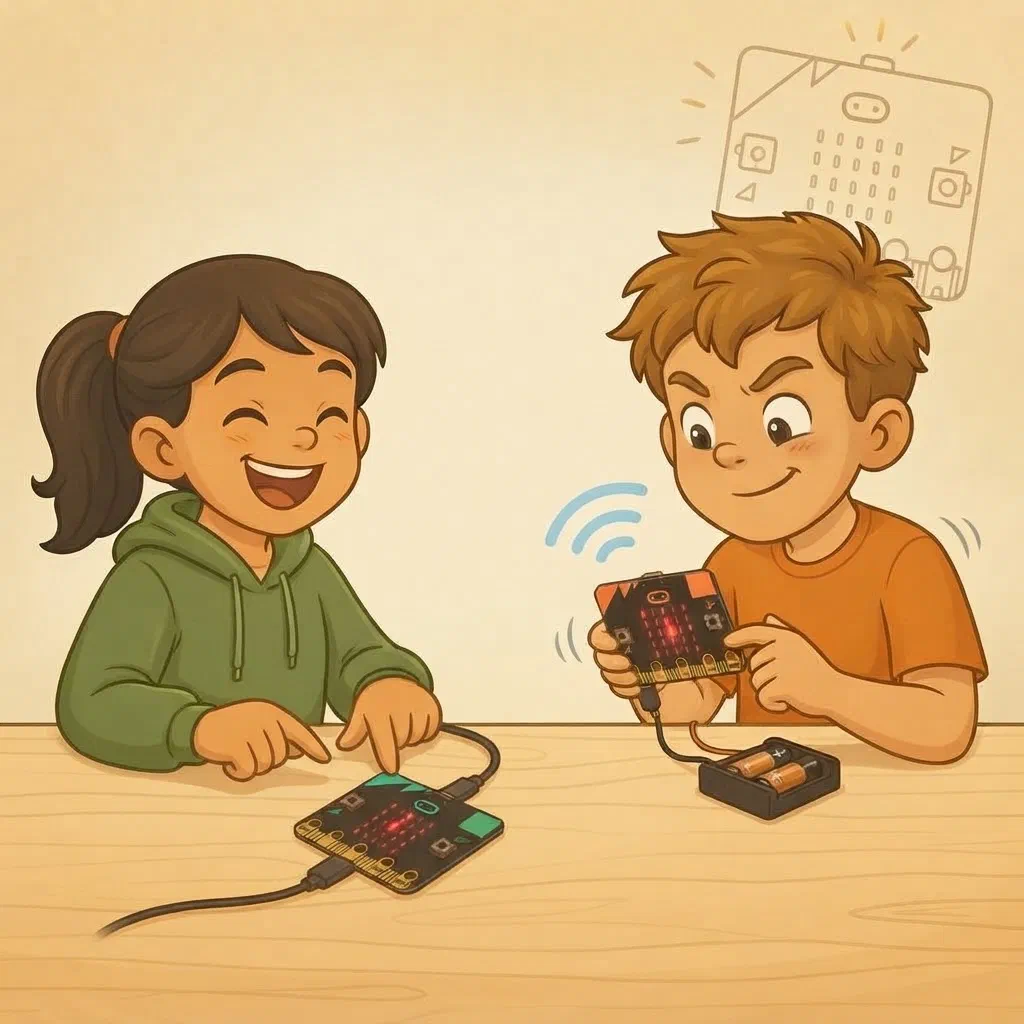
Many real controllers work like this: game consoles that feel the movement of your hand, and remote-control cars and drones. And soon we’ll control robots this way too.
Today we will:
- find out how the micro:bit feels that it’s tilted;
- measure the tilt in degrees;
- turn the tilt into an arrow;
- make a sender that sends the direction and a receiver that shows it;
- teach the receiver to stop when it can’t hear the sender.
Materials
Today everyone has two micro:bits:
- the sender – the micro:bit you hold in your hand, with a battery pack;
- the receiver – the micro:bit that stays on the table, connected with a USB cable.
The sender is the transmitter from the radio games, and the receiver is the receiver. Both micro:bits have a sticker with the number of your radio group (from 11 to 18). One sticker says sender, the other says receiver. Remember your group number; you’ll need it later too.
Two programs that grow
Today you write two programs, one for each micro:bit:
- you build the sender in exercises 1, 2 and 3;
- you build the receiver in exercises 3, 4 and 5.
Each exercise carries on where the previous one stopped. So each exercise says only what you add, change or remove, and a picture shows the new blocks.
How does the micro:bit know it’s tilted?
On the back of the micro:bit there’s a small part called the accelerometer. It feels which way gravity pulls.
Imagine a box with a marble in it. When you tilt the box, the marble rolls to the lower side. The accelerometer has no marble, but it feels the same thing: which side is lower, and by how much.
You already know the accelerometer, even though we didn’t know its name. It’s what recognises shaking in the digital dice and in the steady-hand game.
A micro:bit can be tilted in two ways, like an aeroplane:
- pitch – forward and back, like an aeroplane lowering or raising its nose;
- roll – left and right, like an aeroplane tipping its wings.
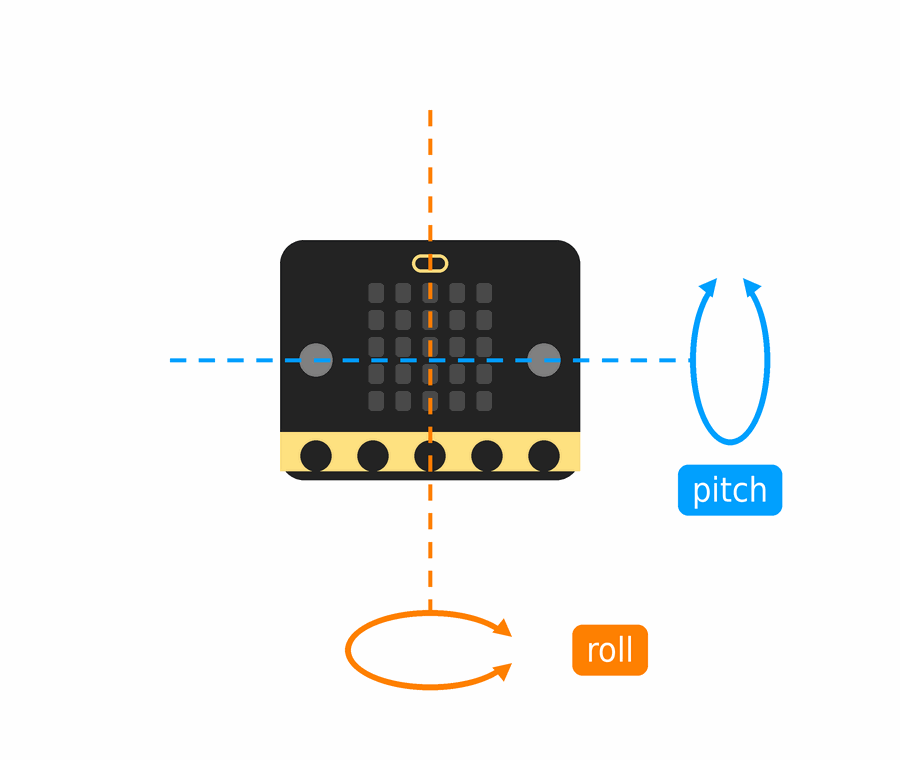
The tilt is read by the rotation (°) block from the Input category. In it you choose pitch or roll, and the block gives back the angle in degrees. When the micro:bit lies flat, the angle is about 0. When it stands upright, the angle is about 90.
How we hold the sender: flat on your palm, screen up, with the logo pointing away from you, like a tray. Forward means tipping the logo end down, away from you.
Why don't we use the on tilt left block?
MakeCode also has the events tilt left, tilt right, logo up and logo down. They run once, when you tilt the micro:bit a lot, almost upright.
That isn't enough for controlling something. We want to know how much the micro:bit is tilted, all the time. That's why we read the angle with the rotation (°) block.
Exercise 1: How much is it tilted?
Program: the sender, step 1 Technique: measuring before programming
Before we teach the micro:bit to control anything, we’ll measure what numbers it gives.
Connect the micro:bit with the sender sticker to the computer. In MakeCode, start a new project and call it Odašiljač (Croatian for “sender”). You’ll work in it in the next two exercises as well.
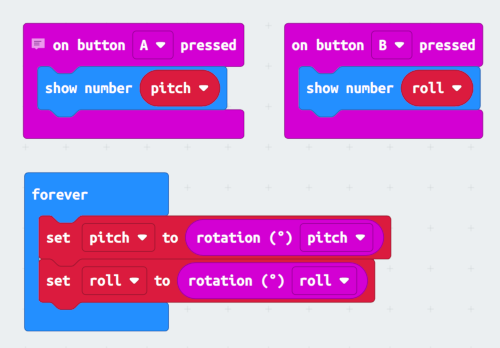
In the forever block, the micro:bit keeps measuring the tilt and stores it in the variables pitch and roll. The buttons just show the measured number.
Predict
Before measuring, guess: when you tilt the micro:bit forward, will pitch be a positive or a negative number? And when you tilt it to the left, what will roll be?
Measure
Hold the micro:bit tilted and press a button. The number scrolls across the screen, so read it carefully. Write the numbers in the table:
| Position | pitch (A) | roll (B) |
|---|---|---|
| Flat | ||
| Forward (logo down) | ||
| Back (logo up) | ||
| Left | ||
| Right |
Check your table
Notice that the number is rarely exactly 0, even when the micro:bit is lying still on the table. The sensor isn’t perfect, and a hand is never completely still. That’s why in the next exercise we’ll say: it’s tilted only if the angle is more than 20 degrees.
Exercise 2: The tilt becomes an arrow
Program: the sender, step 2 Technique: a chain of conditions and a dead zone
We carry on in the Odašiljač project. Now the micro:bit has to decide by itself which way it’s tilted and show an arrow.
The direction is stored in a new variable, smjer (Croatian for “direction”), as a number, because in the next exercise we’ll send it over radio. These are our agreed messages:
| Tilt | smjer | On the screen |
|---|---|---|
| pitch less than −20 | 1 – forward | ↑ |
| pitch more than 20 | 2 – back | ↓ |
| roll less than −20 | 3 – left | ← |
| roll more than 20 | 4 – right | → |
| anything else | 0 – stop | a dot in the middle |
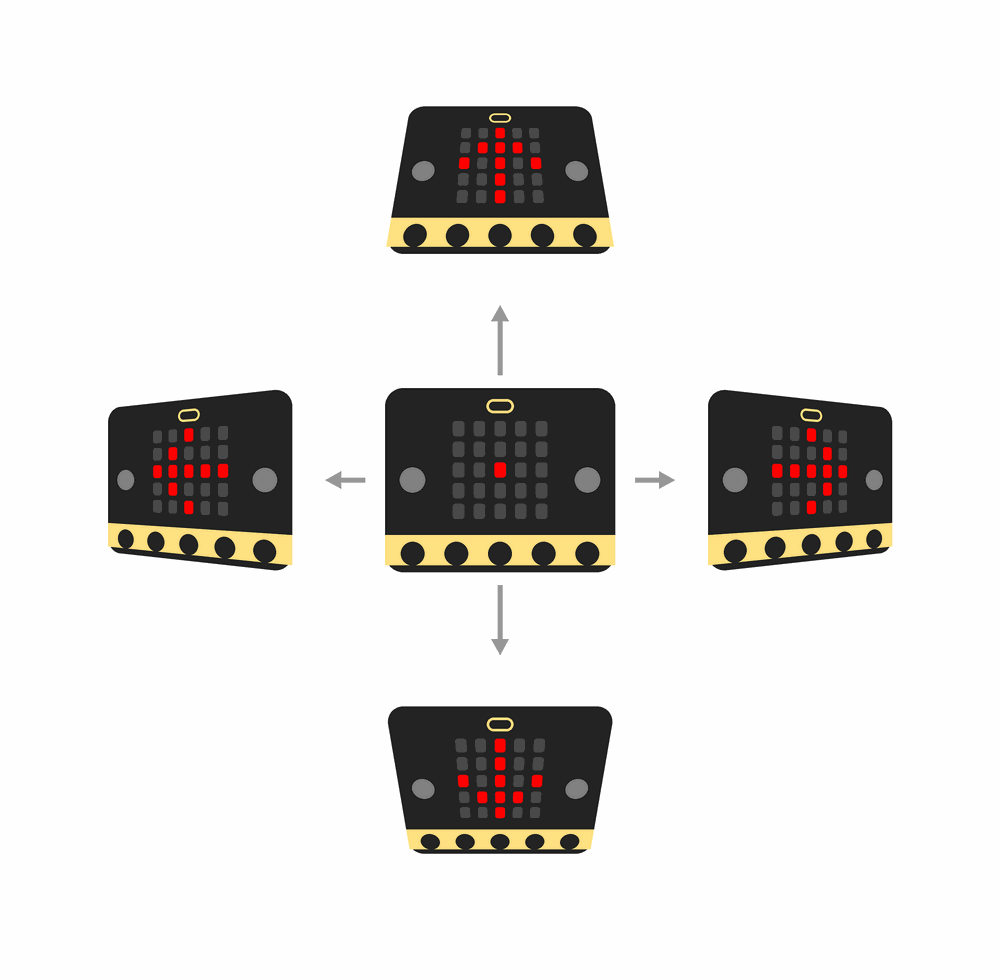
Remove the on button A pressed and on button B pressed blocks. If they stayed, the number and the arrow would fight over the same screen. You have the numbers from exercise 1 in your table anyway.
Add to the forever block, below the two measurements, a chain of conditions that sets smjer, and at the end a call of the function prikaziSmjer (“show direction”). Make the function prikaziSmjer with one number, smjer, like the function Svjetlo in the traffic light.
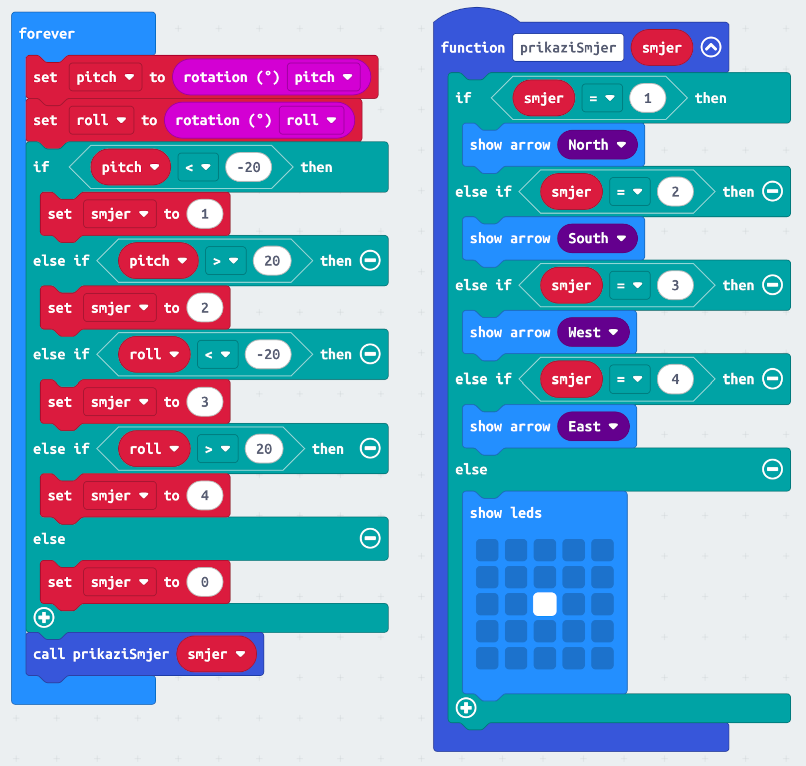
The arrows are shown by the show arrow block from the Basic category; draw the dot with the show leds block.
The dead zone
Between −20 and 20 degrees, the micro:bit doesn’t show any arrow, just a dot. We call this range the dead zone. Without it the arrow would keep jumping, because a hand is never completely still. A robot would twitch at every small movement of your hand.
The order matters
The conditions form a chain: if, then else if, then else if again… The micro:bit checks them from top to bottom and runs only the first one that is true. It doesn’t look at the rest.
What if you tilt the micro:bit both forward and to the left? Both conditions are true, but forward comes before left in the chain, so the arrow pointing up wins.
Predict
- pitch is −35 and roll is 10. What does the screen show?
- pitch is 5 and roll is 25. What does the screen show?
- pitch is −10 and roll is −10. What does the screen show?
Try it
In the simulator you can tilt the micro:bit with the mouse. Then download the program to the sender and tilt it by hand into all five positions in the picture.
Exercise 3: The sender sends, the receiver receives
Programs: the sender, step 3, and the receiver, step 1 Technique: sending regularly
Now take both micro:bits. You hold the sender in your hand, and it sends the direction. The receiver stays on the table and shows what it received.
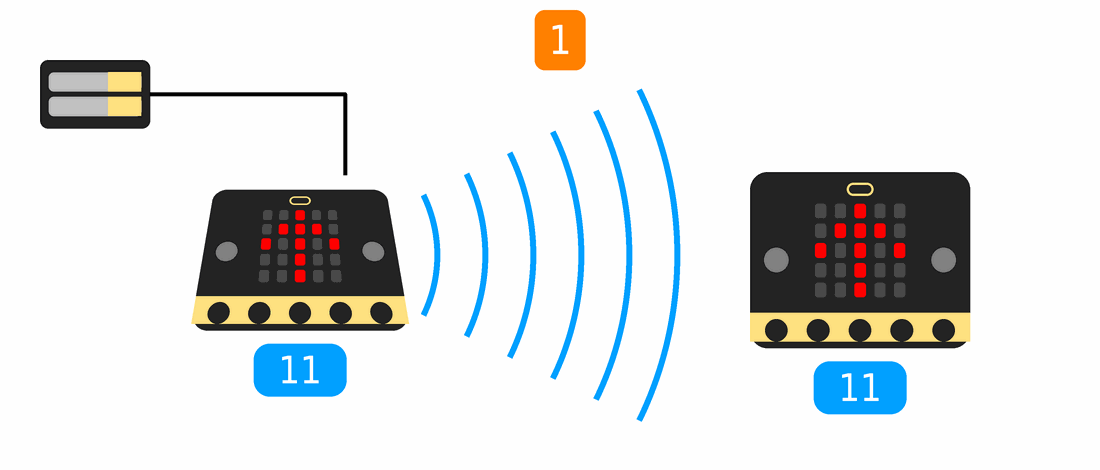
Two micro:bits, two programs
From now on you have two projects, Odašiljač and Prijemnik. It's easy for the sender's program to end up on the receiver. So:
- before downloading, look at the sticker on the micro:bit that is connected to the computer;
- connect only one micro:bit to the computer at a time;
- in both programs, set the radio group number from the sticker;
- program the sender over USB, then unplug it and connect the battery pack.
The sender: step 3
We carry on in the Odašiljač project.
Add the radio group from your sticker to the on start block. Add another forever block that sends smjer every tenth of a second.
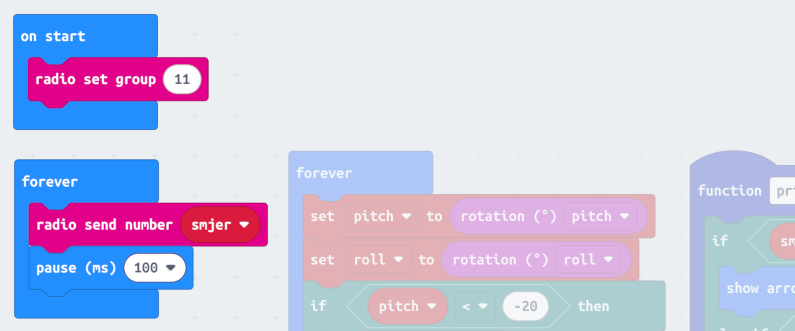
A program can have more than one forever block, and they all run at the same time. The first measures and shows the arrow, and the second sends. Why not do it all in one? The show arrow block shows the arrow for 0.6 seconds before it lets the program carry on. If sending were in the same block, the sender would send only once every 0.6 seconds. This way, the second block sends every tenth of a second, whatever the first one is doing.
Why do we send the direction all the time, and not only when it changes? If one message gets lost, the next one arrives just a tenth of a second later. And we don’t send faster than that, because the messages would pile up.
The sender is now finished.
The receiver: step 1
Connect the micro:bit with the receiver sticker to the computer. Start a new project and call it Prijemnik (Croatian for “receiver”). First we check just one thing: does anything arrive? So the receiver shows every number it receives.
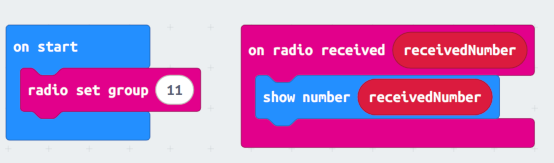
Predict
- You tilt the sender forward. Which number does the receiver show?
- The sender is lying flat on the table. Which number does the receiver show?
- What would the receiver show if it had a different radio group?
Try it
Tilt the sender into all five positions and compare the numbers with the table of agreed messages in exercise 2. If no number arrives, check the radio group in both programs and that the programs are on the right micro:bits.
Then change the tilt quickly: forward, back, then forward again. Does the receiver keep up with your hand, or does it fall behind?
Exercise 4: The number becomes an arrow
Program: the receiver, step 2 Technique: receive quickly, show slowly
We carry on in the Prijemnik project. In exercise 3 you saw that the receiver falls behind when you change the tilt quickly. Why? A message arrives every tenth of a second, but showing a number takes much longer. The messages wait in a queue, and the receiver falls further and further behind.
The answer: when a number arrives, the receiver only remembers it. It shows it in the forever block, always the newest number. The rule is: receive quickly, show slowly.
Change the on radio received block: instead of showing the number, make it remember the number in the variable smjer. Make the function prikaziSmjer, the same as in the sender, following the plan in exercise 2. Add a forever block that calls it.
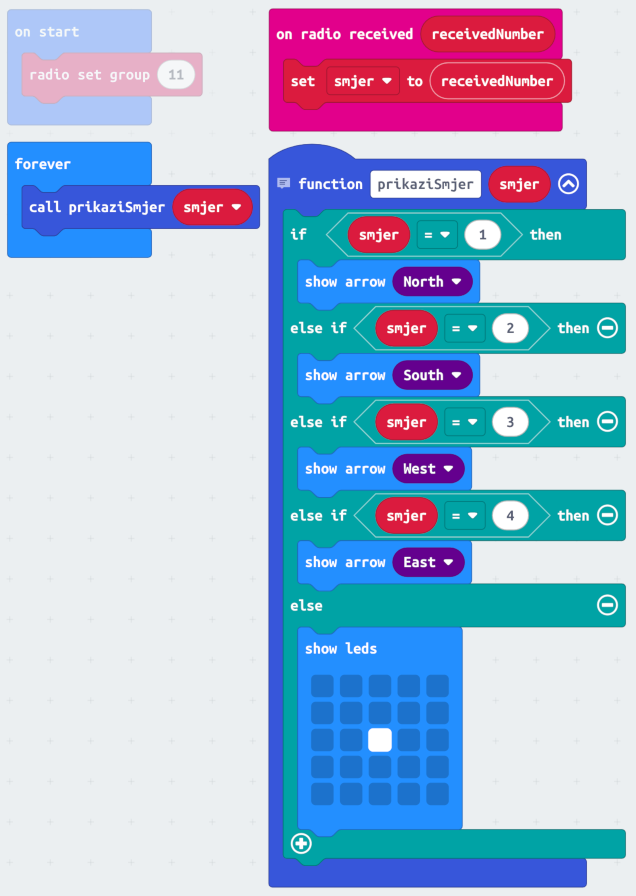
The function is the same in both programs. That’s why both micro:bits show the same number with the same arrow.
Predict
- You tilt the sender to the left. What does the receiver show?
- You change the tilt quickly. Does the receiver fall behind now?
- You tilt the sender forward and switch off the battery pack. What will the receiver show?
Try it
Download the program to the receiver and control it. Then try the last question: tilt the sender forward and switch off the battery pack.
Exercise 5: If I can’t hear you, I stop
Program: the receiver, step 3 Technique: the safety rule
When you switch off the sender, the receiver keeps showing the last arrow, for ever. It doesn’t know the sender is switched off; it thinks the last message is still true.
Imagine the receiver is a robot. The last message was forward, and then the sender’s battery ran out. The robot would keep driving forward, all the way into the wall!
In the radio games we learnt that nobody reports whether a message has arrived. So the receiver has to notice by itself when messages stop arriving. The sender sends every tenth of a second, so several messages should arrive in half a second. If none arrives, the link is broken.
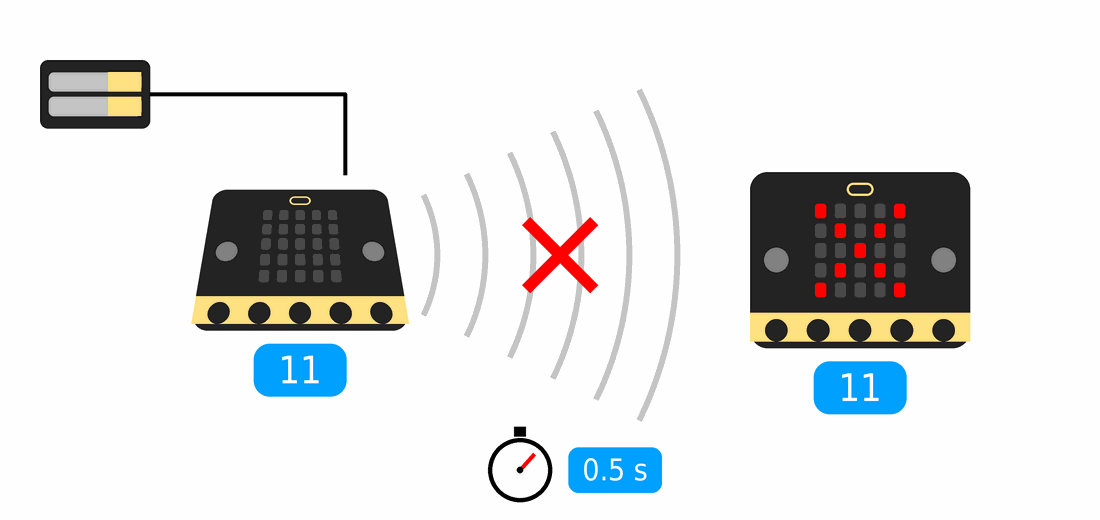
So the receiver remembers when the last message arrived. We use the stopwatch from the steady-hand game: the running time (ms) block.
We carry on in the Prijemnik project. Add to the on radio received block remembering the time in a new variable, zadnjaPoruka (Croatian for “last message”). Change the forever block: put the function call inside if / else.
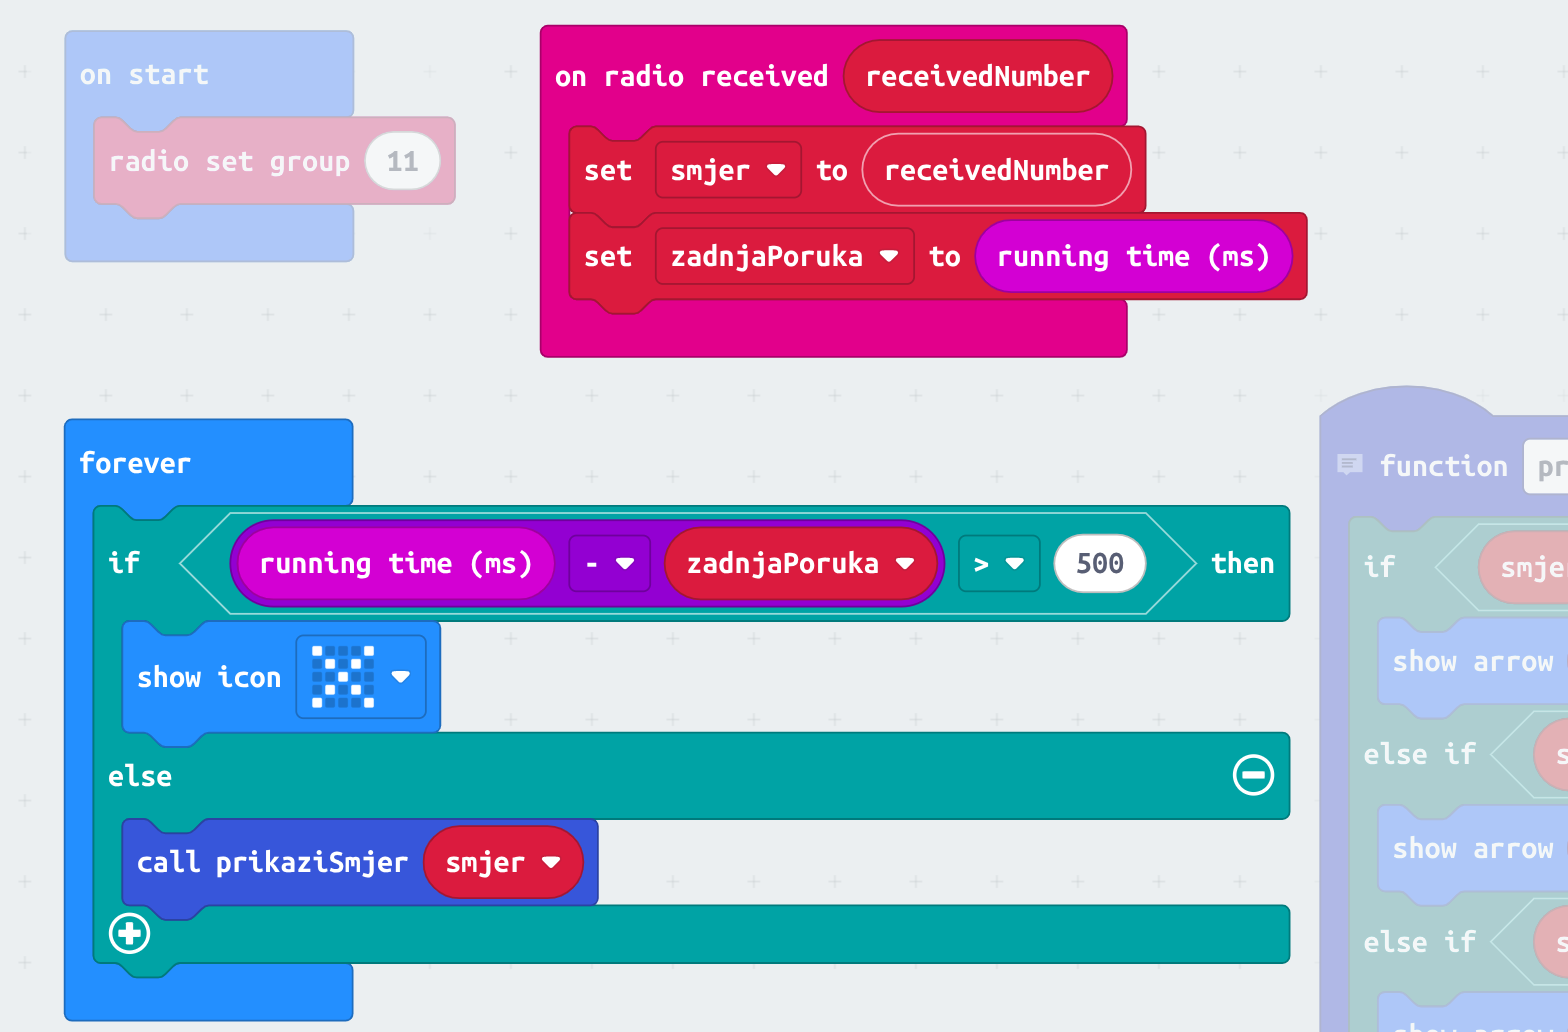
running time − zadnjaPoruka is the time that has passed since the last message. If it’s more than 500 ms, the receiver shows an X: stop. As soon as messages start arriving again, it shows the arrow again.
We call this the safety rule. Many drones and remote-control cars have a similar rule: when they lose the link with the controller, they stop or land.
The receiver is now finished.
Predict
- You switch on the receiver before the sender. What does the receiver show at the start? Why?
- You switch off the sender’s battery pack. How quickly does the receiver show the X?
- You walk further and further away from the receiver with the sender. What will happen in the end?
Try it
Switch the sender’s battery pack off and on, and watch the receiver. Then, with the leader’s permission, carry the sender as far away as you can and see when the X appears.
Extra tasks
- Explore the threshold. Change 20 to 10, then to 40 (in the sender, in all four places). With which number is it easiest to control? What happens when the threshold is too small, and what when it’s too big? Write down which number suits you best.
- Diagonals. When the sender is tilted both forward and to the left, make it show a slanting arrow (↖). Do the same for the other three diagonal directions. Hint: use the and block from the radio games and the new numbers 5 to 8. Check the diagonals before the straight directions, because the first true condition wins. Change the function prikaziSmjer on both micro:bits.
- Buttons as a backup. While you hold button A, make the sender send left, and while you hold B, right, whatever the tilt. Hint: the button A is pressed block works like pin P1 is pressed in the steady-hand game.
What’s next?
Soon the receiver will be a robot. Instead of showing an arrow it will drive its motors, and instead of the X it will stop them. The sender stays the same.
 What did we learn?
- The accelerometer feels which way gravity pulls, so the micro:bit knows whether it’s tilted and by how much.
- pitch is the tilt forward and back, and roll the tilt left and right. The rotation (°) block gives it in degrees.
- Forward gives a negative pitch, back a positive one. Left gives a negative roll, right a positive one.
- The dead zone between −20 and 20 degrees stops the arrow twitching at small movements of the hand.
- In a chain of conditions with else if, only the first true condition runs, so the order matters.
- A program can have more than one forever block, and they run at the same time.
- A program can grow step by step: each step adds something new, and we test it before the next one.
- The sender sends the direction all the time, every tenth of a second, and the receiver receives it quickly and shows it slowly.
- The safety rule: when the receiver can’t hear the sender for half a second, it stops.