Meet the Maqueen
The Maqueen robot with a micro:bit: the robot's parts, batteries, a safe start and the first drive forward, backward and turning in MakeCode.
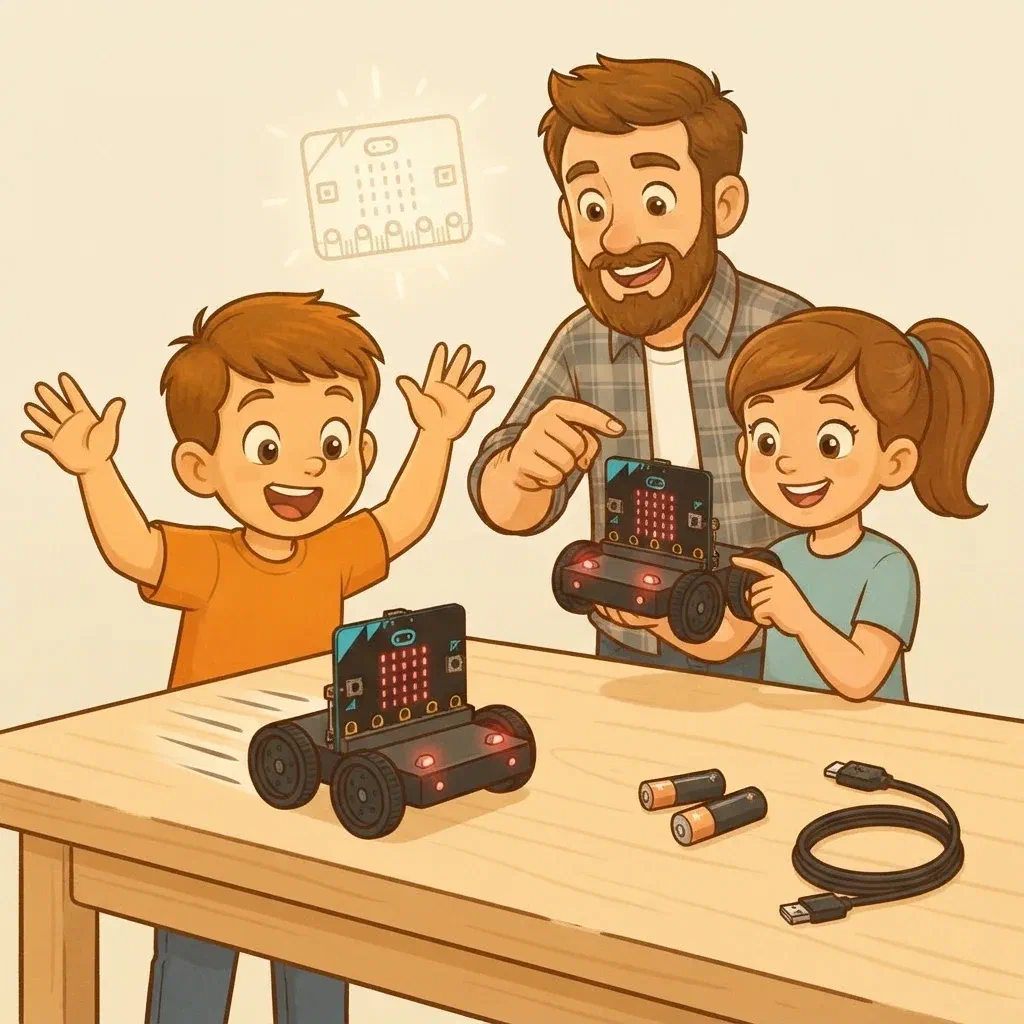
In this chapter the robot will learn to drive, to listen to the sender, and to feel a wall and a line on the floor. At the end of the chapter, after the winter break, the Robot Olympics are waiting for us.
Today we will:
- find out what a robot is;
- get to know the parts of the Maqueen;
- learn the rules for driving the robot;
- drive forward and backward, and turn.
Materials
The micro:bit in the robot has the receiver sticker with the number of your radio group, the same as in the lesson The micro:bit as a controller. That micro:bit now lives in the robot. We’ll need the sender again for remote control.
What is a robot?
A robot is a machine that does three things:
- it senses what is around it,
- it decides what to do,
- it acts: it drives, lights up, beeps.
You already know this from the smart crossroads: input → the program decides → output. In a robot, the micro:bit is the brain, the sensors are its senses, and the motors are its muscles.
A robot isn’t magic. It does exactly what the program tells it, no more and no less. If the robot behaves strangely, the reason is almost always in the program or in the batteries.
Meet the Maqueen
The Maqueen is a small robot with two wheels. In the picture, its parts are marked with numbers:
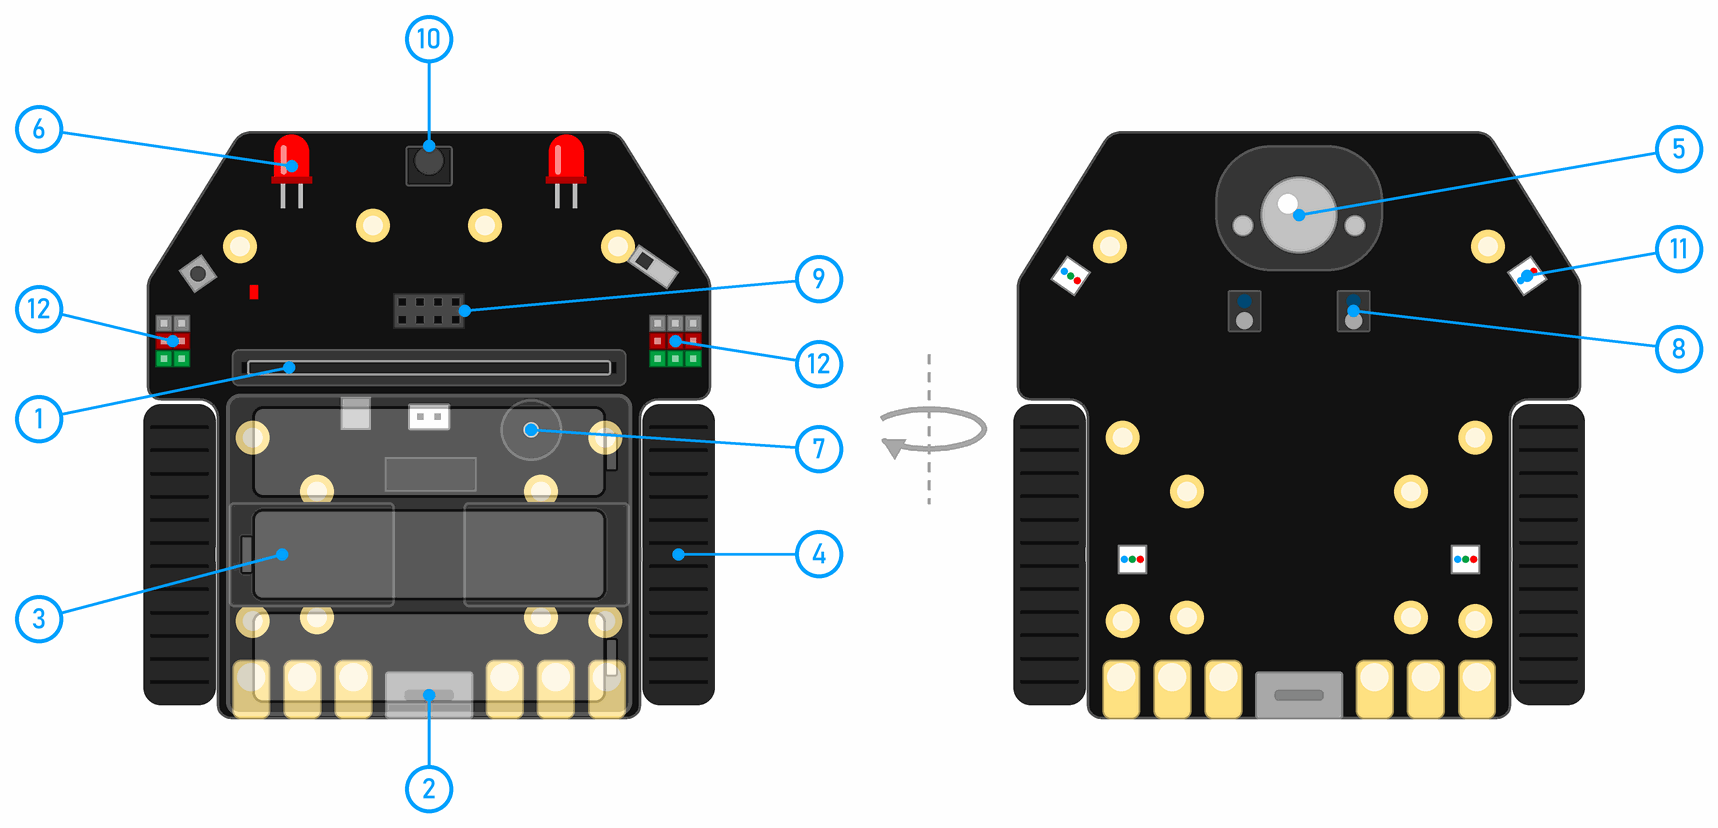
- The micro:bit in its slot: the robot’s brain.
- The power switch: switches the robot on and off.
- The battery holder: three AA batteries.
- Two motors with wheels, left and right.
- A ball that slides on the floor, so the robot doesn’t tip onto its nose.
- Two front LEDs, left and right, like headlights.
- A buzzer: the robot can beep and play tunes.
- Two line sensors underneath: they see a black line on the floor.
- The connector for the ultrasonic sensor: the sensor measures how far away a wall is.
- An IR receiver, for an infrared remote control (we don’t use it).
- RGB LEDs underneath, which can light up in any colour.
- Connectors for add-ons: later we’ll connect a bumper and other parts to them.
We’ll get to know each of these parts in its own lesson. Today we need the micro:bit, the switch, the batteries and the motors.
Batteries
The Maqueen runs on three AA batteries. Both the motors and the micro:bit get their energy from them.
Battery rules
- Mind plus (+) and minus (−): the holder shows which way each battery goes. Ask the leader to check before you switch the robot on.
- Don't mix old and new batteries.
- Only use the batteries you get at the workshop. Batteries are never charged, unless they say they are rechargeable.
- If a battery gets warm, switch the robot off at once and call the leader.
Rules for the robot
A robot isn’t a toy that stays on the table. It drives, and it drives fast. So these rules apply from the first day:
Rules for the robot
- We drive on the floor only. A robot that falls off a table breaks its micro:bit or a wheel.
- The robot moves only when you press button A. When the program starts, the motors are stopped.
- Switch the robot off before you pick it up or program it.
- Take out the USB cable before you switch the robot on. The robot mustn't pull the computer off the table.
- Hands on the robot only when it has stopped.
How we program the robot
In MakeCode, first add the extension for the Maqueen. An extension is a group of new blocks:
- Start a new project.
- Click Extensions (at the bottom of the list of categories).
- Type maqueen in the search box and choose the maqueen extension.
A new green category appears in the list, with blocks for the motors, LEDs and sensors. The extension has to be added to every new project.
The program goes onto the robot in this order:
- Switch the robot off.
- Connect the micro:bit to the computer with the USB cable. The micro:bit can stay in the robot.
- Download the program.
- Take out the USB cable.
- Put the robot on the floor, with space in front of it.
- Switch the robot on.
- Press button A.
Why do we switch the robot off before programming too? The Maqueen has its own small chip that drives the motors. The micro:bit tells it drive, and the chip drives until it gets a new command. Even while the micro:bit is being programmed or restarts, the motors may keep turning.
Exercise 1: Forward and stop
Program: Maqueen, step 1 Technique: a safe start
Start a new project, call it Maqueen and add the extension. You’ll work in this project in exercise 2 as well.
The robot drives with the block motor all move Forward at speed 100. In it you choose the motor (left, right or both, all), the direction (Forward or Backward) and the speed, from 0 to 255. The block motor all stop stops the motors.
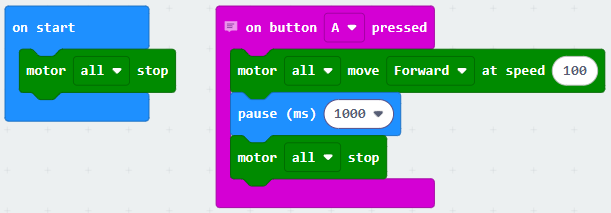
The motor all stop block in on start is a safe start. The robot may still be turning its motors from the last program, and this block stops them as soon as the program starts. Every robot program this year has it.
Predict
- How far will the robot go in one second? Point to the spot on the floor.
- What will happen if you write 2000 instead of 1000 ms?
Try it
Download the program to the robot, in the order above, and press A. Did the robot go as far as you predicted?
Exercise 2: Backward and turning
Program: Maqueen, step 2 Technique: each wheel on its own
We carry on in the Maqueen project. The robot can only go forward. We’ll teach it to go backward and to turn.
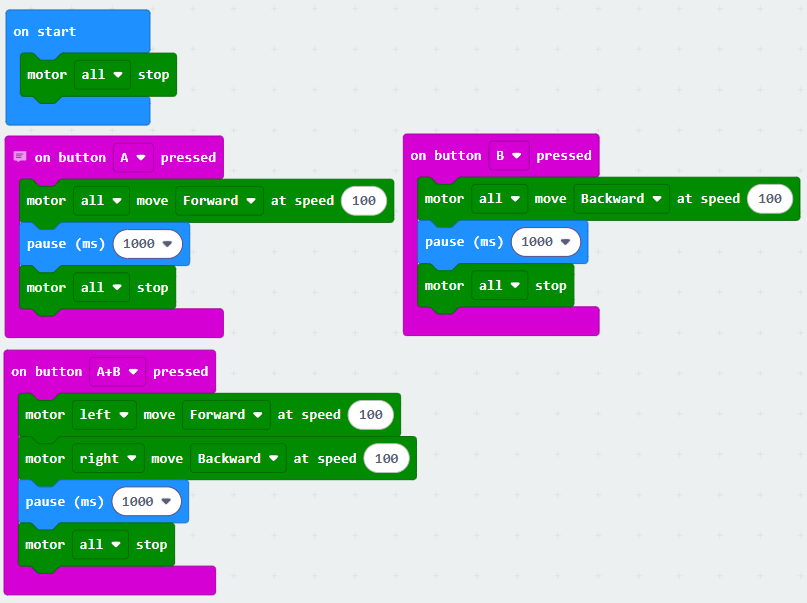
The robot has no steering wheel. It turns by making its wheels turn differently. So instead of all, the motor block lets us choose just the left motor (M1) or just the right one (M2).
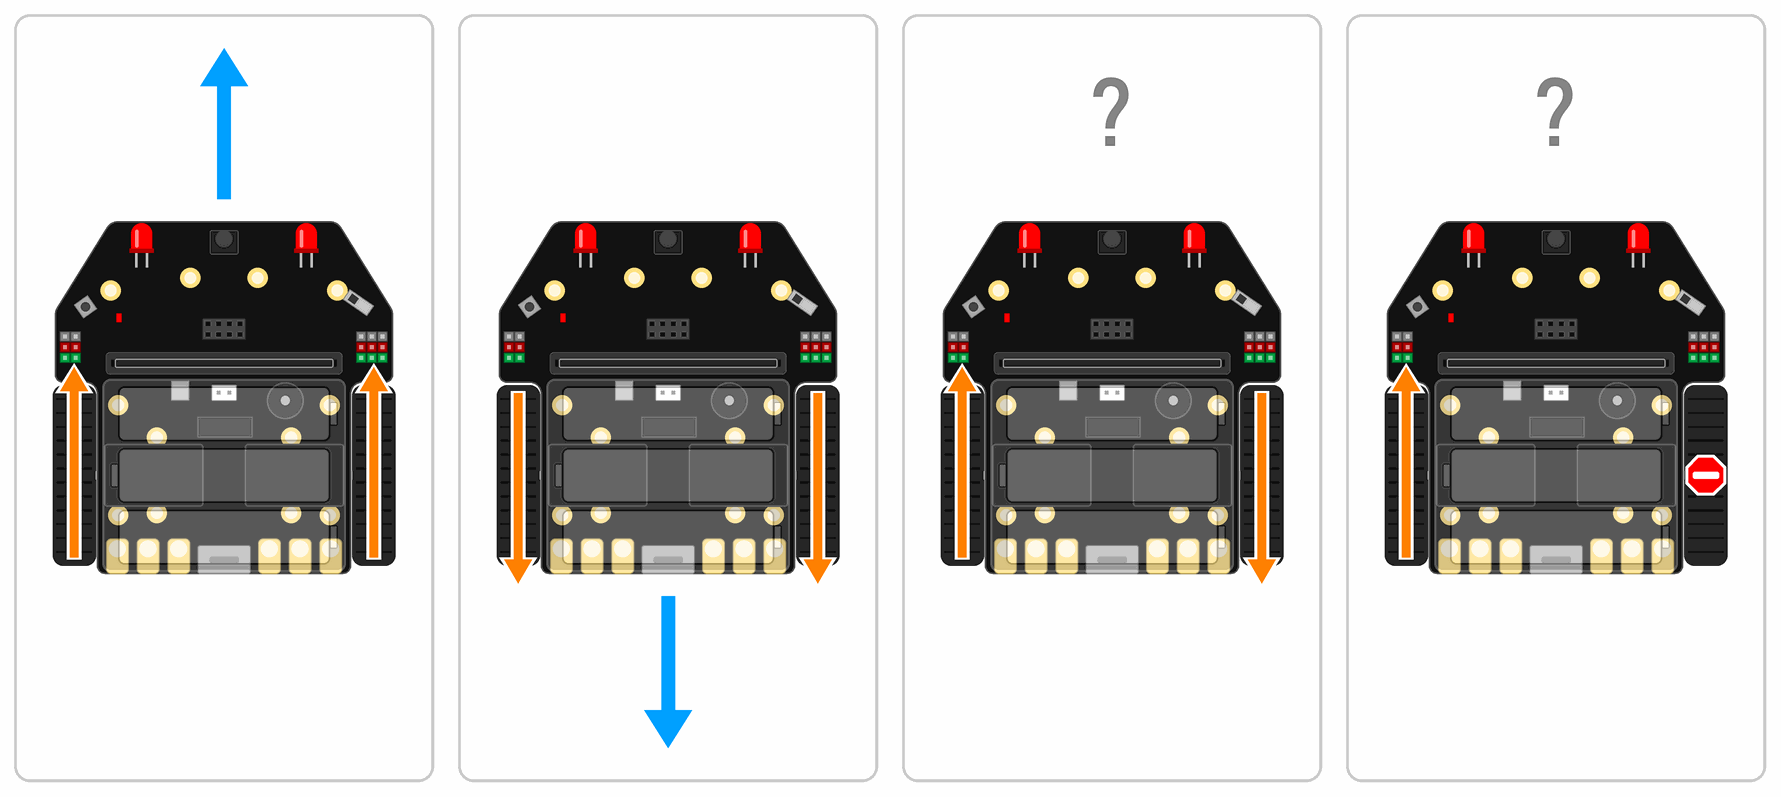
Add an on button B pressed block: both motors backward for one second. Add an on button A+B pressed block: the left motor forward and the right one backward, for one second.
Predict
- The left wheel turns forward and the right one backward. Which way does the robot turn, left or right?
- Does the robot move away from where it was?
- What would happen if the right motor stopped and only the left one turned?
Try it
Try button B, and A and B together. Then, in the on button A+B pressed block, replace the block for the right motor with motor M2 stop. How does the robot turn now?
Check your predictions
Extra tasks
- Robot dance. On button A, let the robot dance: a sequence of at least five moves (forward, turn, backward…). Show the dance to the others.
- Headlights. Let the front LEDs shine while the robot drives and go out when it stops. Hint: the block LEDlight left turn ON.
- Faster and slower. Change the speed from 100 to 50, then to 200. What changes?
What’s next?
Next time we measure how fast the robot drives and find out what’s inside a motor.
 What did we learn?
- A robot senses, decides and acts. The micro:bit is the brain, the sensors are the senses, and the motors are the muscles.
- The Maqueen has two motors, and it turns by making its wheels turn differently.
- We drive the robot on the floor only, it moves only on button A, and we switch it off before we pick it up or program it.
- An extension adds new blocks; for the Maqueen we add it to every project.
- Every robot program begins with a safe start: the motors are stopped.
- The Maqueen’s chip keeps the motors turning until it gets a new command.