
Driving to a plan
The Maqueen robot drives a square: our own functions for driving and turning, the speed measurements, and why a robot with two motors doesn't drive straight.
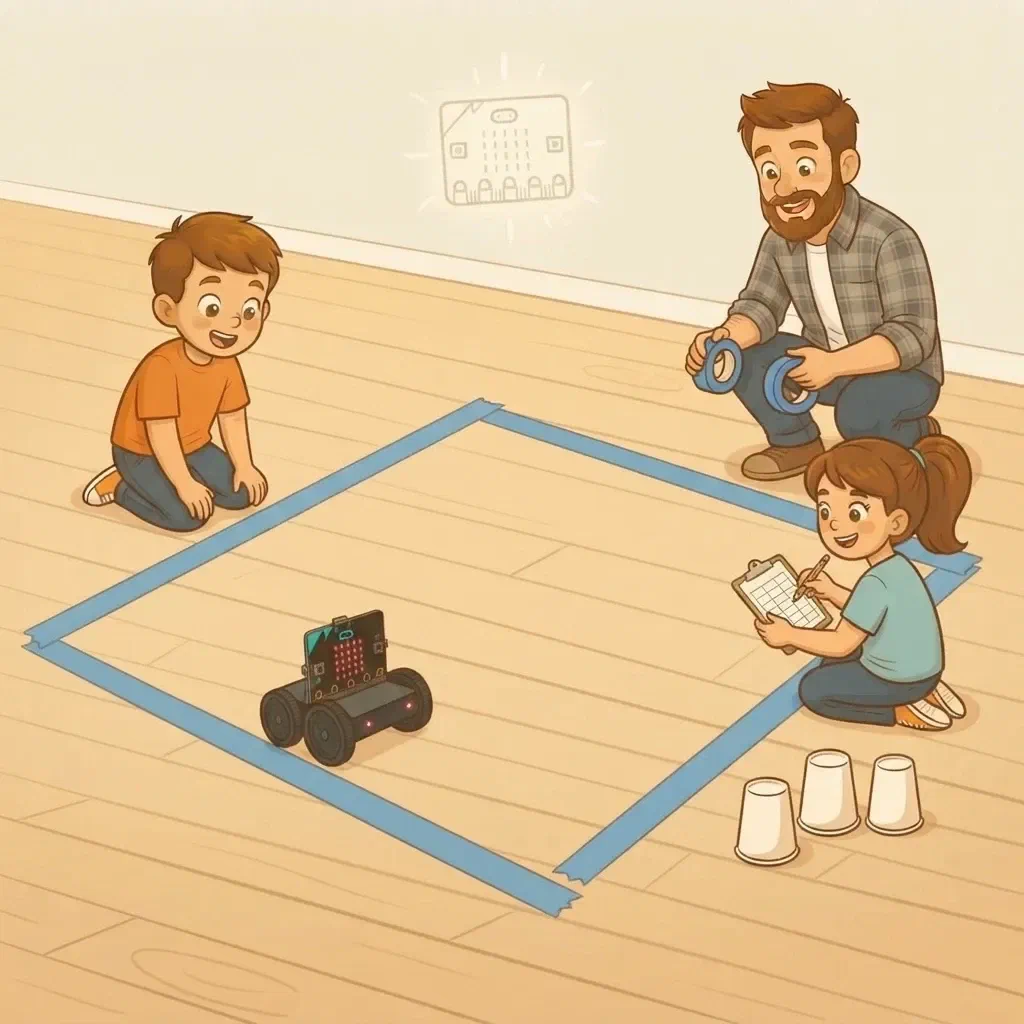
For that we’ll make our own blocks, functions, and use the measurements from the last lesson, How fast does the motor spin?.
Today we will:
- make the functions naprijed and okreni;
- give numbers names: meet constants;
- set up an exact quarter turn;
- drive a square with the repeat block;
- find out why the robot doesn’t drive perfectly straight, and how to fix it;
- if there’s time, drive a slalom between cups.
Materials
- a Maqueen robot with a micro:bit;
- the speed table from the last lesson;
- a tape measure and sticky tape;
- free space on the floor, at least 1 × 1 metre;
- for the slalom: three plastic cups and a space 2 metres long.
Exercise 1: The function naprijed
Program: Plan, step 1 Technique: a function with a parameter
In the smart crossroads we made the function Svjetlo: a group of blocks with a name, which we give numbers. Today we make a function for driving. It’s called naprijed (Croatian for “forward”), and the number we give it is how long it drives, in milliseconds.
Start a new project, call it Plan and add the maqueen extension. In the Functions category, make the function naprijed with one number, vrijeme (Croatian for “time”).
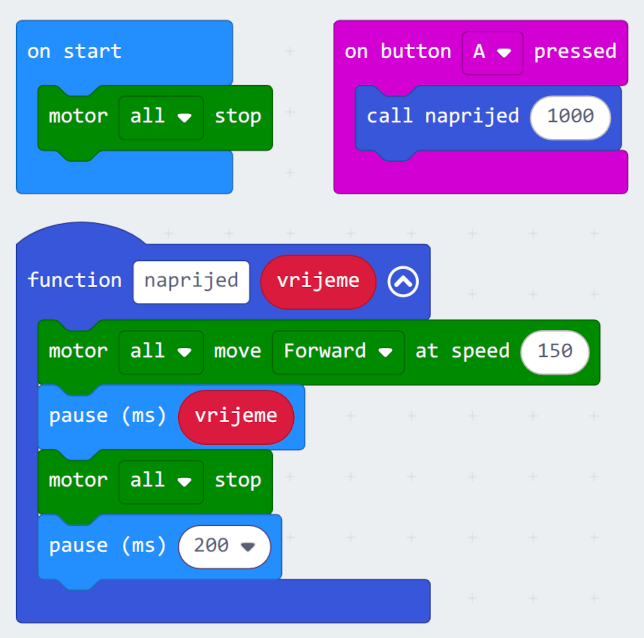
Why does the robot wait 0.2 seconds after stopping? After it stops, the robot still rolls a little. If the next move started straight away, the moves would get mixed up.
Predict
Look at your table from the last lesson. How far does the robot drive at speed 150 in 2 seconds? So how far will it drive in 1 second?
Try it
Press A and measure. Did the robot get close to what you predicted? Then work it out: how long does it have to drive to cover 50 cm? Put that number into the function call and check with the tape measure.
Exercise 2: The function okreni
Program: Plan, step 2 Technique: constants and setting up (calibration)
For a square, the robot has to turn by a quarter of a circle, like when you turn a corner.
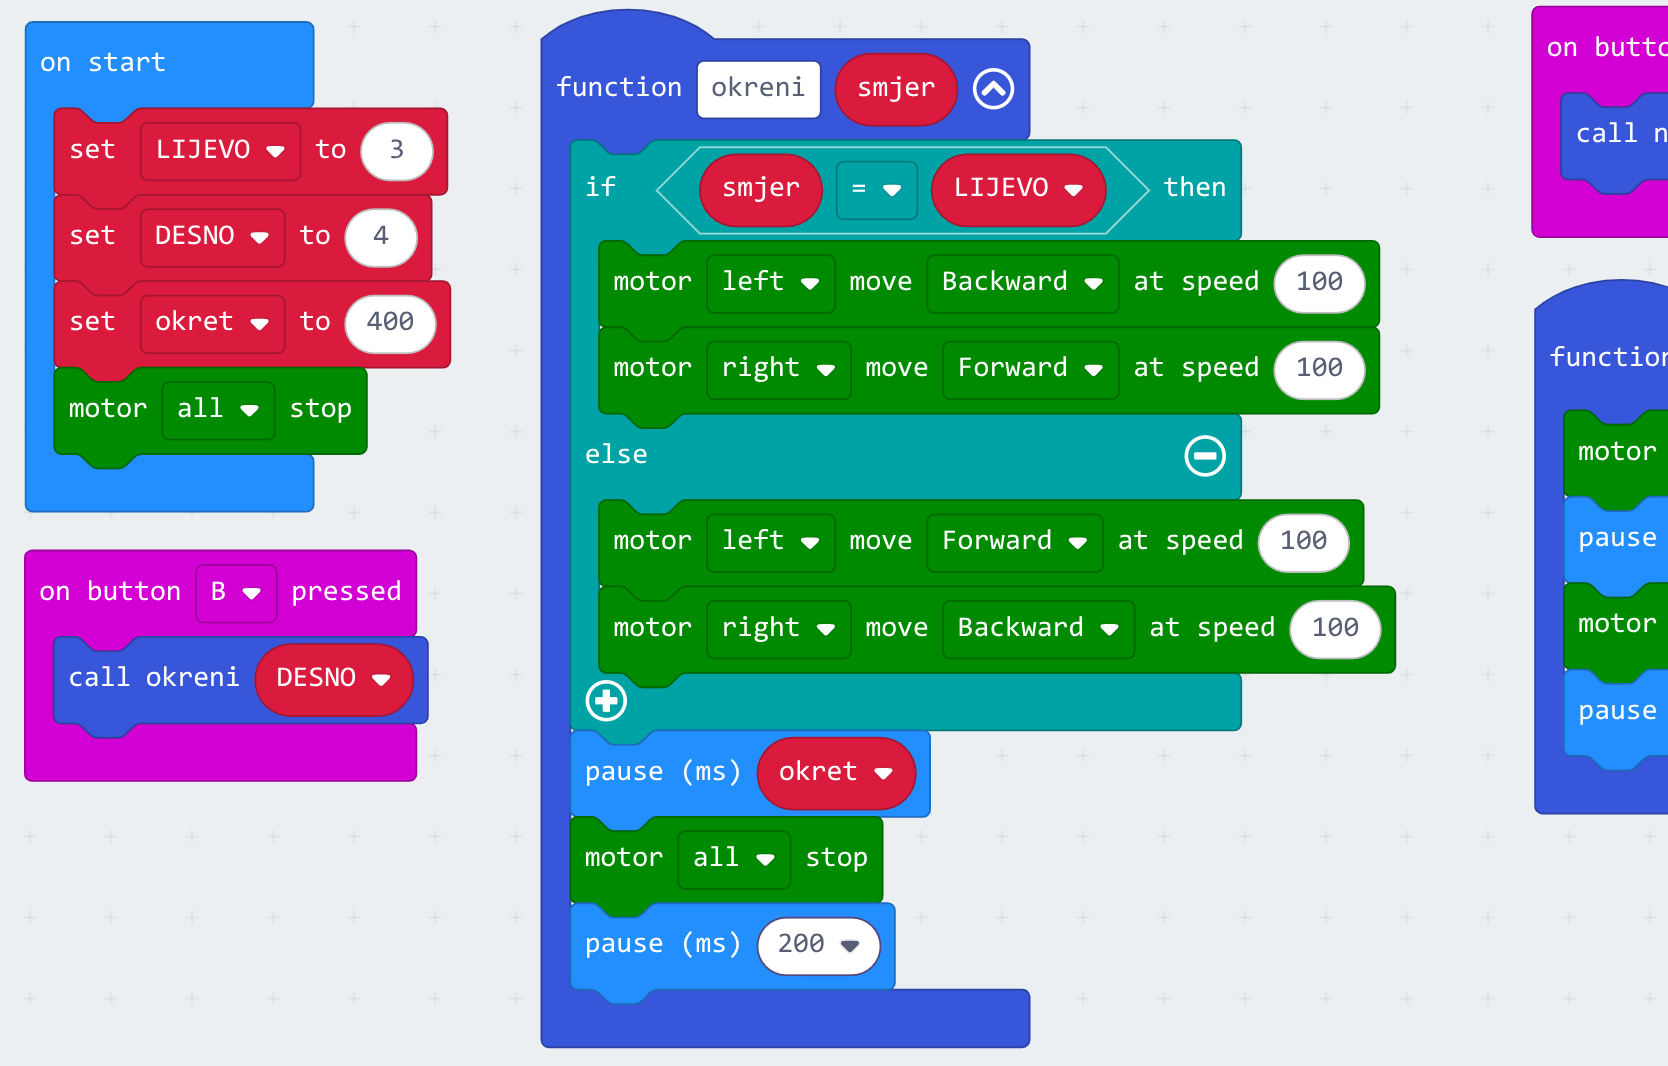
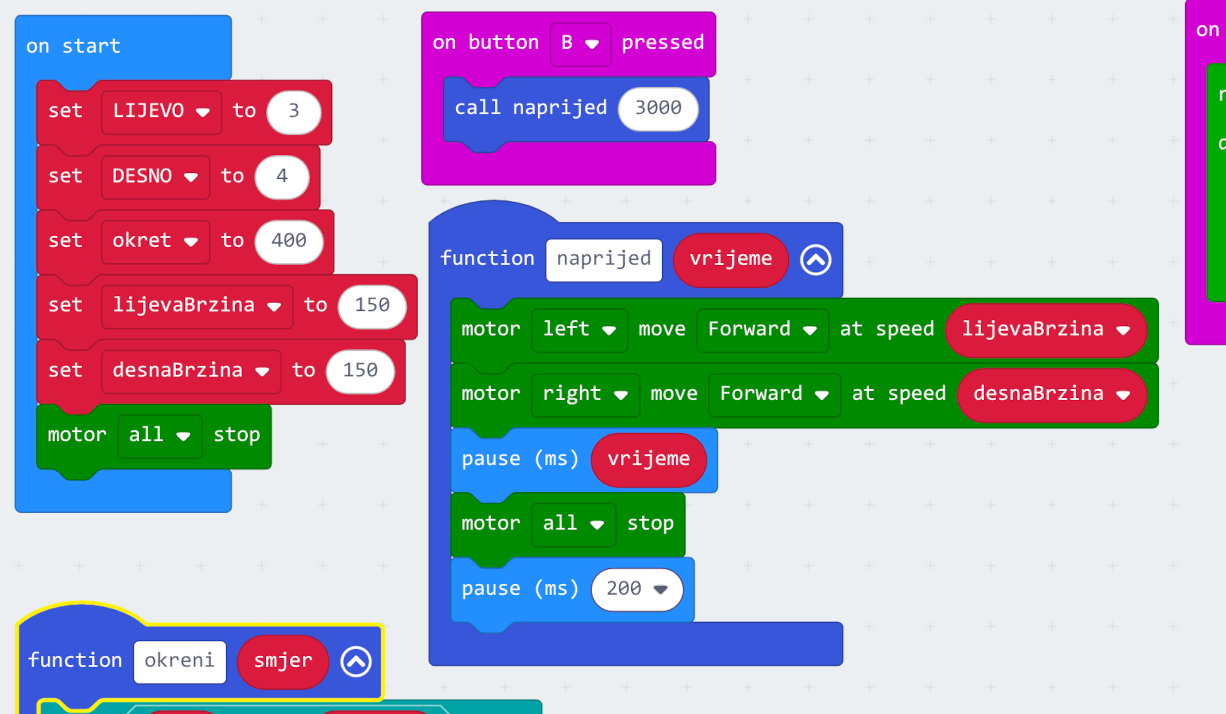
We carry on in the Plan project. Make the function okreni (Croatian for “turn”) with the number smjer (direction). For the direction we use the agreed numbers from the lesson The micro:bit as a controller: 3 is left, 4 is right.
But when the program says okreni (4), it’s hard to see straight away which way the robot turns. So we give the numbers names. Make the variables LIJEVO and DESNO (Croatian for “left” and “right”) and set them to 3 and 4 at the start of the program. Now the program says okreni (DESNO), and everyone understands it.
We set LIJEVO and DESNO only once, at the start, and never change them anywhere else, because left is always 3. A name for a number that never changes is called a constant. We write the names of constants in capital letters, so it’s clear at once that the program mustn’t change them. MakeCode has no special block for constants, so we use ordinary variables for them.
How long the turn lasts is kept in the variable okret (turn). Add an on button B pressed block that turns the robot right.
Set up the turn
400 milliseconds is only a first guess. Put the robot on a line of sticky tape and press B. Did it turn exactly a quarter of a circle, so that it now stands at a right angle to the line?
- If it turned too little, make okret bigger.
- If it turned too much, make okret smaller.
Repeat until the turn is right. Write down your number:
A quarter turn takes my robot ______ ms.
Real machines are set up the same way. We call it calibration: you measure, correct the number, then measure again.
Exercise 3: The square
Program: Plan, step 3 Technique: the repeat loop
A square is four equal sides and four equal turns. Instead of putting the same blocks together four times, we use the repeat block from the smart crossroads.
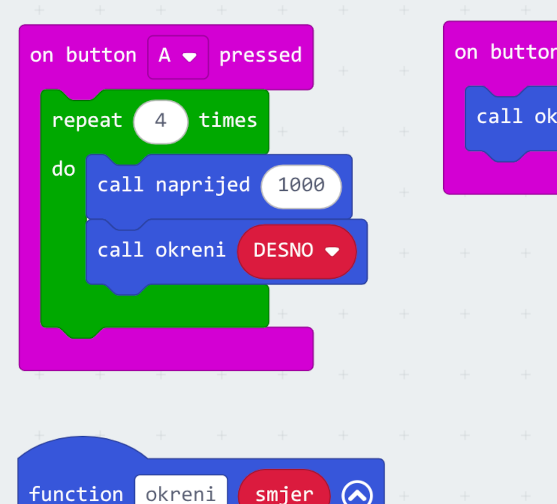
Change the on button A pressed block: put the naprijed call inside repeat 4 times, together with the call okreni (DESNO).
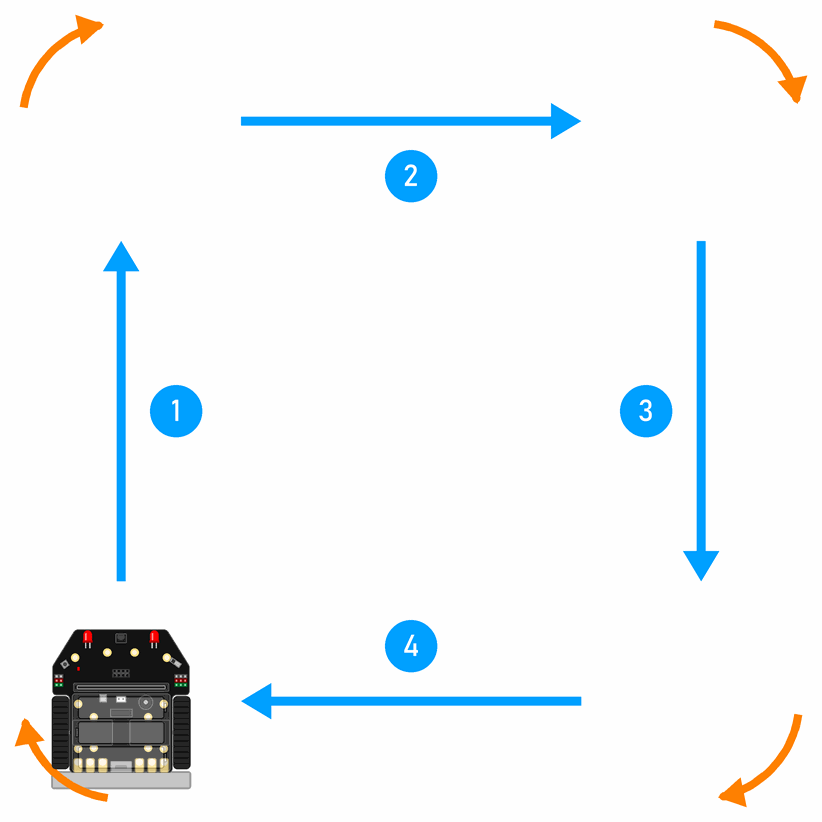
Predict
Mark the robot’s starting spot with tape. When the robot has driven the square, will it stop exactly at the start?
Try it
Run the square and mark where the robot stopped. How far is it from the start? Run it twice more. Does it always stop in the same place?
Why doesn't the robot stop exactly at the start?
Exercise 4: Drive straight
Program: Plan, step 4 Technique: each wheel its own speed
Stick a straight line of tape on the floor, 1 metre long. Put the robot at the start of the line and let it drive forward. Does it stay on the line?
Almost no robot drives perfectly straight. Two motors are never exactly the same: one turns a little faster than the other, so the robot drifts towards the side of the slower wheel. It’s not a fault. It’s like that with every robot that has two motors.
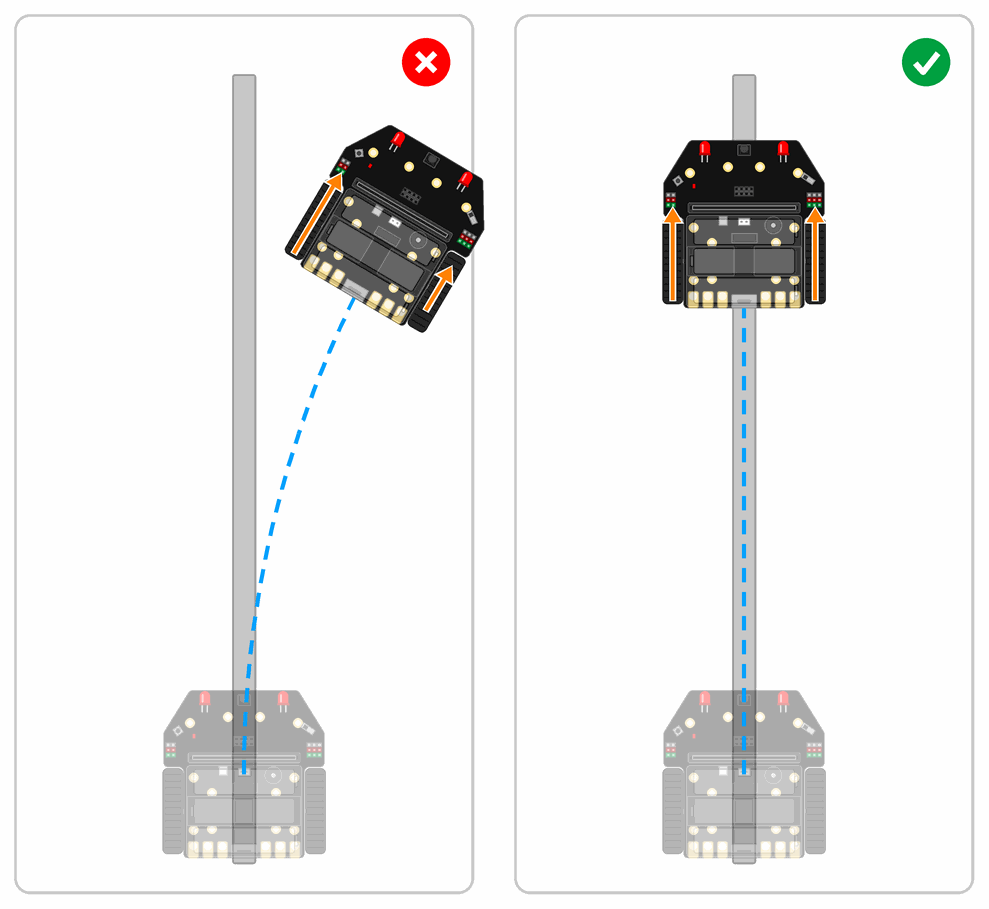
The fix: each wheel gets its own speed. We carry on in the Plan project. Make the variables lijevaBrzina and desnaBrzina (left speed and right speed) and set them to 150. Change the function naprijed: instead of one block for both motors, use two blocks, one for each motor. Add a long straight drive on button B, so it’s easier to try out. You don’t need the turn on a button any more.
Try it
Press B and watch which way the robot drifts.
- Does it drift left? The left wheel is slower, so lower desnaBrzina, for example to 140.
- Does it drift right? Lower lijevaBrzina.
Change the number a little at a time, until the robot stays on the line for the whole metre. Write down your robot’s speeds:
lijevaBrzina = ______, desnaBrzina = ______
Then run the square again with button A. Does it stop closer to the start now?
Exercise 5: Slalom (optional)
Program: Plan, step 5 Technique: a driving plan
If you have time left, the robot can drive a slalom, like a skier between the poles. Put three cups in a row, half a metre apart. Put the robot 25 cm to the left of the row of cups and 25 cm before the first cup, so that it faces along the row.
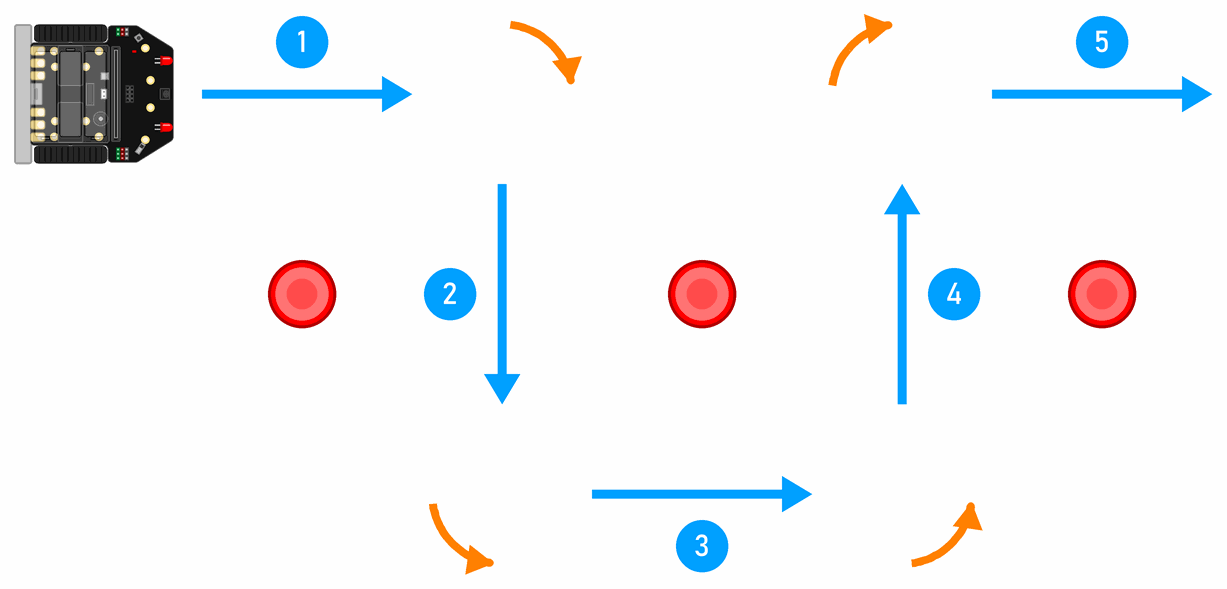
Each drive in the plan is 50 cm long. You worked out in exercise 1 how many milliseconds the robot needs for 50 cm. We carry on in the Plan project. Make the variable korak (Croatian for “step”) and set it to that number, so you don’t have to type it five times. Add an on button A+B pressed block with the slalom plan.
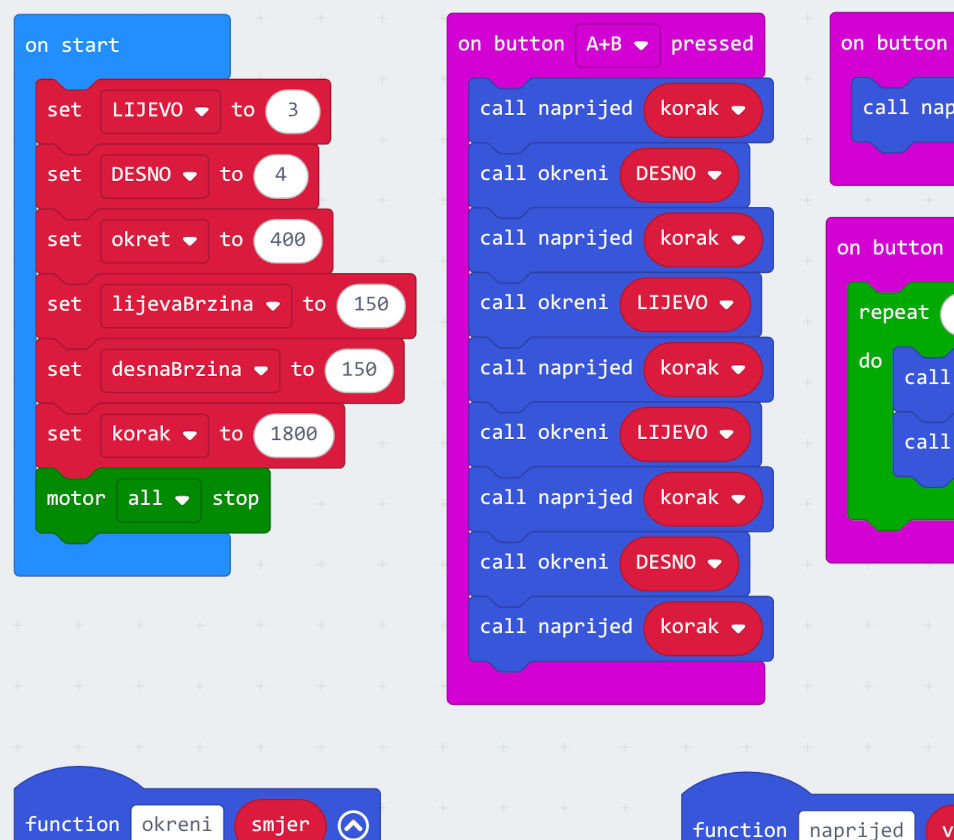
Try it
Press A and B together. Does the robot get past the cups without knocking any over? If it bumps into a cup, first check that the turn is exactly a quarter of a circle, then check korak.
Predict: what would the plan look like if the robot started to the right of the row of cups?
Extra tasks
- Triangle. Let the robot drive an equilateral triangle. Hint: at each corner of the triangle the robot turns by a third of a circle. How many times do you need to repeat, and how much longer does a third of a circle take than a quarter?
- Forward in centimetres. For the older ones: make a function naprijedCm, which you give a number of centimetres and which works out by itself how long to drive. Hint: from the table, work out how many centimetres the robot covers in a second.
What’s next?
Next time the robot no longer drives to a plan: you drive it, with the sender from the lesson The micro:bit as a controller.
 What did we learn?
- A function is a group of blocks with a name. A parameter is a number we give it when we call it.
- The functions naprijed and okreni make the program shorter and easier to read.
- A constant is a name for a number that never changes, for example LIJEVO and DESNO. We write the names of constants in capital letters.
- Calibration: you measure, correct the number, then measure again.
- The repeat block repeats the same blocks a given number of times.
- A robot that only drives to a plan doesn’t know where it is, so small errors add up.
- Two motors aren’t the same, so the robot only drives straight when each wheel gets its own speed.